
Dragon Quest VIII: Journey of the Cursed King Walkthrough Chapter 8
This guide is designed to point you in the right direction but not hold your hand throughout the entire game. Dungeons and Towns you'll be exploring mostly on your own, with my maps pointing out any treasures that are hidden in a dungeon as well as how to solve any puzzles you'll encounter that could possibly get you stuck.
Additionally, depending on your own personal preference, my maps/pictures are designed to work as a guide of their own. If you'd like to skip reading text entirely while you play, you can just look at the maps for the treasure chest locations and where you need to go to advance the story forward.
Skill Point Tips: Jessica Staff (Kazing 100 Points); Whip (Attack Power Bonuses); Yangus Humanity (Golden Oldies 100 Points); Scythe (Attack Power Bonuses); Hero Courage (Omniheal 82 Points); Sword (Falcon Slash 52 Points) and Angelo Bow (Shining Shot 88 Points); Charisma (Divine Intervention 27 Points) and Staff (Oomph 65 Points)
Alchemy Tips: Crimson Robe, Thinking Cap, Golden Tiara, Phantom Mask, Shamshir of Light, Shimmering Dress, Sorcerer's Ring, Uber Double-edge, Uber Falcon Blade, Uber Miracle Sword; Cheeses & Other Consumables
With the Kran Spinels in hand return to Arcadia and speak with Master Dominico standing in his front yard. You'll have to endure another scene with him berating David; after it's over head inside and speak with Master Dominico again. Travel down into the secret room of his basement and steal his stuff while finding the book he asks you for.
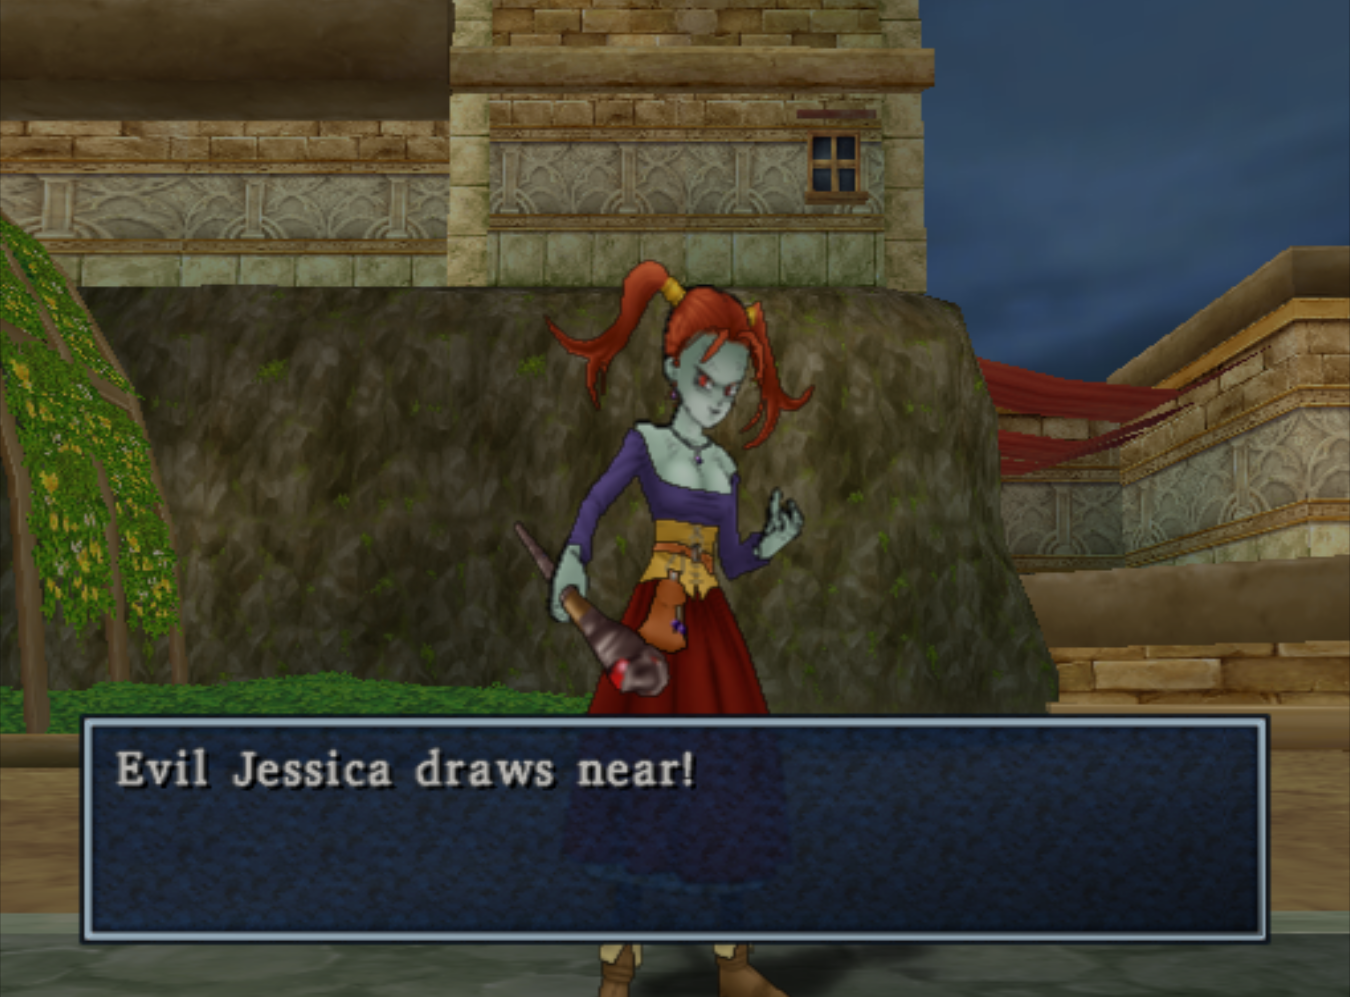
When you come back upstairs you'll find that Jessica is here and her new target is David! This battle is a real pain in the butt since Jessica attacks twice per round and she hits like a truck. She can also put your entire party to sleep with a single cast which is another nuisance.
After you beat Jessica and before you leave town, head inside of Master Dominico's house and speak to him. When you leave the room that he is in there'll be a cutscene with a nun bursting through the doors asking someone to come help David. Go outside and watch the cutscene. After the cutscene Dominico will unlock Jessica's latent abilities and she'll learn Kacrackle and Kasizzle as well as rejoin your party.
With that out of the way, head north out of Arcadia and to Blizzard Peaks; it's the opposite direction of Rydon's Tower. Before leaving town equip Jessica with a weapon and armor again - you get her back naked... and not naked in the good way.
After you pass through the Blizzard Peaks cave you'll trigger a cutscene - when the cutscene is over you'll wake up in a building which you should search thoroughly for all of the goodies here. Talk to your party and Marta when you're done to advance the story forward. The next morning when you depart she hands you a bag to bring to someone in the town to the north.
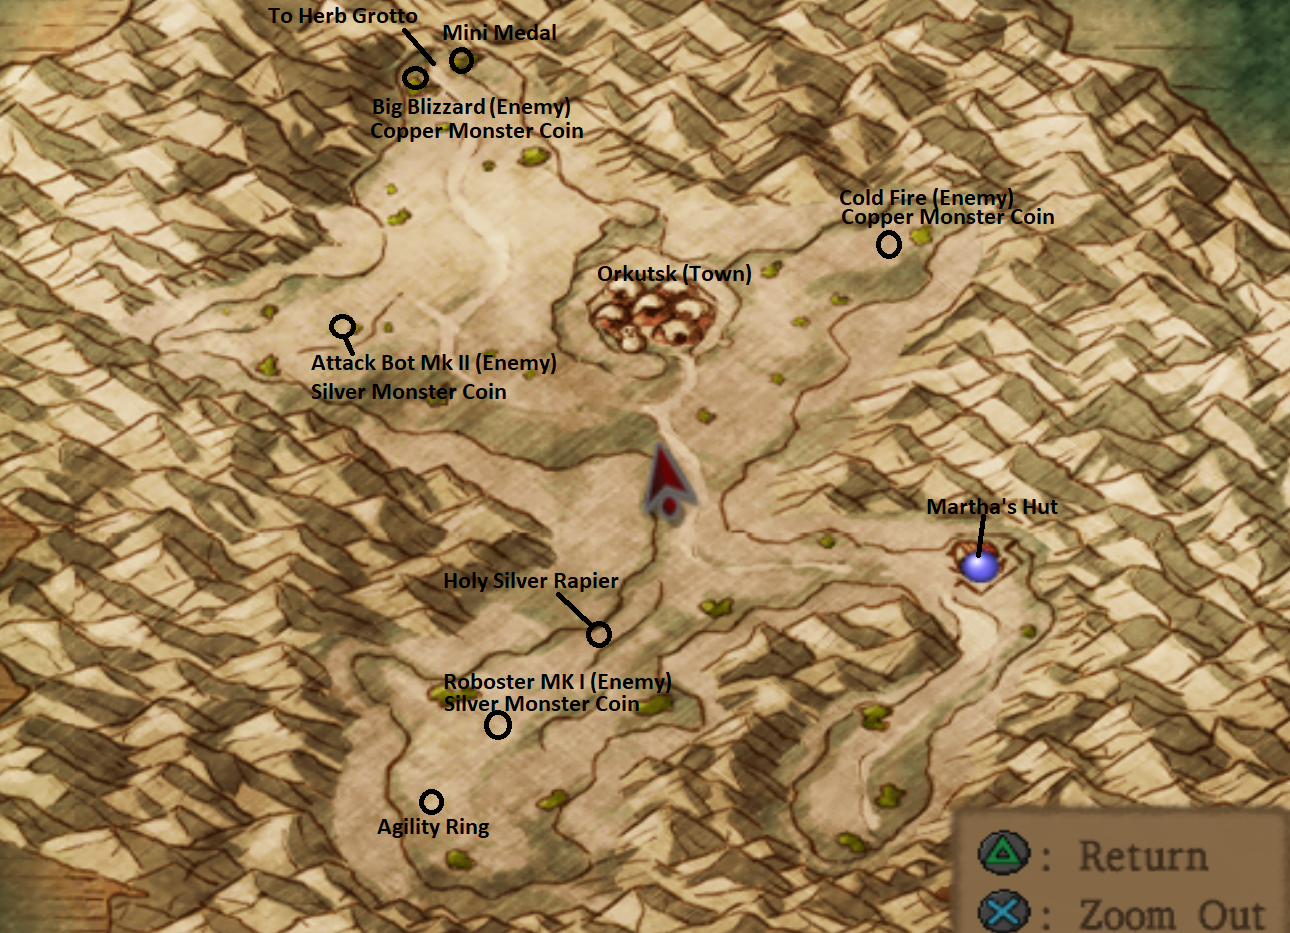
Run around the area and collect all the treasure chests you come across before venturing into the town of Orkutsk. At least that's what I recommend you do. Either way, our next stop is really easy to find.
Town of Orkutsk
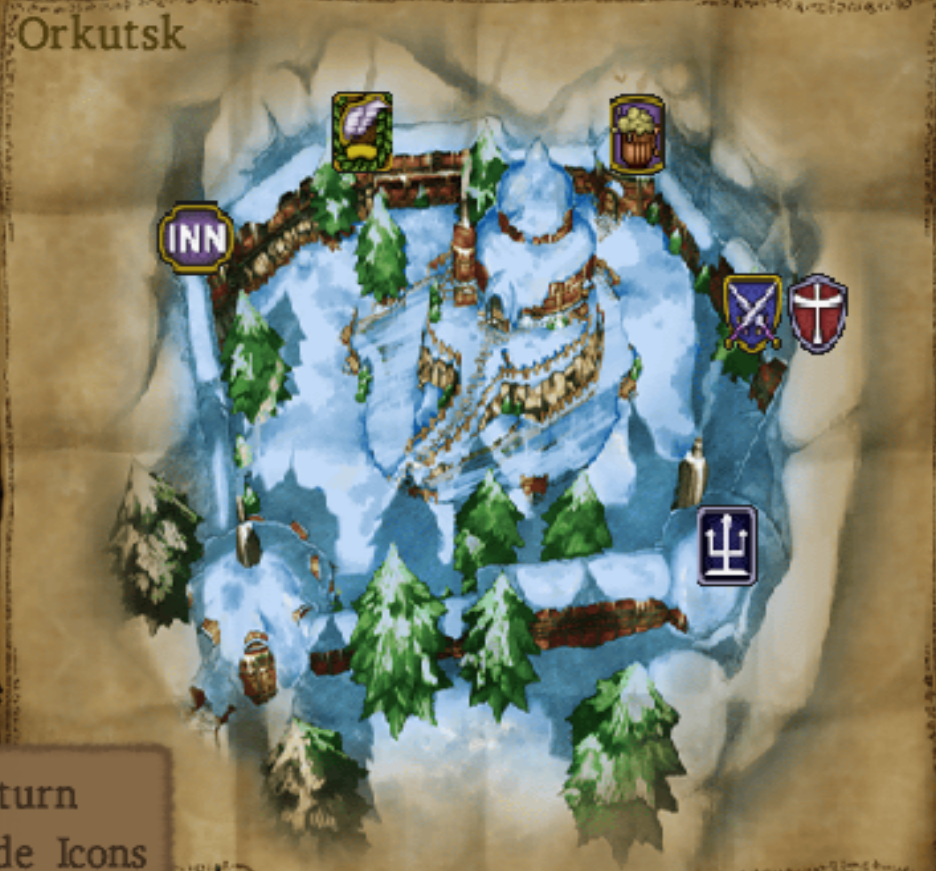
Thankfully the town of Orkutsk is rather straight forward - the entire town is a ring with multiple levels. When you first enter you'll be at the inside portion of the ring. Most of the shops and useful areas are in this part; if you venture in the center of town you'll find the mayor's house and in the mayor's house you'll find stairs that lead into the basement.
Down in the basement is where you'll find Marek's house but he isn't home at the moment it seems. The man standing outside of Marek's house tells you to speak with the Item Shop owner and the Item Shop owner tells you that if Marek isn't home he is likely at the Herb Grotto. I don't think you need to speak to these people in order to advance the story forward though. I think you can just go to the Herb Grotto and find Marek.
Herb Grotto Dungeon
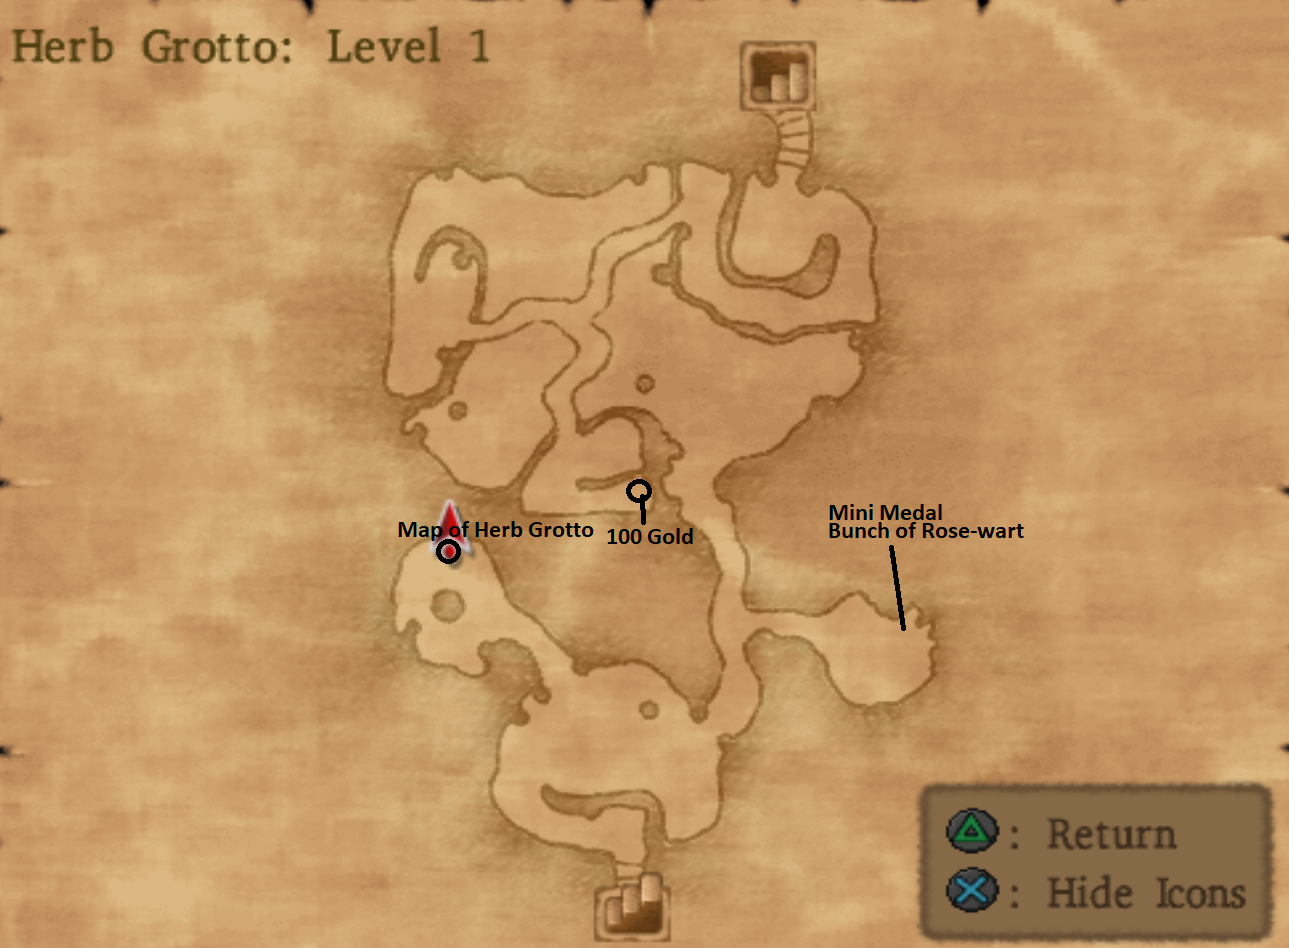
Immediately to your left in the small room with the fountain when you enter is where you will find the Map of Herb Grotto. The whole first floor of this dungeon is rather straight forward, when you reach the icy walkway in the northern portion of the area use the D-pad to walk across it. Running will cause you to slip and slide so much you'll easily fall off.
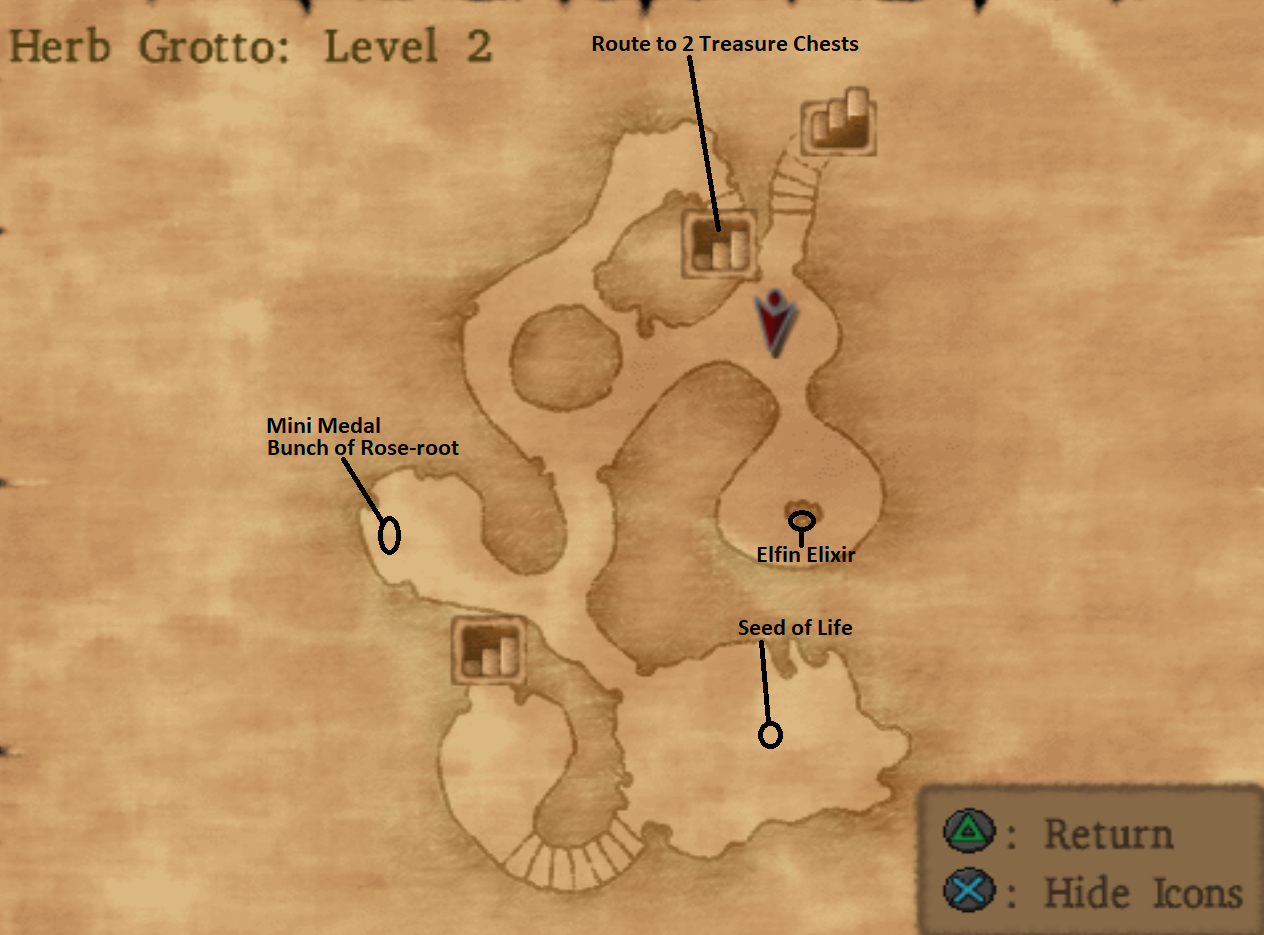
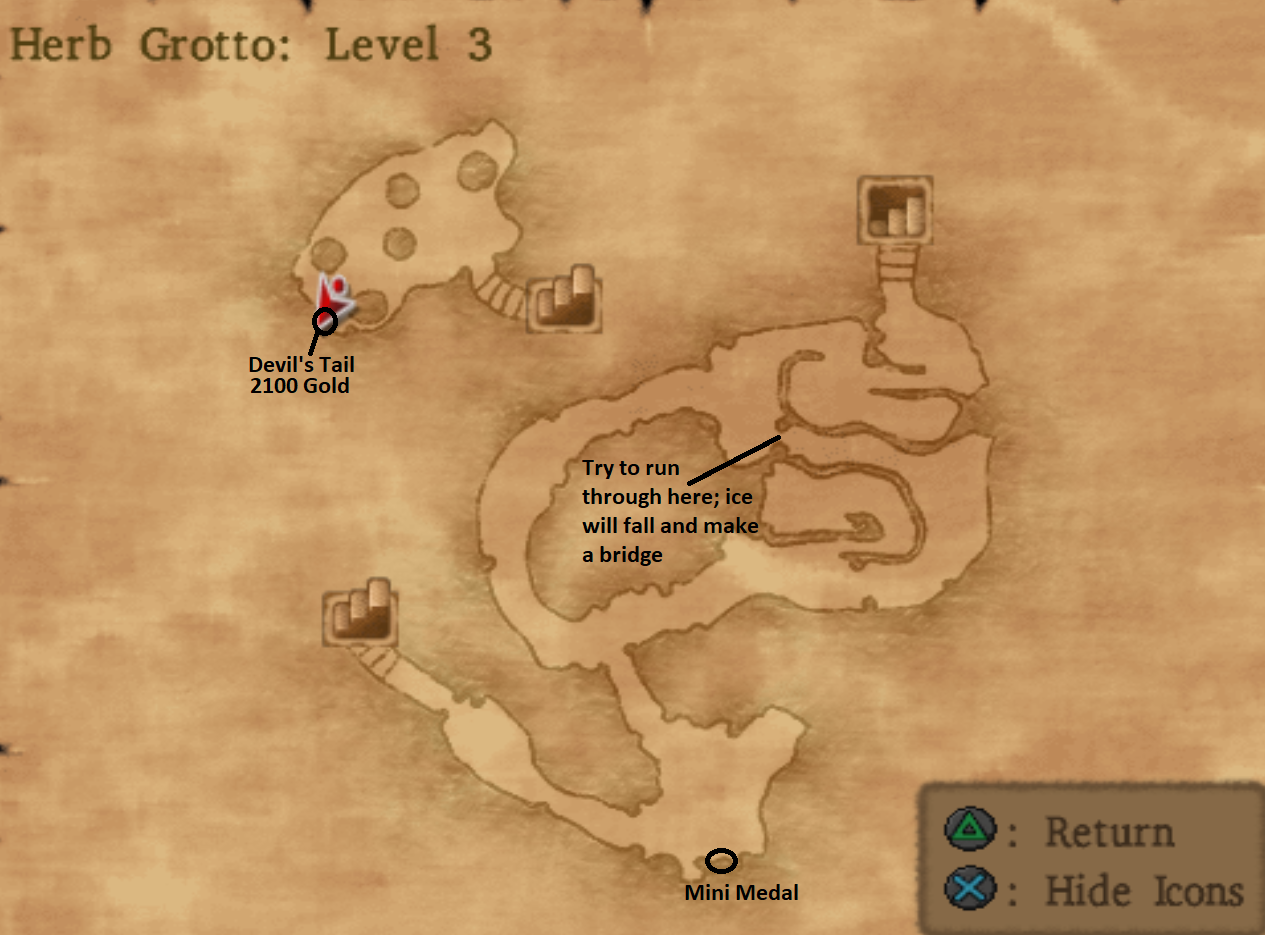
Level 2 is rather straight forward too. Take the northern most staircase so you can grab the two treasure chests, then come back to level 2 and take the southern staircase for the path forward to level 3. Things start to get a bit more complicated when you make it to this floor. In the northern most portion of the area you will find a bunch of twists and turns, when you try to run through the middle road you'll cause large icicles to fall which will make a bridge across.
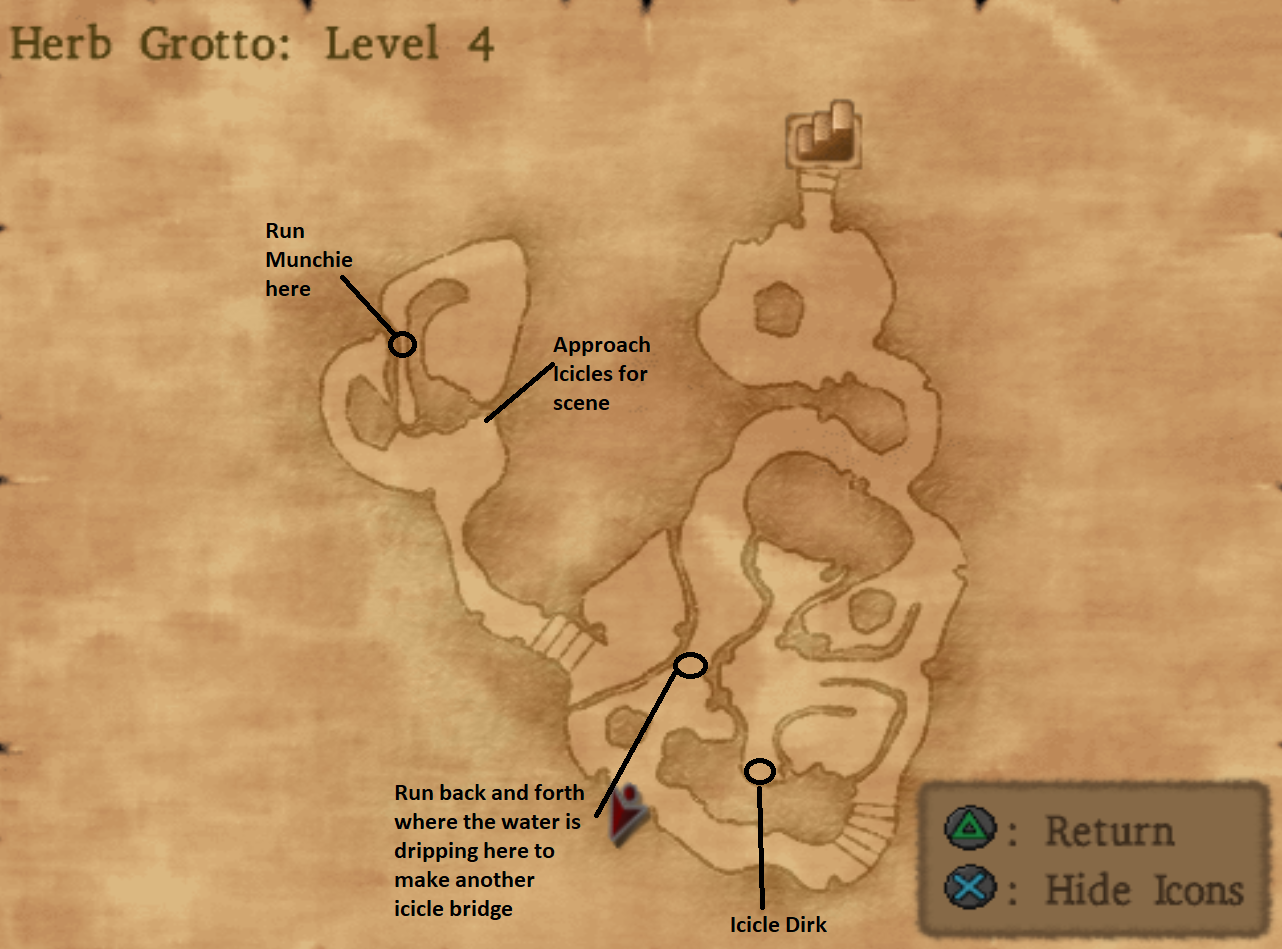
This is the final floor of the dungeon and on this level we'll need to make another icicle bridge just like on Level 3. Unlike on Level 3 these icicles don't all fall at the same time though, so you have to run back and forth where the water is dripping to have all three of them fall. With that out of the way it's time to run across the newly formed bridge and into the final room of the dungeon.
In this room you will want to approach the icicle wall which will trigger a scene with Marek on the other side. After the scene send Munchie through the icicles and run around Marek to the narrow gully with dripping water. With Munchie run across where the water is dripping to make an icicle fall - just like we've done numerous times before.
Return to the Hero with Munchie and then talk to Marek. Heal up either before or after the scene; definitely before using Evac. After the scene you'll be tasked with getting Marek out of the cave, just use your Evac spell to be taken back to the entrance and you'll immediately be engaged in a battle with 8 Hellhounds.
Despite the hounds outnumbering you,0 this battle is rather easy - they count as one giant group and don't have much health so just use all your strongest AoE attacks to dispatch them quickly. When the battle is finished travel back to town and down to Mareks room for another scene.
He asks you to go to the south and check up on his mother, Marta. Throughout her cottage you'll find hellhounds all over the place, approaching them will trigger a battle. Marta actually isn't in her house though, she's around back in the ruins which have recently opened.
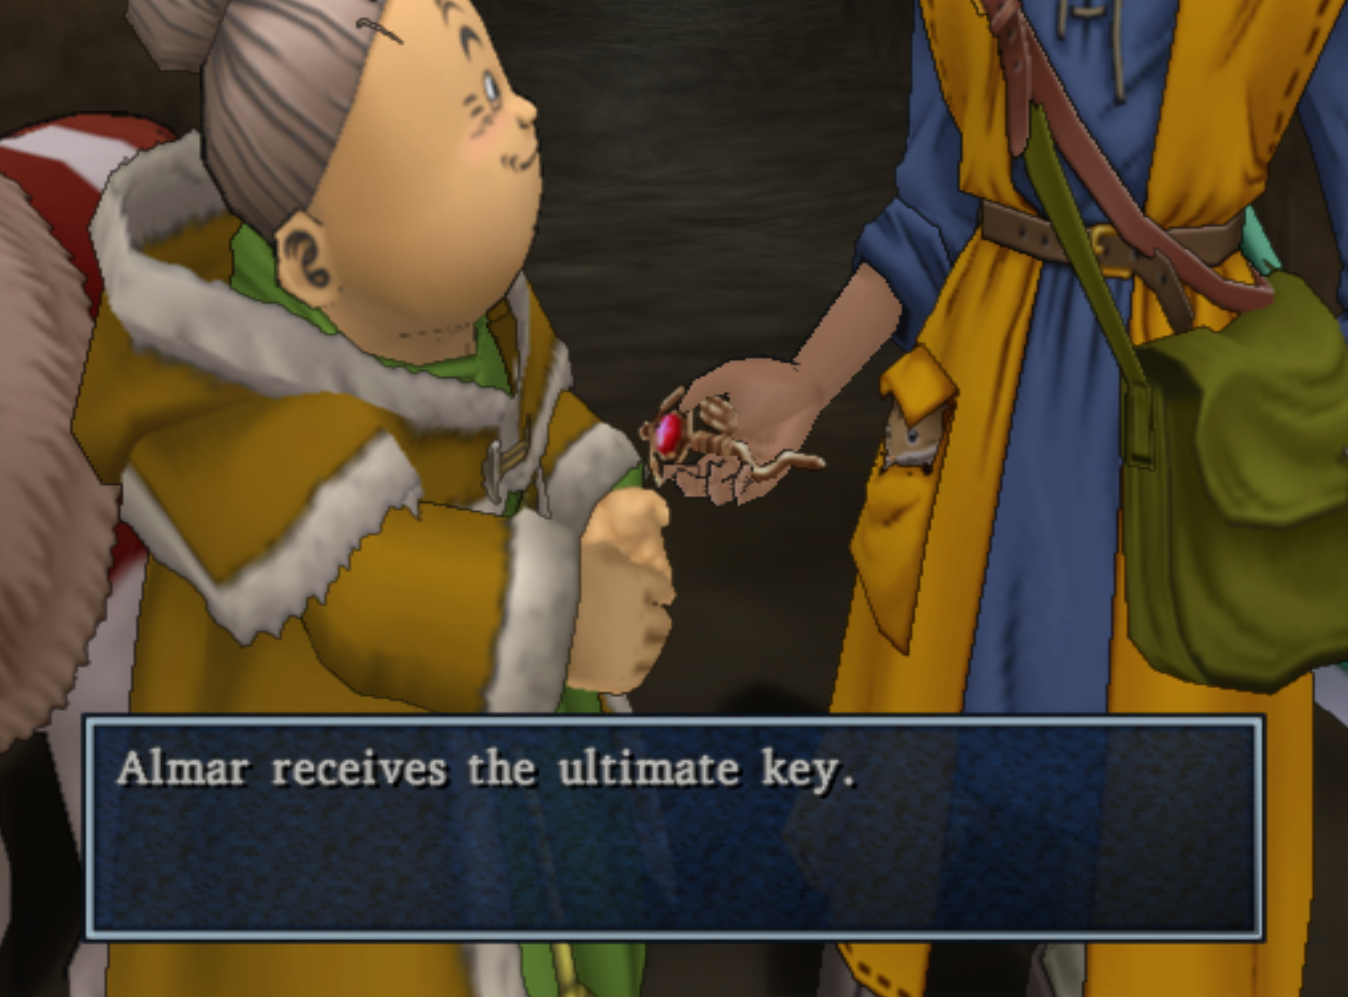
Travel around the back of the house and into the ruins to talk to Marta. After the scenes travel back outside to find Marta's house on fire and staff wielding canine there to greet you. During the cutscene Marta hands you the Ultimate Key, which is a key that opens almost every locked door/chest we've come across that the Thief's Key and Magic Key don't work on. Get ready for lots of back tracking!
During the cutscene Marta bites the dust and the dog-creature announces it only has one sage left to kill - poor chap whoever it is because they're obviously going to die. We haven't been able to save a single person's life yet due to our Hero's incompetence. So far he's just stood around looking clueless as everyone died right in front of us.
After the staff wielding bird-canine flies away you'll have to fight another large pack of hellhounds. Unleash on them your strongest AoE attacks to quickly end the battle. Once that's done Marek will tell you to enlist the help of empyrea; you can get more information about her from the large stones inside the ruins with writing on them.
Ultimate Key Treasure Hunt!
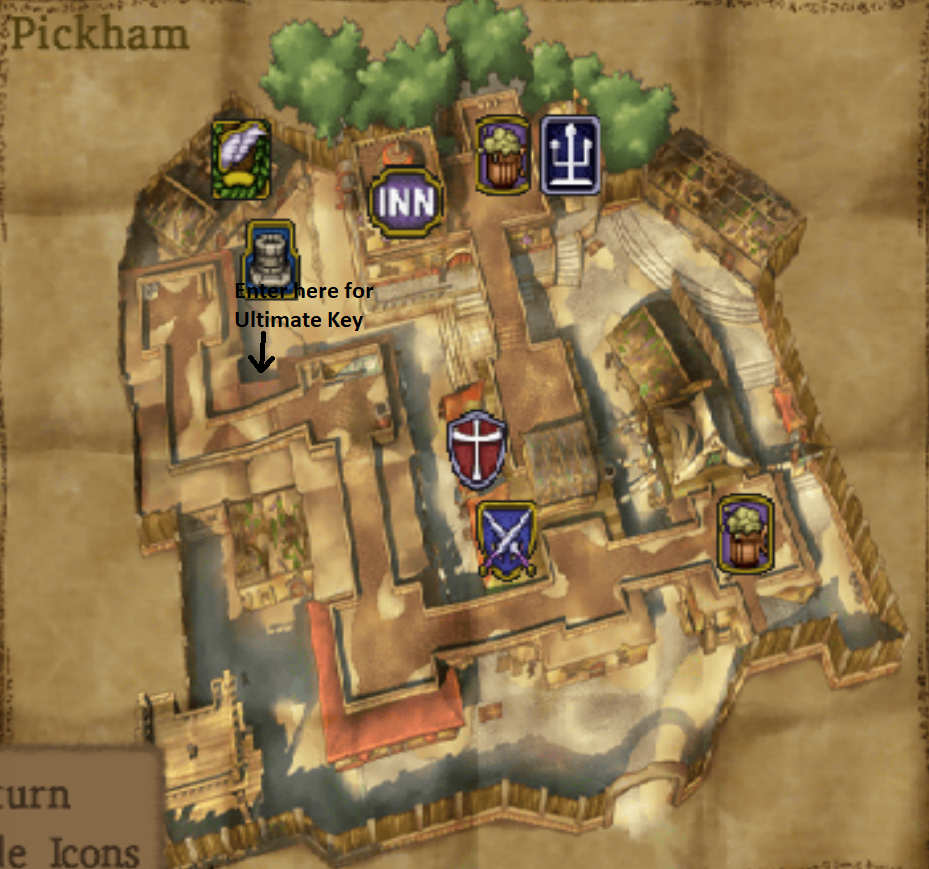
Zoom back to Pickham since this is the first town that we passed which had treasure chests and doors you could open with the Ultimate Key. In the northwestern portion of the town there'll be a door hidden in a little nook south of the well and the item shop. Enter this door and in the hallway you'll want to go through the gated door where there's four treasure chests.
Pickham Ultimate Key Loot:
1) Rune Staff
2) Mimic
3) Power Shield
4) Mini Medal
Once you're done in Pickham Zoom to Swordsman's Labyrinth and go south to Reds' house. Downstairs in Reds' house you'll find four more chests which you can access and open with the Ultimate Key. These four chests contain...
Reds Ultimate Key Loot:
1) Garter
2) Seed of Agility
3) Mini Medal
4) Spiked Steel Whip
Next up is Trodain Castle, you might remember the room here filled with treasure chests - if not it's found in the east wing which you can reach from the outside door on the right hand side of the castle. Go up the stairs and you'll find the room with all four treasure chests.
Castle Trodain Ultimate Key Loot:
1) Seed of Magic
2) Phail of Yggdrasil Dew
3) Rusty Old Sword
4)
Mini Medal
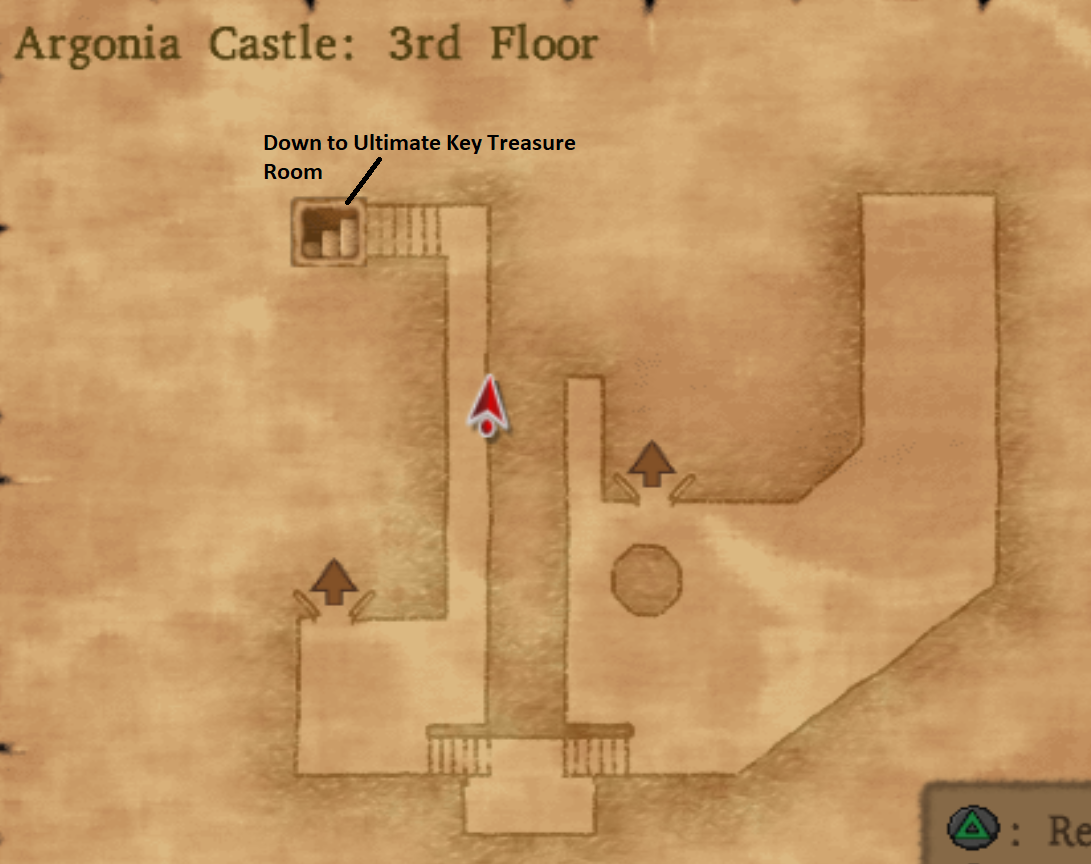
The next town that we're going to do is Argonia. Technically there's stuff for us to do in Baccarat too, we're not going in order anymore. Since Baccarat has a side quest to do now too we'll go there last. In the Argonia castle you'll find a room with four treasure chests, reaching it is a bit of a challenge though since this castle is extremely confusing.
Run up to the Argonia Castle 3rd Floor and make your way outside. In the northern portion of this outside area you will find a stairwell down. This is where the Ultimate Key door is; my map below shows you what I am talking about.
Argonia Ultimate Key Loot:
1) Mini Medal
2) Skull Ring
3) Moon Axe
After Argonia we go to Arcadia! In the central portion of town head inside of the Item Shop. Behind the counter you will see three treasure chests in a gated room, you can open the door using the Ultimate Key and grab the chests which hold...
Arcadia Ultimate Key Loot:
1) Mini Medal
2) Titan Belt
3) Seed of Magic
Now Zoom over to Princess Minnie's castle because we have enough Mini Medals for another few prizes and there's another Ultimate Key door here. Princess Minnie will give you Gold Nugget, Meteorite Bracer and Miracle Sword. In addition to these items you can also open the gated room to the right of Princess Minnie and use the Ultimate Key to get these four treasure chests too.
1) Seed of Life
2) Mini Medal
3) Seed of Strength
4) Double-edged Sword
We're not entirely done yet, Zoom over to Baccarat and head into Golding's Mansion in the northwestern portion of town. There are more Mini Medals for you to find here, along with a few other items and there's a side quest for us to do here too involving the Dragon Graveyard and Baccarat Casino. After you collect the Mini Medals here and accept the side quest you should Zoom to the Desert Chapel in the southeast and travel to the Dragon Graveyard in the center of the desert to complete the side quest.
Continue reading for more information involving the Dragon Graveyard Side Quest
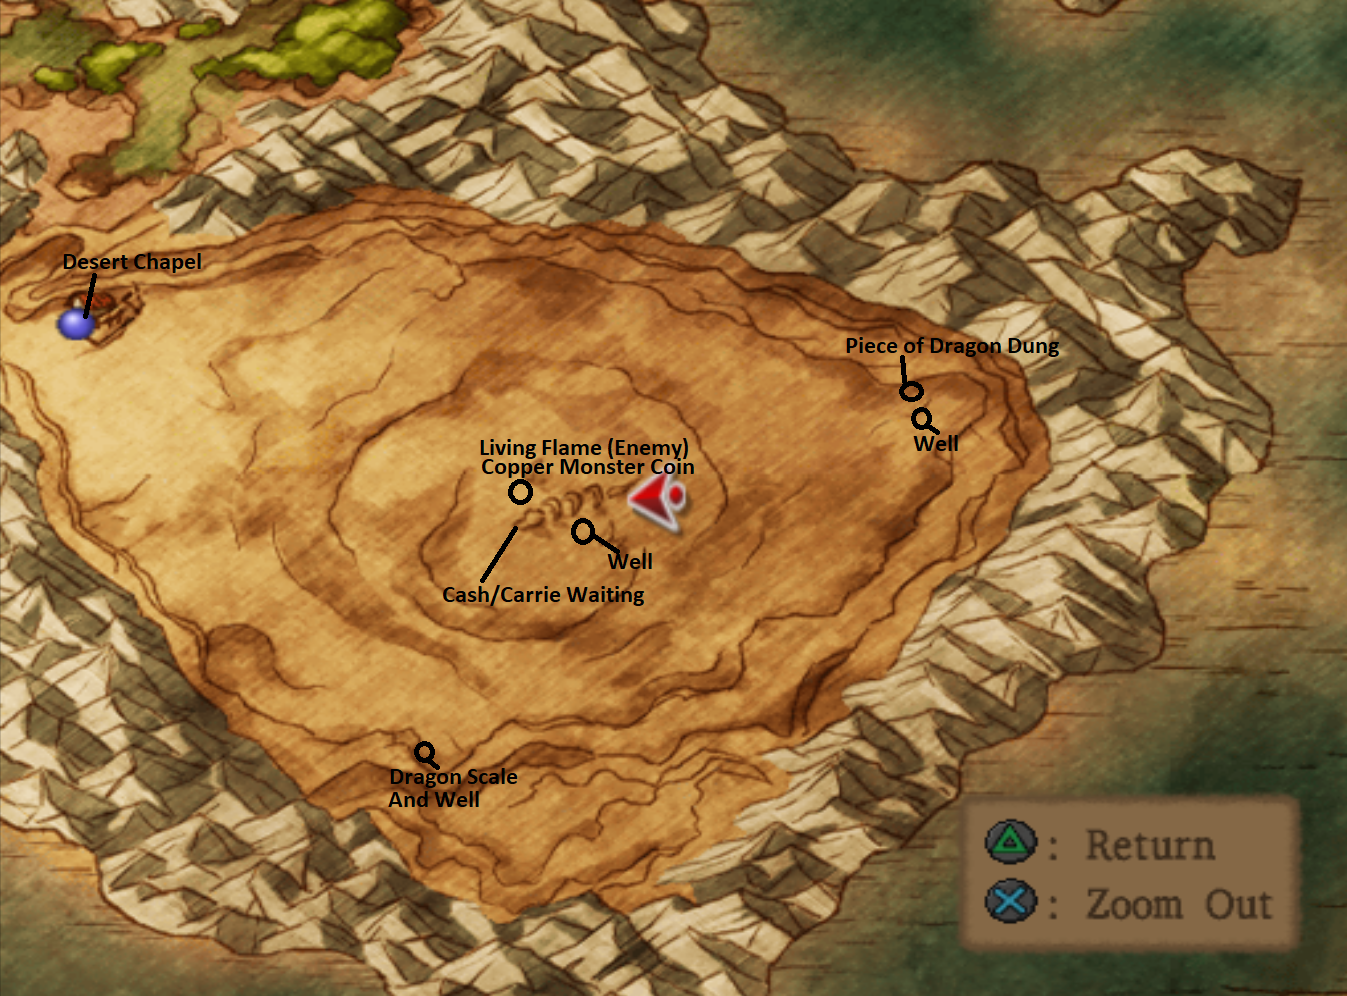
If you don't plan to do the side quest it's recommended you still Zoom over to the Desert Chapel to collect the loot scattered around the desert. You should also head inside of the Dragon Graveyard to grab the Mini Medal and other treasures. I don't see any reason to avoid doing this side quest though.
When you're done with this side quest return to Princess Minnie's Castle and turn in your Mini Medals for another reward, Sacred Armor. Before continuing to the next section of the guide it's strongly recommended you make the Phantom Mask, Golden Tiara and Shamshir of Light (if you're using Swords on Angelo). These are some of the best in slot items and you'll be using them on your character's until the end of the game.
Also if you decided to complete the Baccarat Casino/Dragon Graveyard Side Quest you'll be able to purchase the Falcon Blade from the Baccarat Casino along with Gringham Whip, Jessica's ultimate weapon and Metal King Armour, some of the best chest armour in the game. If you get the Falcon Blade, you can make an Uber Falcon Blade which when you use it with Falcon Slash it attacks a total of 4 times! This makes the weapon when combined with Falcon Slash the highest damage output in the game with a single attack.
You can also use Alchemy to make a Sorcerer's Ring if you want right now as well as an Uber Double-edge. Last but not least if you had enough Mini Medals to acquire the Miracle Sword from Princess Minnies, you'll also be able to make an Uber Miracle Sword. With the Shamshir of Light, Uber Falcon Blade and Gringham Whip, you've already acquired three ultimate weapons and we're only 3/4 of the way done the game! Woo-hoo!
Return to walkthrough Chapter 7 (Argonia Bazaar, Dark Ruins, Arcadia, Rydon's Tower)
Continue to walkthrough Chapter 9 (Side Quests, Savella Cathedral, Pirate's Cove, Empycchu)