
Ironing out the Legion - Belrina Blastil

This is the second Heroic Adventure given to you by Belrina Blastil in Gnome Memorial Mountain and in order to accept this quest you'll first need to complete What's Cooking, Furnace Fire and At Its Core. All three of these quests are given to you by Belira Blastil and they're all fairly easy to do except What's Cooking.
Request Phrase: stop
Task Type: Group (Heroic Adventure)
((Do not defeat many static enemies in this zone or you will fail the quest. Try to ONLY fight the enemies you need to fight))
1. Make sure the Museum is safe (defeat ticking device)
2. Make sure the Museum's second wing is safe
3. Defeat the Secretive Mechanics and Suspicious Lookouts in the southern Museum wing
4. Go to the Supply Room and destroy 4 supply crates
5. Go to the Security Area and defeat 5 Ancient Security Guards
6. Go to the Furnace Area and defeat 10 Busy Legion Enemies
7. Defeat Glimmerlove
8. Give 1 Tin Note to Belira Blastil
9. Open the Chest
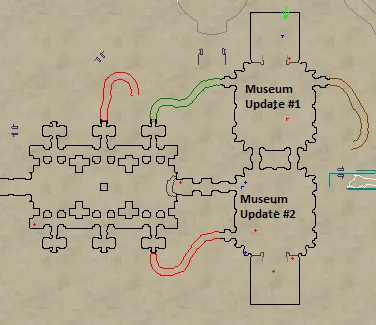
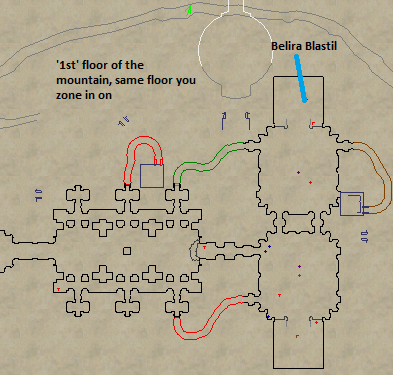
For the first part of this Heroic Adventure you're going to want to travel east back to Belira Blastil's room - also known as the Museum. In the northern most part of this area, where Blastil is in the static zone, you'll find four enemies that you need to dispatch. In addition to these four enemies there's also something called 'a ticking device'.
A ticking device can be attacked after you defeat all four of the other enemies in the room - otherwise you can't lay a finger on it. Once you've cleared the northern part of the Museum your task updates and you have to clear the southern part.
In the southern part you'll face off against two more suspicious lookouts, 4 secretive mechanics as well as a Legendary Clockwork. If you defeat the four secretive gnomes before they are able to activate the Legendary Clockwork enemy then you won't have to worry about fighting him too - but you'd need a butt load of DPS to do that.
After you've cleared both the northern and southern half of the Museum it'll be time to move to the supply dock a smidge north and part way up the mountain from the Museum area.
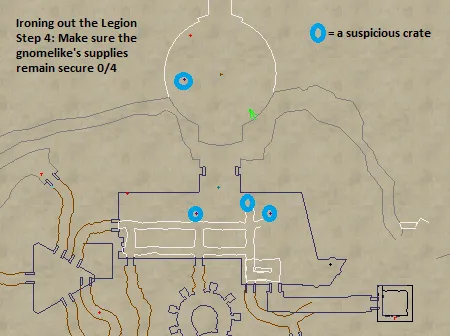

In the Supply Room and on the Supply Dock you'll want to destroy the four suspicious crates/boxes that you come across. Each box has a fixed location (shown on my map above) and is guarded by two Iron Legion gnome enemies. I highly recommend you fight all enemies inside the Supply Room to decrease how many adds you get. The Iron Legion enemies don't have social agro per say but they do always agro other nearby enemies during the fight, maybe it's an ability I am not sure.
Don't forget - killing too many enemies in this HA will result in failure!! So it's extremely important that you don't accidentally agro the entire landing pad/supply dock while doing the outside crate, that's why I recommend fighting inside the Supply Room.
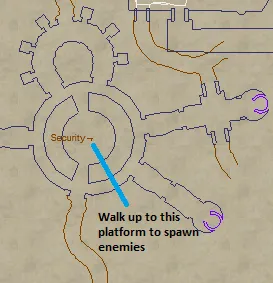
When you're done all four of the suspicious crates you'll need to move up 1 floor to the security room (it's very close by - go up the metal catwalk in the Supply Room). The moment you step foot in the Security Room 'an ancient security guard' will spawn and path around this area until it agros your group or you agro it. Keep this in mind because you may want to wait for your whole group to get up here before you start spawning enemies!
Additionally the Security Room has an AE aura that damages everyone inside of it for 30k a tick it seems, or maybe 30k every time you move in and out of it - I am not sure. Either way it's recommended you make camp in one of the hallways and pull enemies to that area and fight them there. Don't try to fight inside the Security Room.
The 'an ancient guards' that spawn come from the 6 different cubbies just north of the Security Room. You can see them on my map above; so it's recommended you don't make camp in this area otherwise you'll be right where they pop!
Something else I would like to say too is it seems random but sometimes more than one 'an ancient guard' will spawn when you step on the platform. I think it just has to do with server lag. I've had three or four gang up on me before and I am fairly certain that's what caused it.

Now for the furnace area.... Woooah boy what a pain in the ass this part of the quest is! Busy mechanics and charmers spawn around the furnace and you have to defeat 10 of them. You're timed for this part of the task, it seems like you have about 20 minutes or so to defeat all 10 enemies. Or rather, you can't let the enemies beat on the forge for more than 20minutes or you'll fail.
The annoying bit of this part of the task is the enemies in the furnace room and how they operate. After you engage them if you don't defeat them within 20 - 30 seconds an emote pops up where they say how much they love you and then they deagro. Typically they path behind the furnace then become agroable again moments later, if you have someone in your group that uses swarm pets it'll help out a bunch for this part since the enemies will auto reagro and come back to you without much regening any HP.
Even though the next part of the task will have you fighting a named enemy it's recommended that you use your cooldowns for this part just to make things easier and to speed things up. Glimmerlove is a complete and total pushover and can barely even be considered a named, the furnace part of the quest is significantly harder in my opinion which is why I recommend using your cooldowns here.
The faster you defeat the busy enemies in the furnace the less chance you'll have of dealing with their annoying deagro mechanics.


First up, to reach Glimmerlove you'll have to take the elevator directly east of the furnace area in the same location that the Ambassador of Love has a chance to spawn in the static version of the zone. If you're confused about which elevator goes to Glimmerlove it's the northern most elevator that goes up (shown in the screen shot above). The southeastern elevator goes down and that's not the one we want.
Your strategy for Glimmerlove depends on what sort of group you have. If you have a mage with the CoTF Call of the Heroes spell - or even a regular CoH you can have him run up to the top and CoTH the entire group on the opposite side of the boxes next to Glimmerlove so he doesn't agro you. Then you can engage him when you're ready and destroy him.
The alternative is to send a small pincer team upstairs, one or two characters - healers can stay downstairs - to take out Glimmerlove. I recommend this strategy for good reason... If you defeat too many of the enemies in Glimmerlove's room you'll fail the HA so your goal is to defeat Glimmerlove and none of the other enemies in his room with him.
Once you do defeat Glimmerlove I would recommend you just evac back to the zone in. Hail Belira Blastil and hand her the Tin Note that everyone in your group got after completing the museum task updates. She'll then spawn the chest for you which you open to complete the HA - that's all there is to it!
Chest Loot: Ancient Gear Axe, Appointment Enforcer, Average Cloak, Chewed Bellows Fabric, Howling Mask, Melted Glass Shield, Moon's Radiance, Sharpened Angle Brace, Spiked Leadership Sword, Whirlrending Mallet