
Sholazar Basin 78 - 80
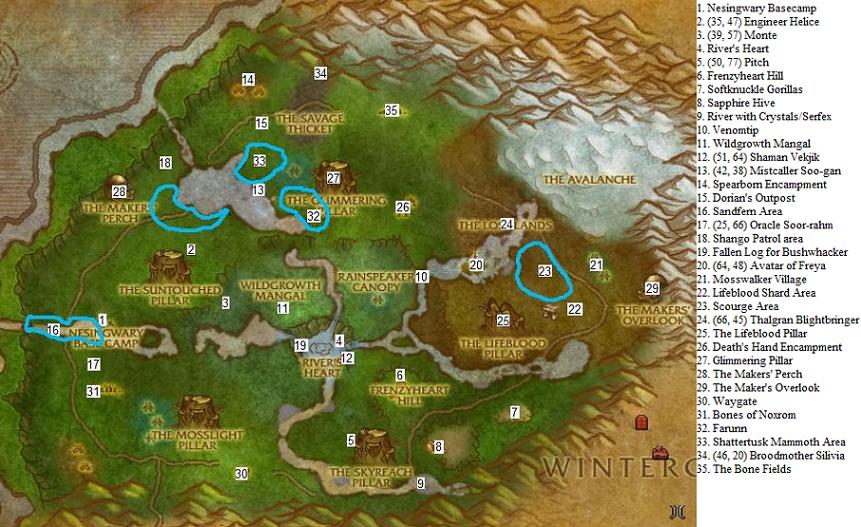
After you crash refresh your quest at Monte Muzzleshot then head northwest to Hemet Nesingwary's Base Camp(1). Turn in your quest and grab all of the available quests here. Head Northeast to Engineer Helice(2), accept her escort and follow her out of Swindlegrin's Dig. After you finish escorting her kill the remaining 15 Venture Company Members. (You'll prolly find the Golden Engagement ring at this time as well). When you're done all the quests return to Hemet's camp and refresh your quest supply.
From Hemet's Camp fly to over where you first met Monte(3). Here you need to collect the Flying Machine Engine. It's almost right on top of where you landed when you got shot down. Return to Nesingwarys and refresh your quest, then return to Swindlegrin's Dig. Now you need to collect 7 Spare Parts and kill Foreman Swindlegrin and Meatpie. Both of which can be found around (35, 49). When you're done both of your quests return to Nesingwarys and turn in your two quests. A ton of quests become available, Grab all of them and the flightpath that pops up.
Equip RJR's Rifle and stand next to Drostan in town. The Rifle will go into your Ranged/Relic Slot. Right click the gun while you have Lucky Wilhelm targeted to fire. It may take more then one shot, and probably will just keep shooting until you hit the apple. When you hit the apple refresh your quest then fly north of Hemet's camp and kill 15 Dreadsabers and 15 Shardhorn Rhinos. When you're done return to Hemet's camp and refresh your quests, then fly east to River's Heart(4).
When you arrive grab all the quests then jump into the water. Start going through the piles of Raised Mud until you find Vic's Keys. When you find them return to Vic and refresh your quest. Now you'll hop into a Flying Machine, protect it when you're ambushed by bats by using the 2nd skill. You'll gain control of the Flying Machine, (You'll know you have control when the engine blows, and you can fly) fly it back to Vic and use ability number 1 to land. Turn in your quest then head to Pitch(5). Kill him, loot his pelt and then accept the quest from Tracker Gekgek. Fly to Frenzyheart Hill(6) and refresh your quest at High-Shaman Rakjak.
He'll give you Goregek's Shackles and automatically summon Goregek the Gorilla Hunter. Accept Goregek's quest then head out of town to the east and kill 8 Hardknuckle Foragers and 6 Chargers on your way to (7). Here you need to use your Softknuckle Poker on the baby gorillas until you piss a Hardknuckle Matriarch off. Kill her when she comes running out at you then return to Frenzyheart Hill and refresh your quests. From town fly south to the Sapphire Hive(8), here you need to kill 6 Sapphire Hive Wasps and 9 Sapphire Hive Drones. Also you need to go down into the Large Stump and kill the Sapphire Hive Queen for her stinger. When you're done both of these quests return to Frenzyheart Hill and turn in both of your quests.
Accept the quest from Elder Harkek. Run around town and use your Chicken Net on 12 Chicken Escapee's then pick them up. When you capture all 12 return to Elder Harkek and refresh your quests. Head south to the River at (9). Here you have to collect 8 Skyreach Crystals and Kill Serfex for the Claw of Serfex. Serfex is a stationary mob that spawns on the sands of this river. You'll be able to tell where he is by the sand "moving" like the worms in Hellfire. As for the Skyreach Crystals they are all over the banks, and in the river. They look similar to the Un'goro Power Crystals. When you're done both quests return to Frenzyheart Hill and refresh your quest.
Head east of town the to Captured Crocolisk (He's right above the H in Heart on the map) and ride him to Mistwhisper Refuge. When you arrive refresh your quest at Zepik. Head into town and kill the Mistwhisper mobs while you work your way to the middle of town (Where the big pool of water is). You'll see a large shrine on the eastern end of the pool of water, use your Skyreach Crystal Cluster in front of it, then right click the cluster to sabotage the shrine. Refresh your quest at Zepik then return to Frenzyheart Hill and refresh your quest.
Head a tad north from Frenzyheart Hill and help an Injured Rainspeaker Oracle. Kill the Crocodile that comes out and refresh your quest at the oracle. Watch the quick scene of betrayal then tell the oracle you're ready to follow him back to his town. When you arrive at their town refresh your quest at High-Oracle Soo-say and he'll summon Lafoo for you. Grab the quest from Lafoo then do the following:
"Make the Bad Snake Go Away"
12 Emperor Cobras Slain
1 Venomtip Slain(10) (He's located at Number 10 on the map)
"Gods Like Shiny Things"
Look for Shiny Flashes on the ground and run Lafoo over to them. He'll dig up a Shiny Treasure, collect 6 of these.
"Some Make Lemonade, Some Make Liquor"
You'll Notice "Sturdy Vines" in the area. Right click them to pull a piece of fruit out of the tree.
You need to collect;
1 Orange
1 Papaya
2 Bunches of Bananas
When you're done these quests head further west to Wildgrowth Mangal(11) and kill 15 Mangal Crocolisks. When you're done that return to High-Oracle Soo-say and refresh your quest. Head to Shaman Vekjik(12) and offer him the peace offerings. He'll shoot you down into the lake which you can conviently swim to Tamara and turn in your quest. Then fly back to High-Oracle Soo-say and refresh your quest. Afterword fly northwest to Mistcaller Soo-gan(13) and refresh your quest. After you get the two new quests from him head further northwest to Spearborn Encampment(14). Here you have to kill 8 Spearbearers, 6 Scavengers and Warlord Tartek. When you get near the shinies at the northern most part of the camp Warlord Tartek will come out. Kill him and loot the shinies to complete your quest.
When you're done both of your quests head over to Dorian's Outpost(15). Accept the only quest here then return to Mistcaller Soo-gan and refresh your quest. Jump into the large lake here and use the Sample Container 5 times when you have Hydra Sputum on you, also kill 5 Hydras. When you're done this quest head to the southern shore and examine the Dreadsaber Tracks in this area (Inside the Blue Line) until you find 3 that are Shango's. When you complete your quest return to Nesingwarys and refresh your quest supply.
Now talk to "Tipsy" Mcmanus and tell him you're ready to start the distillation. He'll ask you to throw more fruit in, release the pressure or light the brazier. The fruit is located in front of the machine, the pressure valve is on the machine and the brazier is under the machine. He'll go about 10 rounds then the distillation will be complete. At which point he will tell you to grab the cask and take it to Grimbooze.
Use the Jungle Punch Sample on Hemet and Hadrius for quest credit. After you do that head west to the river banks at (16) and collect 5 Sandferns (If for some reason you can't find all 5 here keep following the river, you'll eventually find all 5). When you have all 5 head southeast to Oracle Soo-rahm(17). Refresh your quest then kill Longneck Grazers for 5 Longneck Grazer Steaks. When you have all 5 steaks head back to Nesingwarys and refresh your quests.
Fly north to Shango, He Patrols around the (18) on my map kill him and loot his pelt. Then head to Wildgrowth Mangal and kill the Emperor Cobras for 5 Intact Cobra Fangs. When you have all 5 Intact Cobra Fangs head to (19) and use your Sandfern Disguise near the fallen log. Kill Bushwhacker when he comes out, then head to Lakeside Landing and ask Tamara to taste test the Jungle Punch Sample. After she tests it and you complete your quest fly northeast to Rainspeaker Canopy and refresh your quest.
From here fly northeast to the Avatar of Freya(20) and refresh your quest. Then head directly east to Mosswalker Village(21). Discovering the village will complete one of your quests, land and summon Moodle via his stress ball and refresh your quest. Now run around town and "Check the Pulse" of the Mosswalker Victims until you save 6 of them. When you save 6 Mosswalker Victims head to (22) and collect 10 Lifeblood Shards from the ground in this area. When you finish both of these quests refresh them at Moodle.
Now head north to (23) and kill any remaining Blighted Corpses and Bonescythe Ravagers. When you're done head over to Freya and refresh your quest. Head northeast to Thalgran Blightbringer(24). Engage him and wait until he starts channeling a shadow spell (You'll see his hands darken) then use Freya's Ward to reflect it back at him. Just stay out of his rain of fire, and reflect spells back at him until he dies. Return to Freya and refresh your quest, then head south to The Lifeblood Pillar(25) and refresh your quest at the Cultist Corpse.
Fly back to (22) and kill 8 Lifeblood Elementals and use the Lifeblood Gem on their bodies. When you're done head back to Freya and refresh your quests. With new quests in hand head northwest to Death's Hand Encampment(26). Here you need to kill 8 Cultists and destroy 4 Unstable Explosives (they look like giant Sea Mines with a skull imprint). When you complete them return to Freya and refresh your quests. Now head to the Glimmering Pillar(27) use Freya's Horn to kill every cultist here then mount up and fly back to Freya.
Refresh your quest then listen to what Freya has to say. When you finish talking to her fly far west to The Makers' Perch(28) and head inside. At the very back of this tunnel you'll find the switch, activate it then return to Freya. Refresh your quest then head to The Makers' Overlook(29). Grab the quest from the coffin (To the right of the large entrance) then head inside. Kill the Golems on your way back to Switch Theta. Don't forget to loot the golems for a Huge Stone Key. Once both quests are done head back outside and turn in your quest to the coffin. Then fly back to Freya and refresh your quest, Afterword head southwest to the Waygate(30).
All you have to do is land in the white streaks and you'll be teleported to Un'goro. When you arrive in un'goro head up the stairs and refresh your quest at The Etymidian. Now head directly north into the large building. Kill High Cultist Herenn and loot the Omega Rune. With this in your posession head back out to The Etymidian and refresh your quest. Head back through the waygate and fly to Freya to refresh your quest. Now head straight ahead from Freya to The Avalanche.
Here you need to use your Omega Rune to call forth The Etymidian. Heres a quick walkthrough for all 3 of the bosses
Urgreth of the Thousand Tombs: Spam abilities 1 & 2. When you see "Urgreth begins to emanate a powerful dark energy!" get back to a safe distance and use Titanic Surge. (Do not use ability number 5 at any point or the boss will evade)
Hailscorn: Spam abilities 1 & 2. He will summon skeletons at some point during the fight, they're really easy to clear with ability number 2. (Do not use ability number 5 at any point or the boss will evade)
Bythius the Flesh-Shaper: Spam abilities 1 & 2. The only unique thing about him is he has two dogs that come with him when he's attacked. (Do not use ability number 5 at any point or the boss will evade)
Don't forget to kill all 200 Scourge before returning to Freya. Back at Freya turn in your quest then fly back to Oracle Soo-rahm(17). Refresh your quest and head to the head of The Bones of Nozronn(31). Use Shoo-rahm's Incense in the bowl then wait for quest completion. Return to Nesingwarys and refresh your supply of quests. From Nesingwarys head to Farunn(32) and kill him. Once you have his horn return to Hemet and refresh your quest. Head north to Dorian's Outpost(15), and refresh your quests.
Head into the burning woods and kill 6 Primordial Drakes and smash 6 Eggs open to free 6 Primordial Hatchlings. Right click the hatchlings to capture them. When you're done these two quests return to Dorian's Outpost and refresh your quests. Head a tad south of the outpost to (33) and use the Mammoth Harness on a Shattertusk Mammoth. Ride it back to Zootfizzle and turn in your quest, grab the one that pops up at Dorian.
When you accept the quest you'll hop on the back of a Mammoth nammed Stampy. Ride him up to Broodmother Silivia(34) and use Charge to initiate the fight. Use Abilities 4 and 6 every time they're up. Also Hemet will place traps on the ground frequently, lure her over the trap to cause a good deal of damage over time. Eventually you'll kill her or she'll kill your mount and you'll have to finish her the old fashion way. Ethier way once she's dead head east to The Bone Fields(35).
Collect 7 Roc Eggs and 5 Roc Twisted Roc Talons. The eggs are all over the place in nests and the talons drop from the Rocs. When you're done both of these quests head back to Dorian's Outpost and turn your quests in. From here fly east to Icecrown.