
Dragon Quest VIII: Journey of the Cursed King Walkthrough Chapter 5
This guide is designed to point you in the right direction but not hold your hand throughout the entire game. Dungeons and Towns you'll be exploring mostly on your own, with my maps pointing out any treasures that are hidden in a dungeon as well as how to solve any puzzles you'll encounter that could possibly get you stuck.
Additionally depending on your own personal preference, my maps/pictures are designed to work as a guide of their own. If you'd like to skip reading text entirely while you play, you can just look at the maps for the treasure chest locations and where you need to go to advance the story forward.
Skill Point Tips: Jessica Staff (Magic Barrier 31 Points); Whip (Attack Power Bonuses); Yangus Humanity (Golden Oldies 100 Points); Scythe (Attack Power Bonuses); Hero Courage (Holy Protection 28 Points; Omniheal 82 Points); Sword or Boomerang and Angelo Bow (Shining Shot 88 Points); Charisma (Divine Intervention 27 Points) and Staff
Alchemy Tips: Silver Cuirass, Bronze Helmet, Eros' Bow, Holy Lance, Long Spear, Cheeses & Other Consumables
Town of Ascantha

Use Zoom to travel to Ascantha and head into the castle to speak with the King. If it's night time you'll need to wait until daybreak for the King to be sitting on the throne, stay at the Inn or head up to the top of the castle and make some food as you wait for daybreak.
When you speak to the King a scene will commence where he leads you and your party downstairs where the harp is kept. One problem though - the treasures have been stolen! The King freaks out and runs upstairs to get the guards, he tells you to not try and retrieve the harp on your own but hey, who listens to Kings? Head into the tunnel yourself and it will take you to the "Land of the Moles".
Land of the Moles
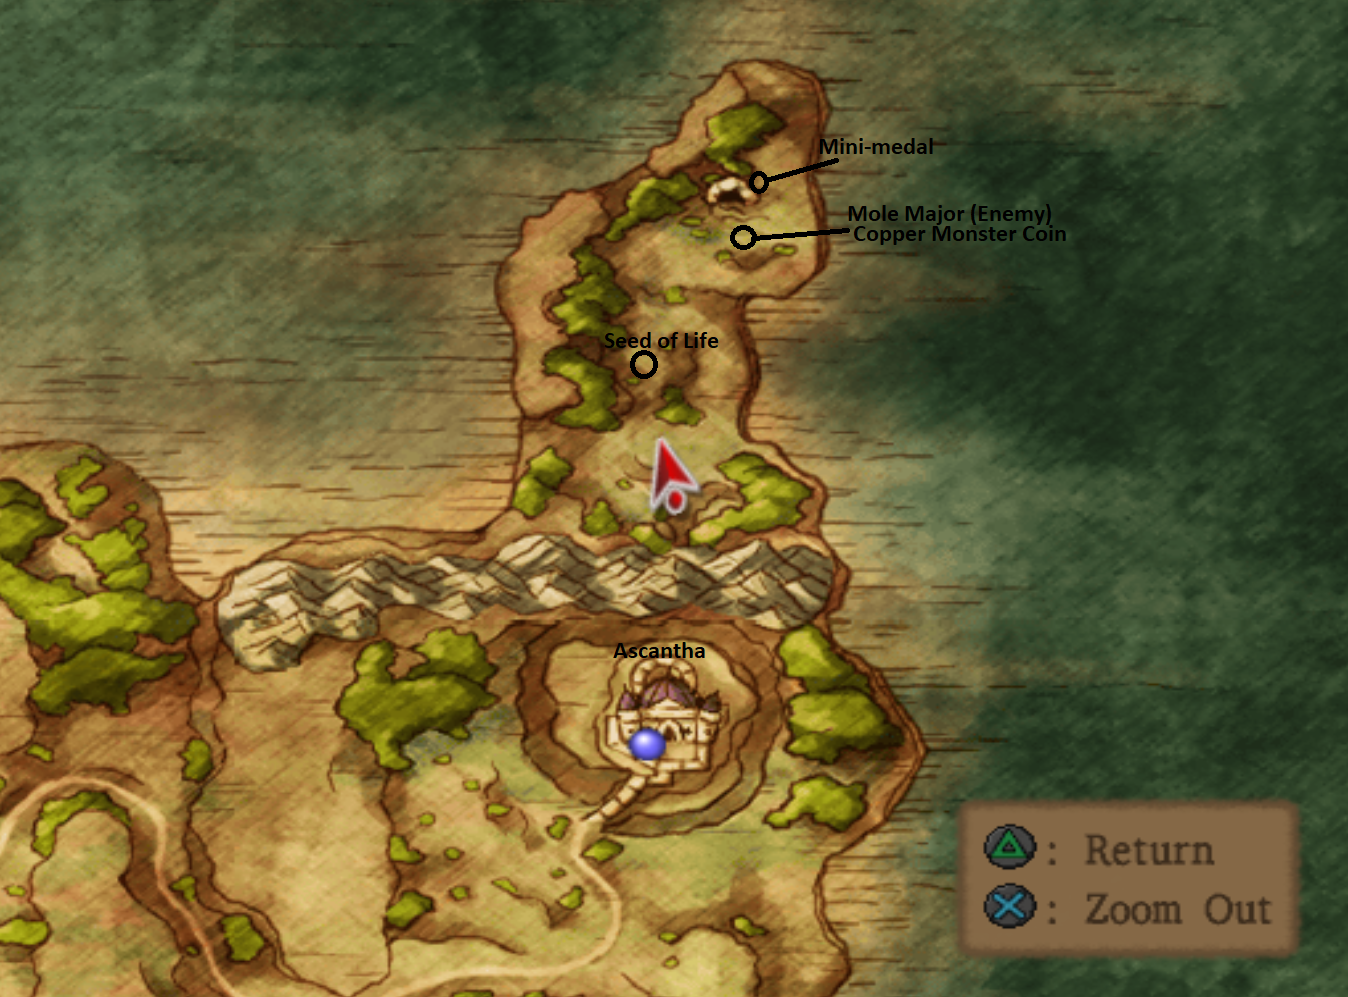
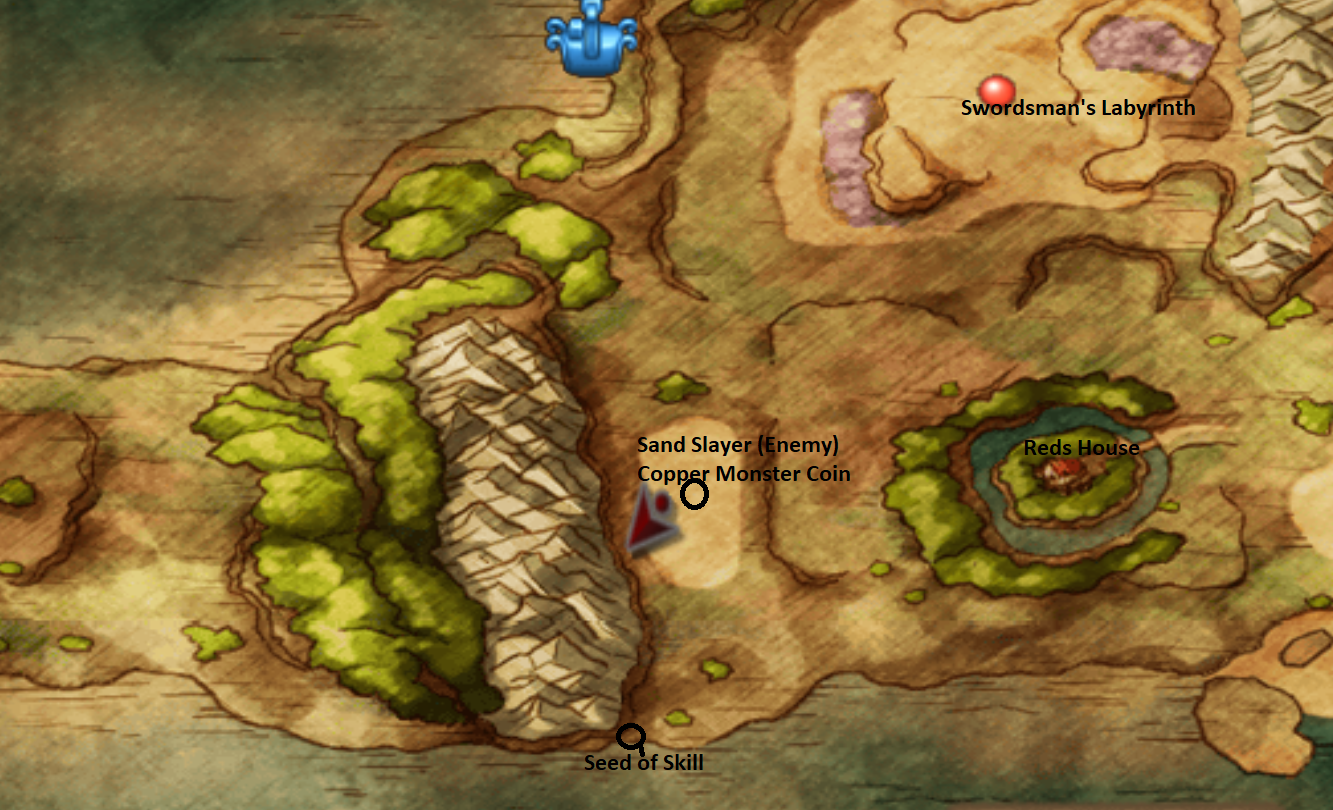
Outside the tunnel you'll find yourself on the opposite side of the mountain range north of Ascantha. There are two nearby treasure chests, one with a Mini-medal and another with a Seed of Life. They're both pretty easy to find since they're out in the open. You'll also find an enemy here that drops a Copper Monster Coin when defeated, he's pretty easy to take down.
To proceed forward with the main story go into the cave at the northern end of the peninsula area. This is the Mole Hole Dungeon.
Mole Hole Dungeon
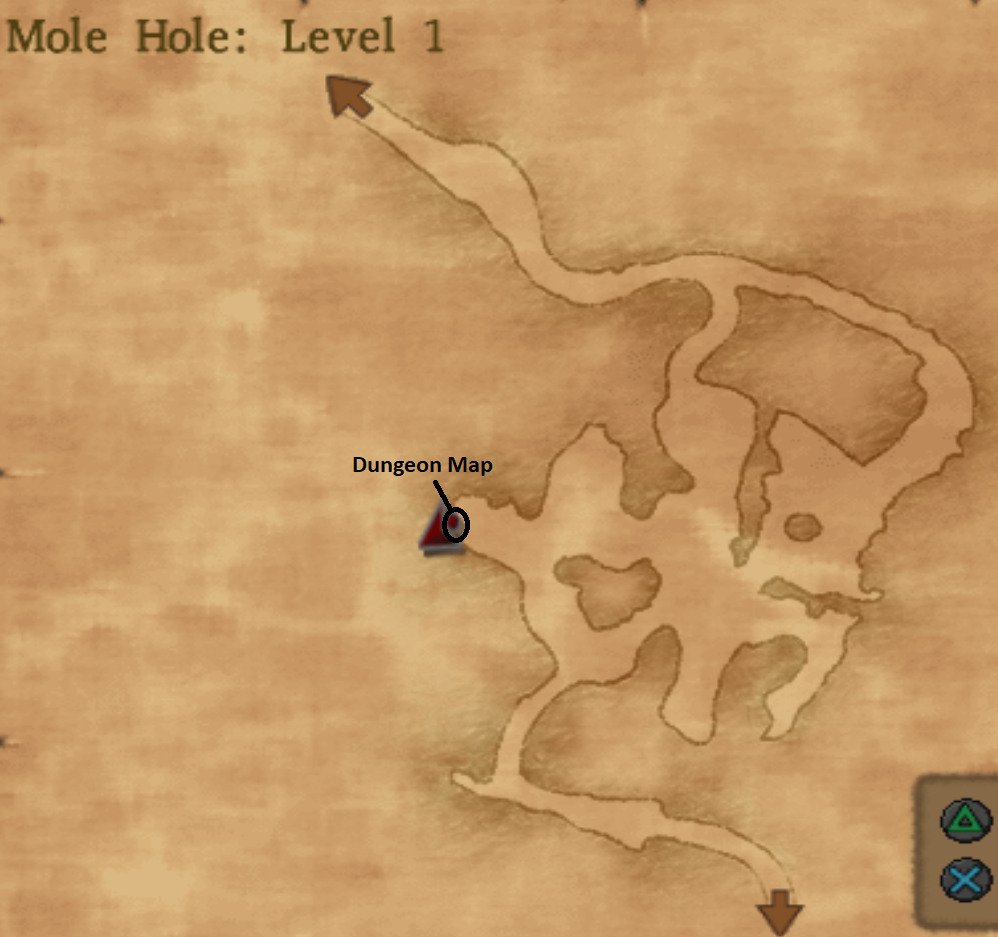
Not too far into the dungeon you'll find the dungeon map, I recommend getting the map as soon as possible because this whole dungeon looks the same and it's difficult to find your way around. Use my map above if you need some assistance with finding the map, it's the only chest on level 1.
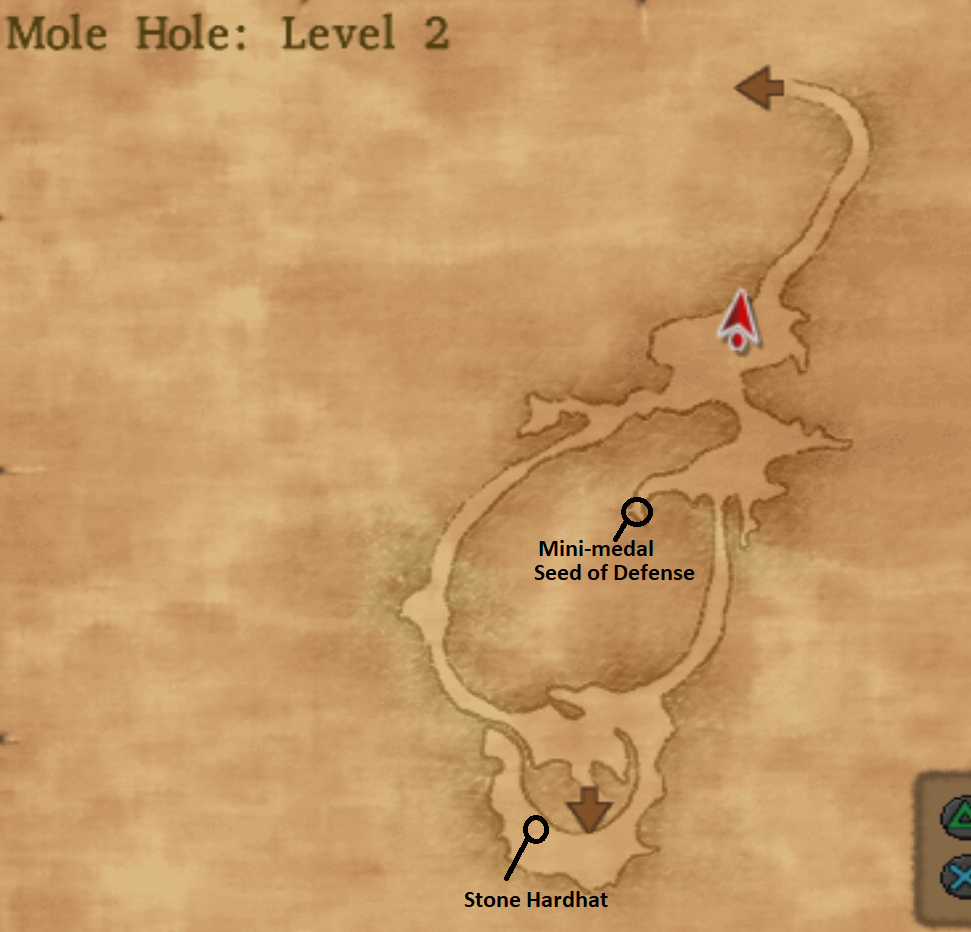
On level two you'll find two pots next to each other which have goodies as well as a chest at the southern most end. When you're ready to fight the boss guy here head down to the bottom of the third floor. There's a big mole isolated on an island - that's the boss. Speak to him when you're ready.

Depending on your RNG this battle will either be a total nightmare or a piece of cake. The big mole has an ability called Performance which has a chance of confusing every single participant in the battle except for himself. If you're unlucky, your entire party could be hit with this spell and then they all end up attacking each other.
Aside from this ability the big mole has one AoE attack that can hit your entire party, a single target attack and if you've defeated any of the little moles, he can call for back up bringing another one into the fight. The little moles should be taken out first to minimize the damage with group attacks, they hit for the same as the other moles we faught during random battles but they have more HP.
You're rewarded with the Moonshadow Harp for defeating the boss mole. Before you head back to Castle Trodain rest somewhere until nightfall. Time doesn't pass inside of the Castle so you have to wait until nightfall elsewhere then come here once the sun sets.
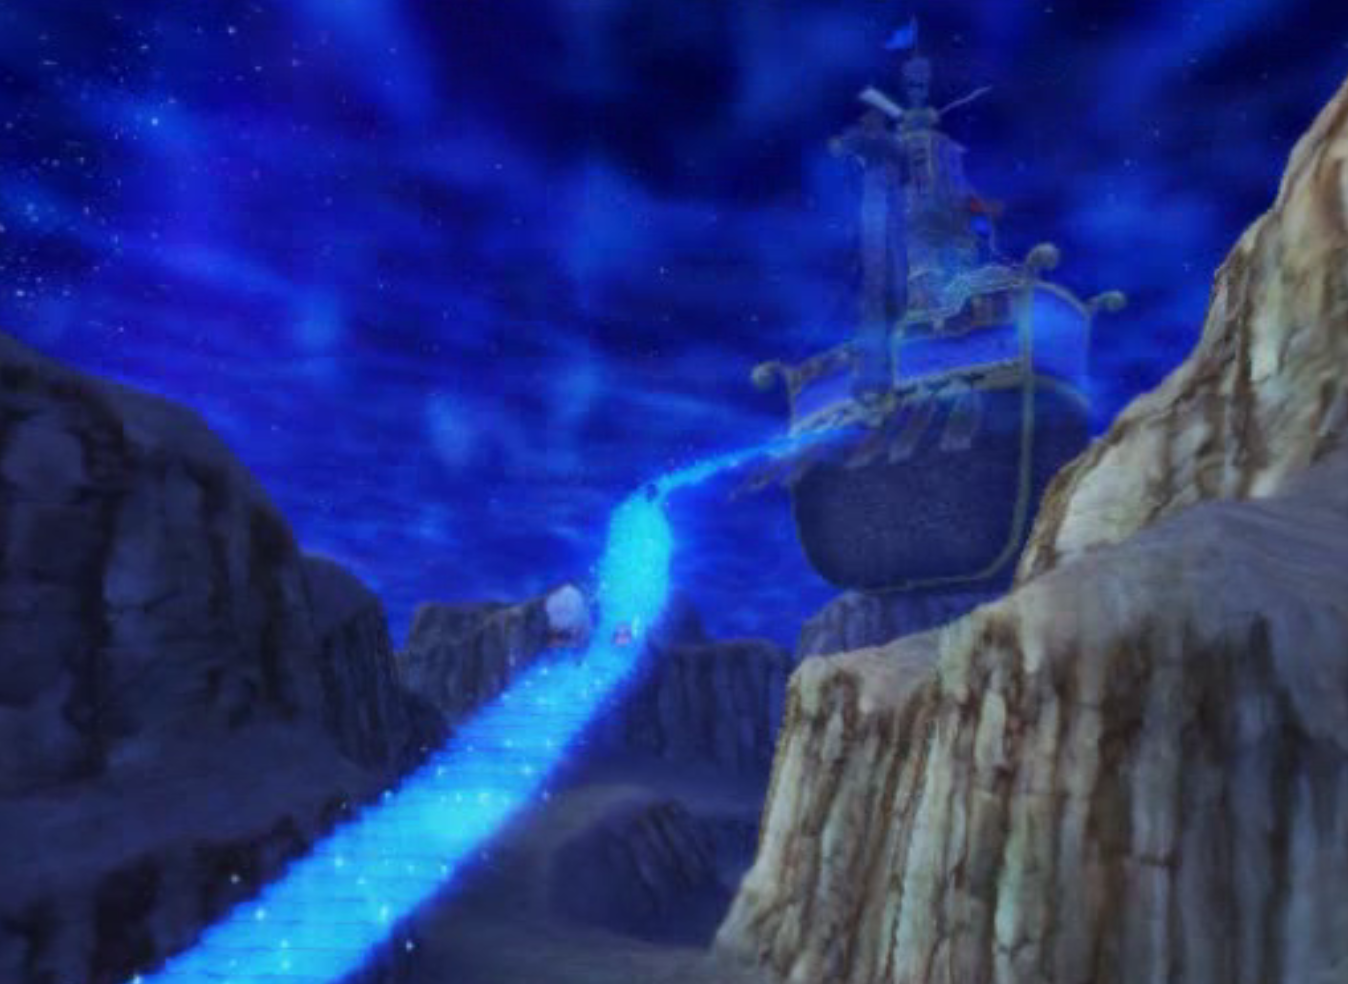
Enter the Moonshadow door and give Ishmahri the Moonshadow Harp. There will be some cutscenes, Ishmahri will teleport your party to the desert where the ship is and lead you up to the ship on a nice sparkly staircase.
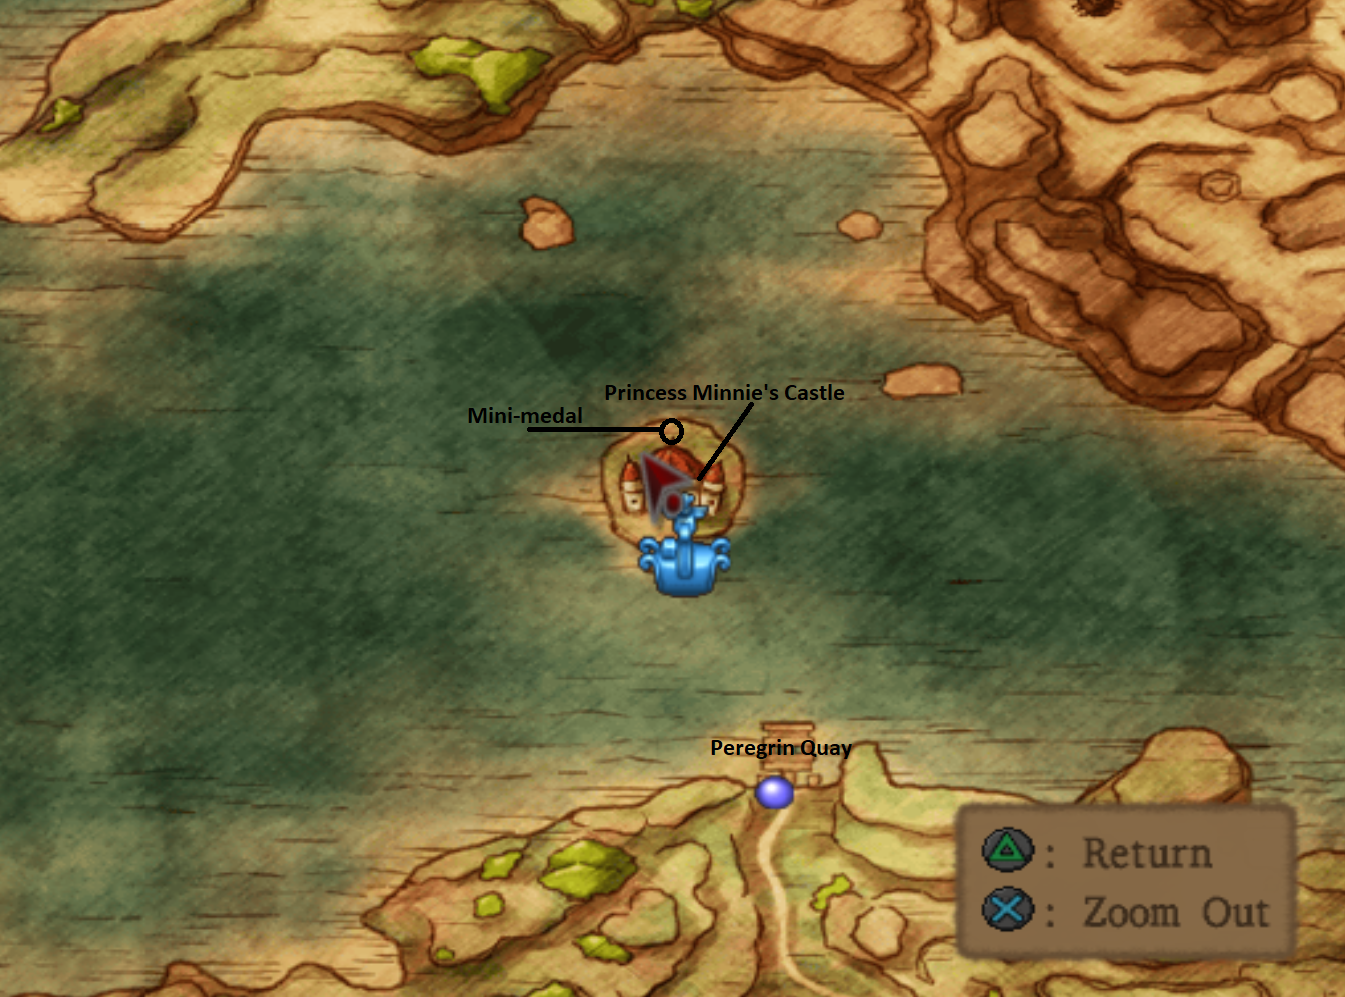
When you regain control of your character you'll be steering a boat to the north of Peregrin Quay. Right in front of you is an island with a large building on it, the Mini-medals we've been collecting are used for a side quest that takes place right on this island. At this point in time I am going to stop the main quest and talk about a few side quests as well as make a list of all the Locked Treasure Chests/Treasure Chests that we have missed up until this point in the game. The boat gives us access to quite a bit of loot which I recommend getting before you move forward with the main story.
If you'd like to continue with the main story and skip all of the side quest content I am about to talk about - go to the next chapter of this guide. First things first you should stop at Princess Minnie's Castle and grab the Mini-medal behind the building. Head inside and talk to the people, one of them tells you that they saw Dhoulmagus walk across the ocean towards Baccarat which is important info for later.
Mini Medals, Lady's Ring, Monster Arena & Locked Treasure Chests Detour
Head upstairs to trigger a scene with Princess Minnie where she asks you about Mini medals. In this same room where you witness the scene search the bookshelves for an Alchemy recipe and a list of all the items you can exchange Mini medals for. On your way back down to the first floor to talk to Princes Minnie again you'll see two pots at the bottom of the stairs, in one there's another Mini medal.
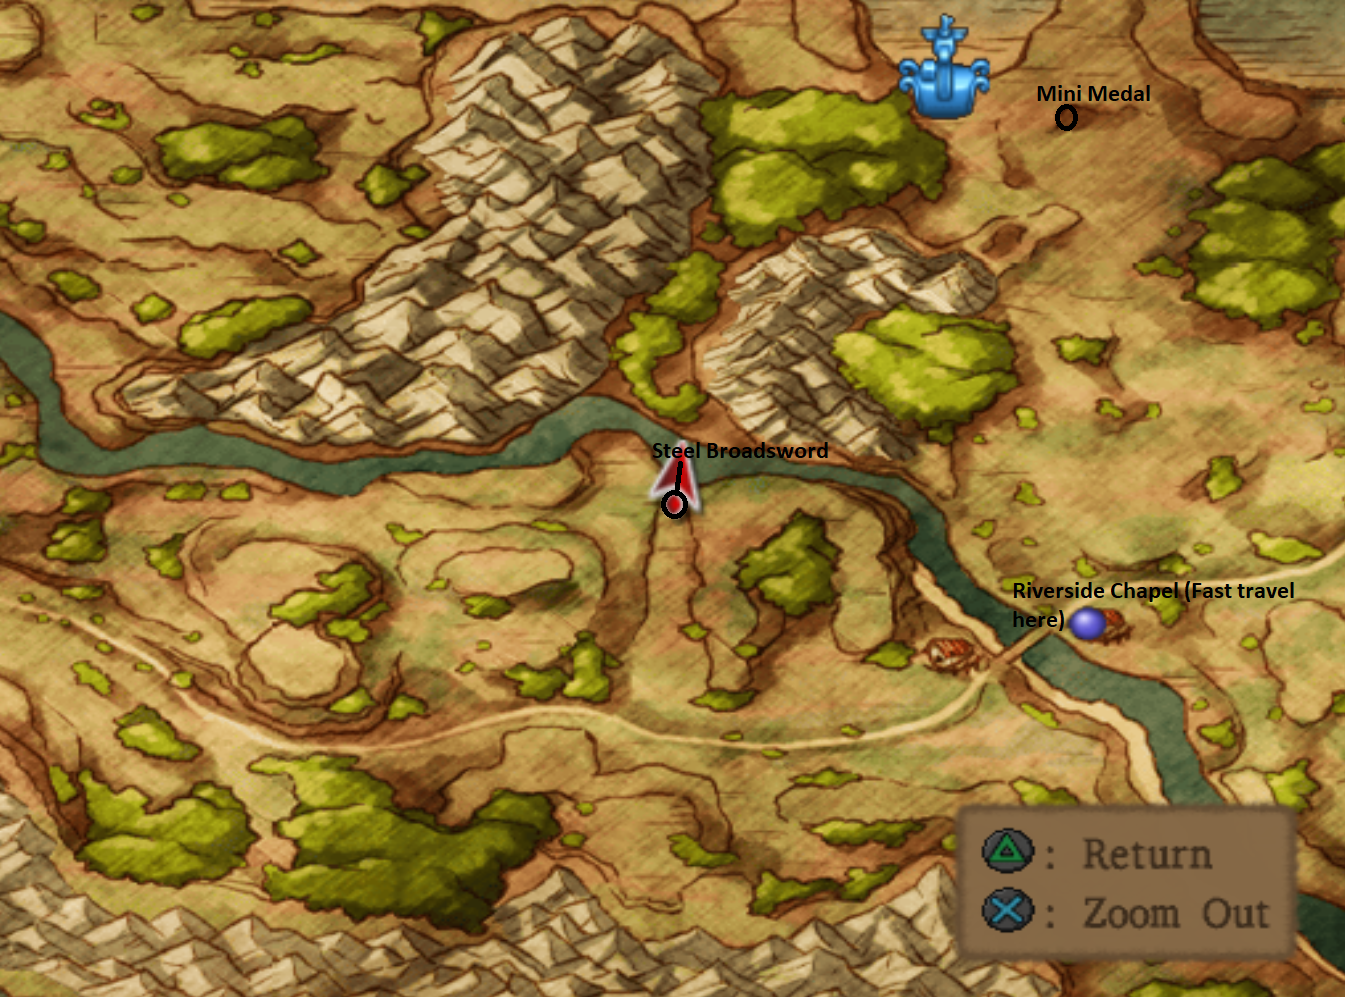
When you're done with the Mini medal side quest use Zoom to travel to Maella Abbey. That's the first area with Locked Chests we passed that we can open with the Magic Key. When you arrive via Zoom head directly west from Maella Abbey following the river until you reach the coast. You'll run right into the treasure chest this way. When you grab this chest it's likely you'll notice the treasure chests on the island nearby too - you can grab these with your boat.
Before you head over to your boat nearby to grab those two treasure chests though I recommend you head southeast of Maella Abbey which is where you'll find the Hollow Knight enemy roaming around on the world map. This guy is for the Monster Arena side quest and is likely the last monster you need to collect out of the three Morrie told you about earlier in the game.

The other two monsters you need to collect for the Monster Arena Side Quest are...
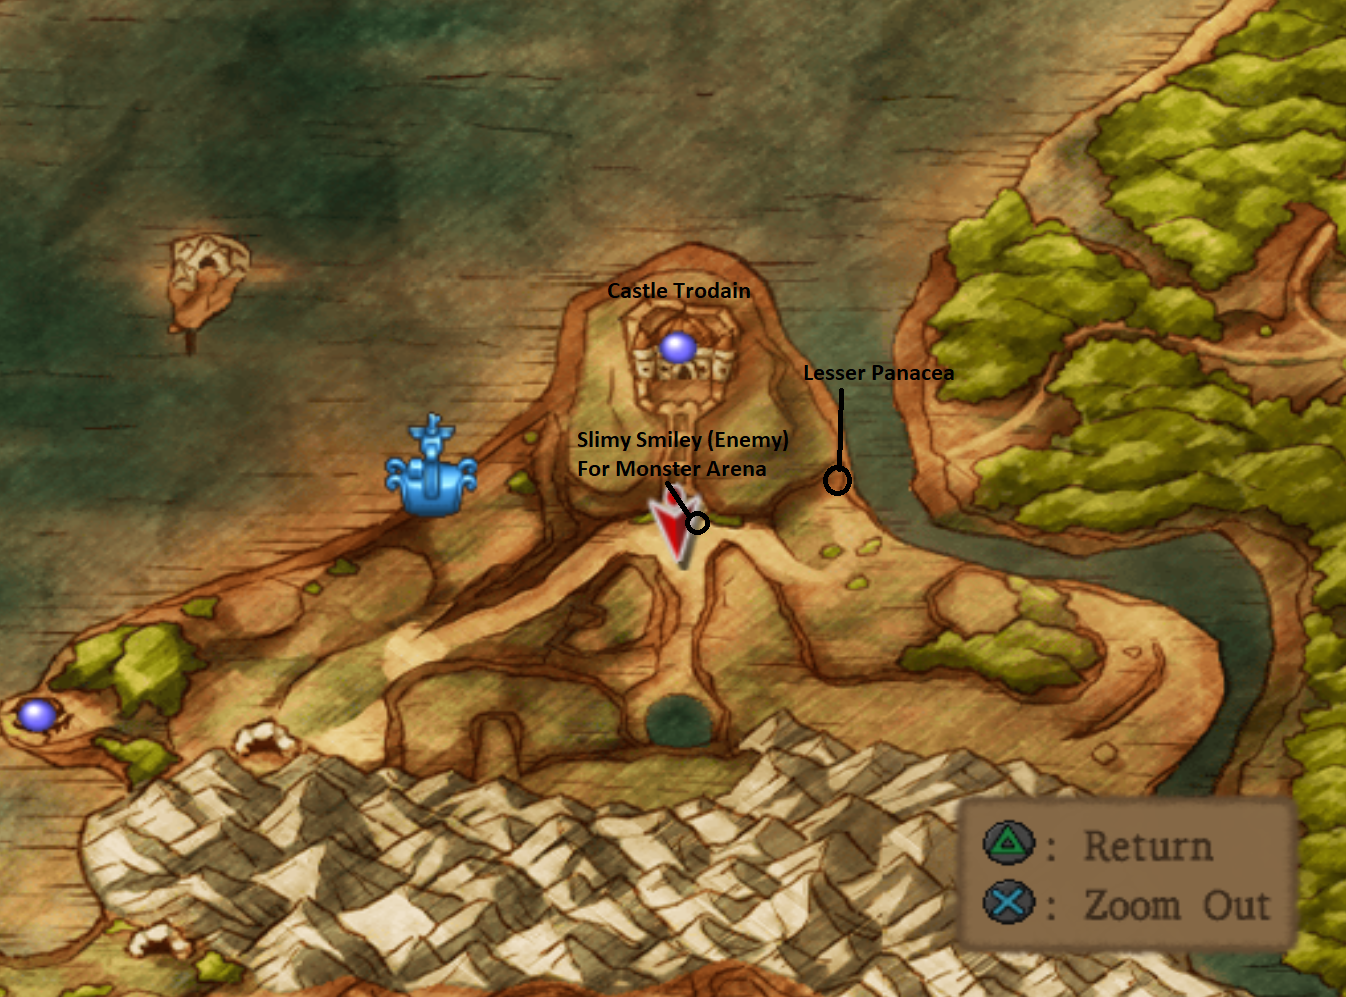
Slimy Smiley who is just outside Castle Trodain
Squiggley Squiggles who is south of Pickham/Southeast of Reds
We'll be by these areas to grab treasure chests, I will point them out on the maps below so you can't miss them. After you collect all three of the monsters you need for the Monster Arena Sidequest it's strongly recommended you go to Morrie's and participate in the Monster Arena one time to win Rank G. This will get you started with the side quest and allow you to collect more monsters so you can win the next few ranks with ease.

After you collect the treasures in the Pickham region and pick up the Squiggly Squiggeler monster it's time for you to Zoom over to Castle Trodain. This is the second to last previously explored area we are going to stop at for chests. If you didn't collect the Slimy Smiley enemy the first time you were here you may want to collect it now because it's the last monster we need to complete the Morrie's Memos.
Once you collect the Slimy Smiley use Zoom to go to Morries and beat Rank G using the monsters you have now. It's worth your time to do right now because we're about to collect three more monsters before we go back to the main story which will allow us to progress up a few ranks and collect a few bad ass items.
Continue reading for Monster Arena Side Quest
Hopefully you're reading this after you've beating Rank G in the Monster Arena; first thing you want to do after being done at the Monster Arena is Zoom to Farebury. Head north of Farebury to the same locaton your ship is docked you'll run into the Axoraptor enemy you may remember from the start of the game. He leaves a lasting impression for anyone who ran into him early in the game due to his difficulty.
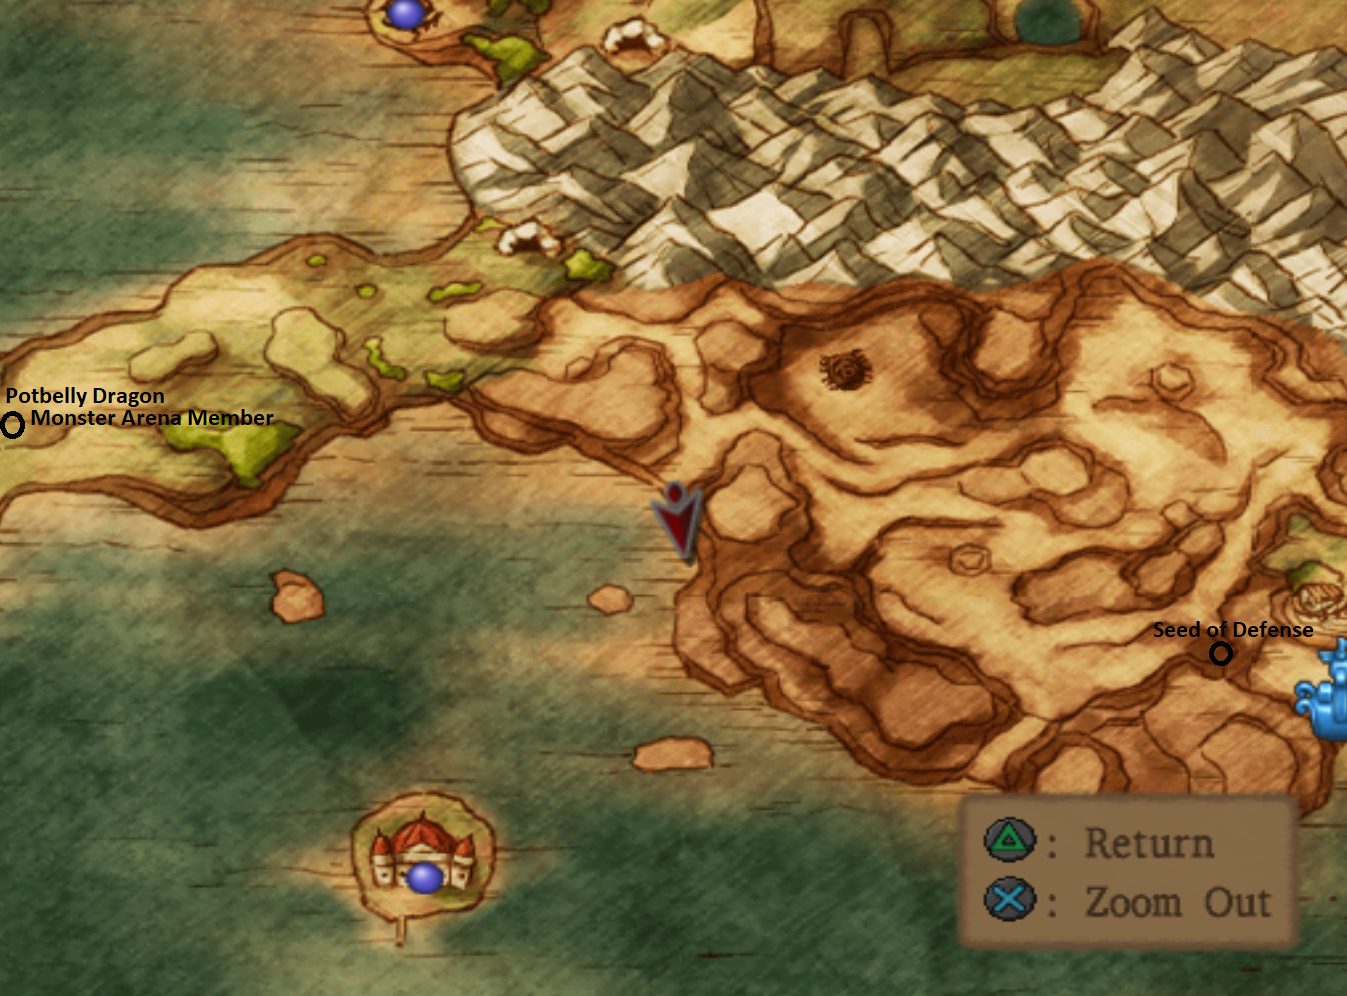
Beat the Axoraptor and have him join your Monster Arena team. With that out of the way Zoom to the Hilltop Hut and grabbed the nearby chest which has a Seed of Defense in it. From here you're going to want to run all the way west to where the next monster we want to join our Monster Arena team is. He's the Potty Dragon you may or may not have faught earlier in the game; he's a tough one so come prepared.
Zoom to Princess Minnie's Castle and hop on your boat. Sail to the island in the middle of then world map, known as the Island of Neos. We're going to make a stop here for armor and weapon upgrades, the goodies in the town, the goodies outside the town and another monster for the Monster Arena.
Bring Holy Water or use Holy Protection on your main char when you arrive on the island of Neos. Also be prepared to Flee from battles if needed. The monsters here don't mess around, one of the little creatures does a dance which can insta death more than one character and a dance that can confuse your whole party which can be a real pain.
The town of Neos in the center of this island has a TON of goodies to buy - every piece of armor is likely an upgrade for you and every weapon is as well. They are all quite expensive but you should have some change lying around from all of the grinding so far.
The Goldbricker Strategy: Kabuff with Angelo/Yangus two or three times and Accelerattle with Jessica at the start of the battle.
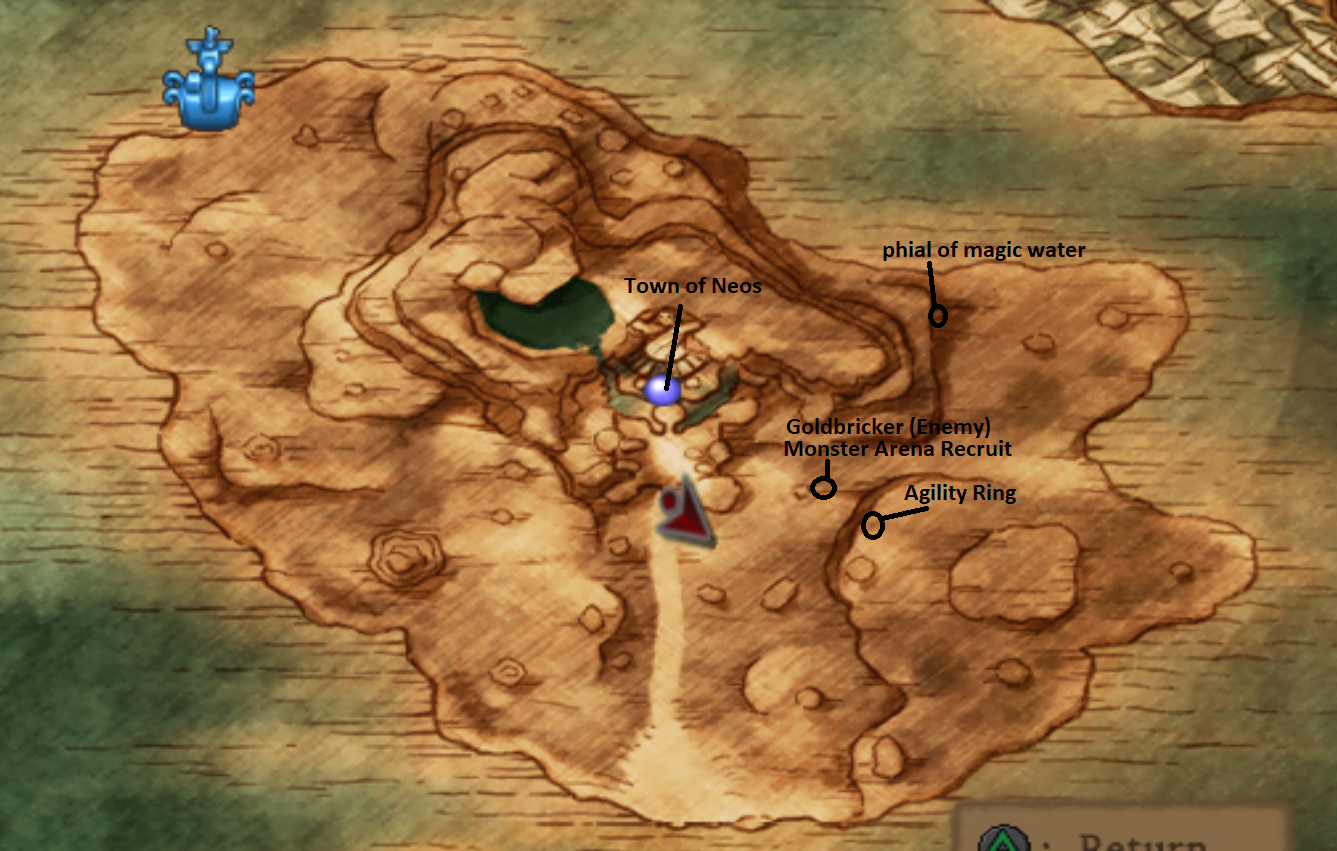
It's up to you if you'd like to collect all of the treasures in Neos right now - I personally am not incase someone skips this part of the walkthrough, that way I collect them at the same time they do later in the game. However for someone like you reading this there's no reason you should avoid getting the stuff found throughout town right now. We won't be back here until much much later in the game.
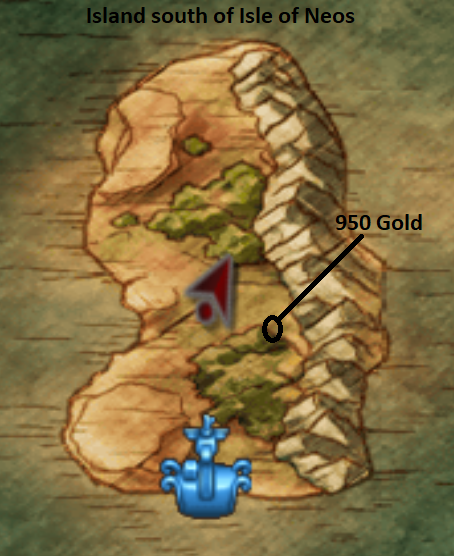
When you're finished collecting all of the goodies on the Island of Neos hop in your boat again and travel directly south to the island below you. This is another island where I recommend you use Holy Protection and/or Flee from every battle you encounter. The enemies here can hit you for 50 - 60 in a single blow. All there is on this island for you to collect is 950 Gold.
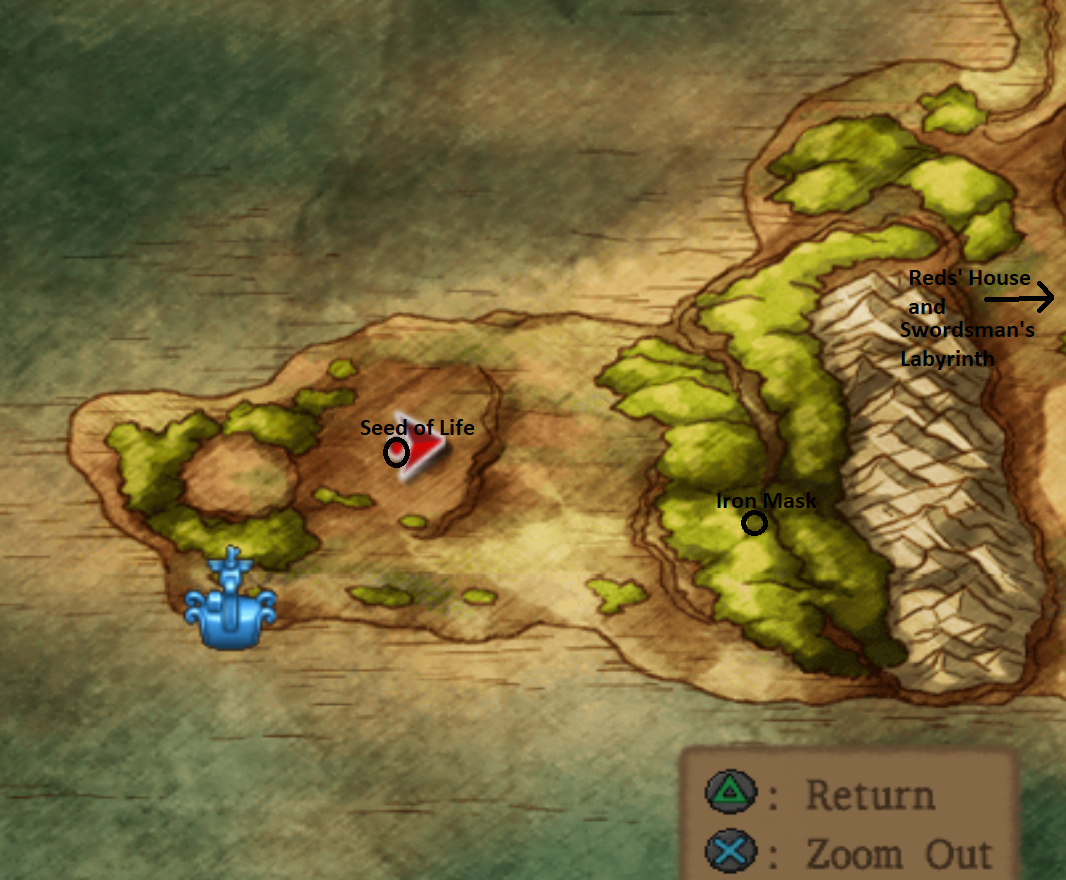
Finally the last stop we need to make before going back to the Monster Arena is the piece of land east of the island we just stopped at. It's the area to the west of Swordsman's Labyrinth which we couldn't get to from the main land because it was blocked off by a mountain range. There are two treasure chests for you to pick up here, one with a Seed of Life and another with an Iron Mask.
After you collect both use Zoom and travel over to Morrie's Palace. We're going to advance forward a few ranks with the Monster Arena before we go back to the main story. In addition to the Monster Arena side quest and the Mini medal one there's two more which we have passed that you can go back and do now. Lady's Ring and Waterfall Hut. I'd recommend doing them now if you didn't do them when we passed them earlier in the game.
Continue reading for more information about the Monster Arena Side quest
With the three monsters we captured you can very easily do 5 ranks of the monster arena, if you get lucky you can take down Rank B too with your current monsters but I figure most of us will stop at Rank C. Here's all the rewards you'll get this time from raising your monsters up in the ranks.
Rank G Rewards: Strength Ring; Morrie allows you to have 3 Reserve Monsters
Rank F Rewards: Bunny Suit; Able to have practice battles with all your own monsters
Rank E Rewards: Ring of Clarity; Hero Learns "Call Team"
Rank D Rewards: Mightly Armlet; Allows 3 more Reserve Monsters
Rank C Rewards: Saint's Ashes
Return to walkthrough Chapter 4 (Swordsman's Labyrinth, Hilltop Hut, Castle Trodain)
Continue to walkthrough Chapter 7 (Argonia Bazaar, Dark Ruins, Arcadia, Rydon's Tower)