
Tower of Frozen Shadow - Velious Leveling Guide
The Tower of Frozen Shadow is one of the most well known Velious zones due to the fact it's so gosh darn unique. Basically the zone is seven different floors (as seen on the map above) that are good for a very wide level range of players (30 - 60). You need to collect a key on each floor in order to progress to the next one.
My guide is going to go through this zone floor by floor; depending on which floor you'd like to hunt just stop at that part of the guide! For those interested in a synposis of the entire zone's levels... Here's the breakdown from P99's wiki:
1st floor (Levels 26 - 35) a large undead gnoll drops the Crystal Key to floor 2.
2nd floor (Levels 29 - 38) an angry librarian drops the Three Toothed Key to floor 3.
3rd floor (Levels 35 - 40) an enraged shadow beast drops the Frosty key to floor 4.
4th floor (Levels 35 - 42) Cara Omica drops the Small rusty key to floor 5.
5th floor (Levels 28 - 45) an enranged relative drops the Bone finger key to floor 6.
6th floor (Levels 33-46) VhalSera drops the Large Metal Key to floor 6. Also her key unlocks the door outside the mirror room.
7th floor (Levels 44-51)
The NPC that drops the key to progress to the next floor has a chance of spawning in place of any enemy you kill on that floor. So basically you'll just want to run around killing everything to try and get the NPC to spawn with the key.
As you could probably have guessed we're going to start with the very first floor that's shown in the screen shot below.
Guarding the hallway that leads to the mirror up north are two lesser shades. Down in the pit that's in the center of the first floor you'll find some skeletons and you'll also find skeletons/shadow beasts spread out throughout the other rooms that branch off the main central room.
Most of the skeletons you find on the first floor will be invisible until you get close enough to agro them (or use see invis). Kill every enemy on the first floor until you get the "a large undead gnoll' to spawn; kill him and loot the Crystal Key which will let you take mirror 'A' on the map above to the second floor.
Nameds on First floor:
The second floor of the Tower of Frozen Shadow is filled with undead student enemies. They aren't spaced out very much and if you try and pull them over one of the tables - the pathing can be terrible. It's safest to camp just inside the room on either side of the doorway (in front of the large oval library desk).
This floor can support two full groups pulling from it at the same time - assuming that the groups aren't all overleveled or well geared. On this floor we'll need to kill an angry librarian who has the Three Toothed Key which allows us to progress to the third floor. The an angry librarian also has a chance to drop Teacher's Syllabus.
Nameds on Second floor:
Many of the named enemies also have a chance to drop Gnome Skin Armor and Crystallized Shadow Weapons.
An angry librarian: Students Homework, Teacher's Syllabus (Rare)
Be prepared before moving to this floor! This is the first floor that the zone in area isn't safe. With that aside - this floor is actually one of the safer and less crowded floors of the zone. The enemies are all spaced out in the smaller rooms on the western end of the floor.
The most I ever saw was a pull of three. On the eastern side of the floor where the larger rooms are on the map above you'll find more enemies per room and usually a bit closer together. This is usually one of the better places to make camp. Don't know about you but I hate pulling through doors and such.
Once you get the enraged shadow beast to spawn and loot the Frosty Key you'll be able to move onto the next floor of ToFS.
Nameds on the Third floor:
Many of the named enemies also have a chance to drop Gnome Skin Armor and Crystallized Shadow Weapons.
an angry chef: Crystallized Shadow Tunic
an enraged shadow beast: Chilled Scythe, Finely Crafted Velium Ring (Rare)
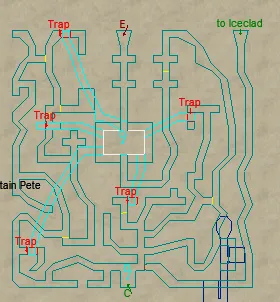
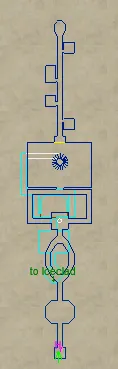
Much like the previous floor the zone in for this one will not be safe. This floor is a bit of a mess too compared to all of the previous ones that we've been on. As you can see from the map above it's basically one giant maze. It has a few traps throughout which are marked on my map above. Falling victim to a trap will put you down in the light blue part on the map above.
In the central part of the light blue area on the map you'll find a torch which you can click on. Doing that will bring you back up to the entrance area. Unlike the previous floors the named that drops the key, Cara Omica, spawns in the central part of this floor. She's sitting inside an open coffin.
Nameds on the Fourth floor:
Many of the named enemies also have a chance to drop Gnome Skin Armor and Crystallized Shadow Weapons.
Cara Omica: Embalmer's Skinning Knife, Magnetic Dirk of Distraction, Sorcerous Bowl (Rare)
Narmak Berreka: Frost Covered Tome, Shield of Shadows
Amonepheta: Sparkling Soul Necklace, Prophecy Scroll (Rare)
Maggot Infested Flesh: Fingerbone Hoop, Maggot Ridden Flesh

The spot you zone in on this floor is safe, unlike the previous two floors. You probably already know, but this is the fifth floor of the dungeon and this is when things start getting a bit tougher. The central room on this floor is littered with mobs and will need to be pulled carefully. You can't just kamikazi in there and expect to live. There's just too many of them!
With that said though most of the mobs on this floor are lower level than the previous floor. The main difficulty here is you'll need CC if you hope to survive. Lul and Pacify will help loads too - especially for clearing the center most room.
Leading up to the central room you'll find golem ushers which you'll want to pacify/lul as to not get all of them with one pull. The two small rooms off to the side have undead dancers and bridesmaids in them which come in groups of three (and the bridesmaids all bring pets).
The keyholder on this floor is An enranged relative which will spawn after you kill an undead usher. The undead usher enemy apparently spawns off any mob that can be killed on this floor but most commonly will spawn after you kill Golem Usher.
Nameds on the Fifth floor:
Many of the named enemies also have a chance to drop Gnome Skin Armor and Crystallized Shadow Weapons.
An enraged relative: Crystallized Shadow Belt, Beer Stained Coldain Tunic, Velium Spiked Skull Helm
Head Golem Usher: Frozen Totem
Nosja: Ceremonial Wedding Sword, Diamond Wedding Band (Rare)
Daman: Laced Veil, Rune Etched Wedding Band (Rare)
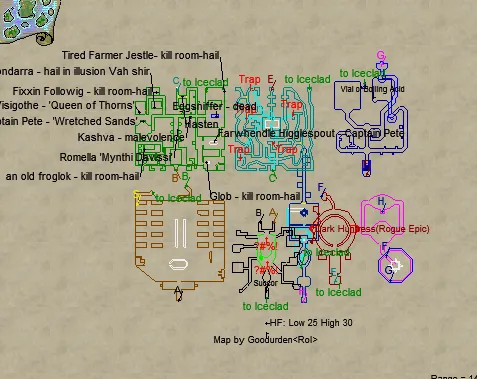
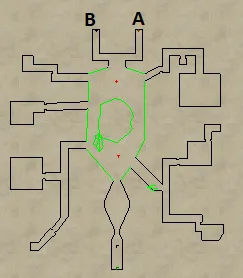
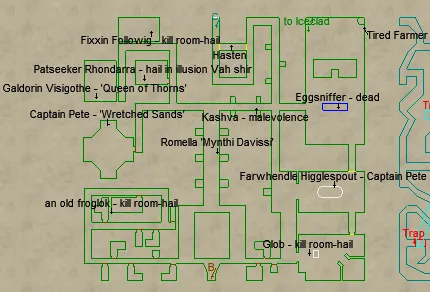
Throughout the first part of Floor 6 you'll find many different shadow beast enemies in the hallways and shades in the larger rooms (like what's found on lower floors). If you're careful as you navigate the hallways you can pull them in pairs or even singles. The level spread for this floor is about 30 - 40.
Before you go to floor 6B please read the entire entry I have for this floor below.
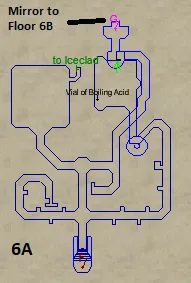
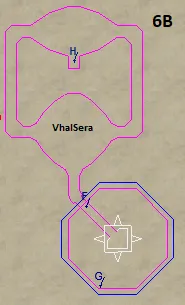
Floor 6 is split into two parts. You can reach the second half of the level by clicking on the mirror that's located on the second floor of the first floor. Woah! Confusing, right? As you can see I have two maps above this paragraph. The one that's on the left is of Floor 6A we'll call it. The second is of Floor 6B.
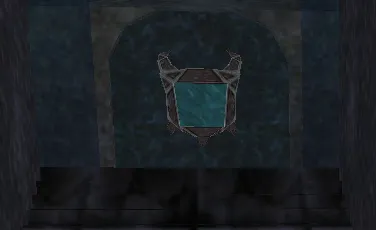
In order to reach the second part of the sixth floor you'll need to click on the mirror that's shown in my picture below. This mirror doesn't require a key like every other one does - instead all you need to do is click on it an viola you'll move up to the second part of floor 6, which is shown in the screen shot above adjacent to the last!
In order to progress to floor 7 you'll need to find and kill "an ice shade" on floor 6 BEFORE taking the mirror up to the second part of floor 6 - which is where you will find VhalSera who drops the key to floor 7. However you'll need to make sure you spawn VhalSera before heading up there to kill him, hence making sure you kill a ice shade before moving up.
On Floor 6A you'll find the following named enemies:
An Incoherant Spirit: Abram's Axe of the Stoic
Now that you're on floor 6B it's time to give VhalSera a good ol' knock in the jaw. He's found in the center of floor 6B. Not too difficult of a fight but you'll want to pull him back towards the entrance to avoid as many adds as possible. There's a lot of bats that roam this floor and when you kill the bat it spawns an additional mob, an enraged vampire. Keep that in mind before you start focusing on adds during the fight!
This floor has a slightly higher level spread, closer to 33 - 40. It's actually not too shabby of a place to hunt considering the mobs are so spread out the pulls will be almost always singles. There's also no really annoying traps here or anything like that, definitely one of the better floors to stop at and hunt.
On Floor 6B you'll find the following named enemies:
VhalSera: Talisman of Vhal Sera, Vhal`Sera Skull Earring
Once you're ready to move onto floor 7, the final floor, click the mirror at the back end of floor 6B.
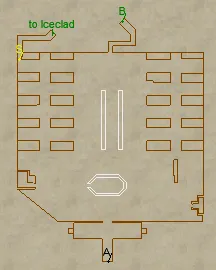
The seventh and final floor or Tower of Frozen Shadow has an odd assortment of enemies. You have shades and golems which were also found on the floors below as well as new drake enemies which are throughout the central part of this floor. In the far northern end of the floor you have the same bats which spawn vampires when killed that we found on the floor below.
Killing the bats I just mentioned on this floor has a rare chance of spawning Tserrina who is the final named so to speak of this tower. She casts a lot of spells and is a general pain in the butt to fight. She drops a key which will let you instantly access the seventh floor from the second mirror that's found on the very first floor of ToFS.
Finally in the center of the large room you'll find a spiral staircase that leads to the second floor (light blue area on my map above). There arent many enemies up here at all - a single named Advisor Svartmane who doesn't drop any loot at all. In the southern most room up here you'll find a room full of mirrors. These mirrors will take you to all the different floors of this dungeon, giving you instant access to every floor.
Nameds on 7th Floor:
Tserrina: Tserrina's Staff, Tserrina's Symbol, Tserrina's Whip, Tserrina's Robe (Rare), Harnessed Soul Gem, Tserrina's Key
The last thing to note about this zone is players on live servers don't have to worry about losing the keys to each floor after they zone out or die - the keys are added to your keyring permanently which isn't how they work on P99.
Additional Zone Information
- Tower of Frozen Shadow (ToFS) is located in the western portion of Iceclad Ocean. For more information on how to reach it check out my reaching ToFS guide.
- This zone was remade into an anniversary raid that you can pick up in Plane of Knowledge later in the game.
Tower of Frozen Shadow Allakhazam Zone Information
Tower of Frozen Shadow P99 Zone Information