
Howling Stones - Ring of Scale Guide
The revamped Howling Stones which was added in the Ring of Scale expansion pack offers you some of the best hunting locations for the extremely powerful Power Sources added with this expansion pack (more info on this is below). This zone is completely remodeled so it'll look different than the Kunark Howling Stones, however, the layout is exactly the same.
All of the floor traps are in the same spot - the hidden walls are in the same location & nameds spawn in the same spots that they do in the Kunark version. So, if you know the Kunark version of this zone well, you'll know this version well too!
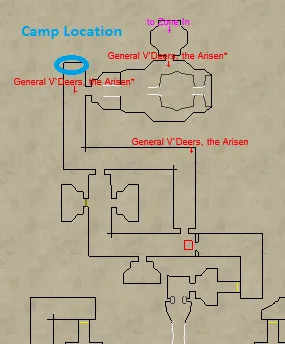
To get started, the easiest camp in this entire zone is the northern most portion of the northern wing, it's the same location that's show in my screen shot above. The hallway that's marked on my map above is actually safe location for you to pull to. There's no enemies that spawn out here and none that roam over here.
General V`Deers, the Arisen: V`Deers' Rod of the Dragoon, V`Deers' Seer's Signet + Scaled Armor Facets, Power Sources & Clawed Tablet Spell Runes
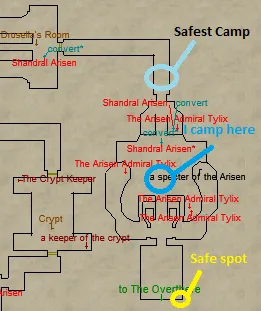
My favorite camp in Howling Stones is far to the east in the room that's just past Drusella's Room. In order to make your way over to the east side you'll either need to use levitate and travel across the broken floor in the main room or travel through the southern wing and around to the east wing. In other words - getting here can be really tough!
Typically at this camp I do not pull Drusella's Room since it has 7 mobs in it and they usually all come with one pull. I'm too lazy to pull with Pacify all day long so I generally just pull the one room that's just north of The Overthere zone out (shown on my map above).
Depending on where you want to camp with your group, you can park your butts in the room to the south next to the portal to The Overthere (recommended to reduce pulling issues). Or the alternative is to make camp in the hallway to the north which is another safe spot; but sometimes when pulling into this hallway the enemies bug out and teleport around the zone agroing more enemies.
The nameds at this location aren't easy either. Admiral Tylix has a really deadly AoE DoT that will kill your entire party if you don't heal them or dispell them. Shandral is much easier, however she has a Fear ability which could result in your parties death if the feared character agros too many additional mobs.
The Arisen Admiral Tylix: Lhranc's Burned Club, Runed Kylong Bauble + Scaled Armor Facets, Power Sources & Clawed Tablet Spell Runes
Shandral Arisen: Enchanted Kylong Wand, Tarnished Kylong Mantle + Scaled Armor Facets, Power Sources & Clawed Tablet Spell Runes
This camp is extremely difficult and it's not recommended for anyone boxing 6 or fewer characters. You might be wondering why I would list such a difficult camp on this page, it's because it's one of the only camps I have found in RoS with two nameds so jam packed into one area. During the Fall Fun where they do Double Spawns I typically can get 100+ named kills a day which results in so many RoS Spell Runes and Power Sources I don't even know what to do with them all. That's the reason I like this camp, high risk, high reward.
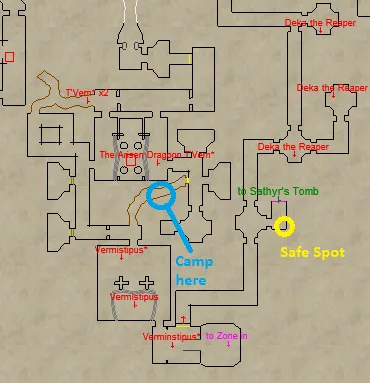
The south wing of Howling Stones is one of the best camps in the zone for boxers who're boxing more than 6 characters. If you're looking for a place where you can pull a crap ton of mobs from one location, the blue circle on my map above is fantastic. This puts you basically in the middle of the south wing and only one or two roamers come through here.
From this location you're able to pull every single room and every single named spawn in the south wing. I absolutely loved this camp for leveling up my characters which is why I am putting it into this guide. Funny enough, I originally found this camp during Kunark while I was camping Drusella on Lockjaw. Turns out it was just as good in the Ring of Scale remake ;).
If you aren't a big time boxer, the camp better suited for weaker/smaller groups is marked with the yellow circle on my map above. This location is a safe spot, no enemies will roam or agro you if you tuck away in the corner and the zone line to Sathyr's Tomb, if you get into trouble, is right there.
Warning: All of the invisible walls in this version of Howling Stones are one way. When you enter the south wing, you can't go back the way you can and the same goes for the other secret walls as you start to clear your way through the south wing. Keep this in mind when you're clearing and your puller is pulling!
The Arisen Dragoon T`Vem: Kylong Stud, Venril Sathir Charm + Scaled Armor Facets, Power Sources & Clawed Tablet Spell Runes
Vermistipus: Imbued Kylong Signet, Vile Spear of Krissuz + Scaled Armor Facets, Power Sources & Clawed Tablet Spell Runes
Deka the Reaper: Miniature Reaper's Scythe (Pet Earring), Reaper's Ring + Scaled Armor Facets, Power Sources & Clawed Tablet Spell Runes
Additional Information
Pickzone Threshold: 20
- If you're looking for the Howling Stones (Charasis) Kunark Guide follow that link to get over there instead.
- You can reach Howling Stones by going into the tomb that's located in a ditch in The Overthere (Ring of Scale). For more information head over to my how to reach Howling Stones Guide.
- There are a total of four collectible sets that you can find in this zone. For more information about the Howling Stones Collectibles follow the link provided.
- The named enemies in this zone have a chance to drop Power Sources of a few different types. These items are Cliff Stone, Magma Stone, Scorpikis Worry Stone and Enchanted Dragon Scale.
- There are rare items unique to Empires of Kunark and Ring of Scale zones called chase items. For an Advloot list of all these chase items that you can use on your own characters head over to my EoK Advloot Chase Item List page and copy and paste it into your own LF_AN file. More info about how to do that is found on this page.
Howling Stones Allakhazam Zone Information
Howling Stones Eqresource Zone Information