
Kor-Sha Laboratory - EoK Leveling Guide
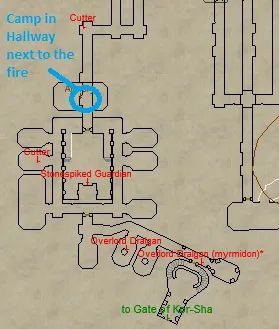
Kor-Sha Laboratory, a Tier 2 EoK zone has two extremely good camps which I believe are worth mentioning and sharing with all of you. We're going to start with the first camp and my favorite one in the entire zone (and arguably favorite camp in all of Tier 2 EoK) which is in the southwestern portion of Kor-Sha Laboratory nearby one of the two entrances. This is the same location shown in the screen shot above.
I like to make camp in the hallway that's just to the north of the large room - no enemies patrol into this hallway so you can take AFK breaks here/log off here without ever worrying about getting yourself killed. A little bit north of where I camp up the ramp you'll find one of Cutter's spawn points. This is one of the two or three named enemies that you can pull from this location.
The other easy to pull named is the Stonespiked Guardian which is at the opposite end of the large room from where I recommend you make camp. You can pull both Cutter and the Stonespike Guardian from this camp location with out struggling one bit! Now, big boxers or really well geared groups will be able to pull a third named from either a bit further south or a bit further north, Overlord Dralgan.
Overlord Dralgan will take a lot of trash clearing but it's definitely doable for people boxing 12 + characters. I did the camp with all three nameds while boxing 12 chars in TBM group gear. It's safe to assume if you have better gear you'll do much better here.
Cutter: Burnt Scale Ring, + Amorphous Selrach's Armor
Stonespiked Guardian: Stone of Dragon Tolls (Aug), + Amorphous Selrach's Armor
Overlord Dralgan: Orb of Tormented Rage (Aug), Spear of Vindictive Judgement, + Amorphous Selrach's Armor
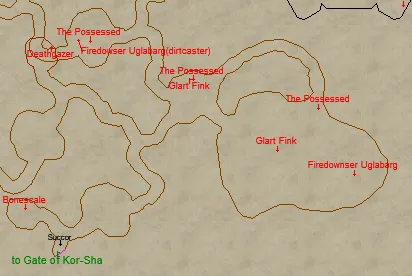
The map above shows you the other location that is very commonly grouped/farmed by people in Kor-Sha Laboratory. In the huge room on the far right hand side you'll have three different nameds to pull as well as a few different trash mobs. Depending on what you're after when you come to this zones determines which of the two camps you should pick.
If you just want named enemies, this camp is the best. You won't be fighting many other trash mobs, unlike the location mentioned on the other side of the zone where there's tons of trash mobs for you to fight.
Glart Fink: Unleashed Vengeance Staff, + Amorphous Selrach's Armor
Firedowser Uglabarg: Deep Mine Bulwark (Aug), Driven Dragon Belt + Amorphous Selrach's Armor
The Possessed: Dreams of Goodwill Bangle, Veil of Freedom Ring + Amorphous Selrach's Armor
Additional Information
Pickzone Threshold: 20
- You can reach Kor-Sha Laboratory by taking the Guild Hall to Lceanium or The Overthere and then running through a few zones to get there. For more information on reaching this zone check out my How to get to Kor-Sha Laboratory Guide.
- There are three sets of collectibles that you can find in this zone belonging to the Sathir's Court Achievement.
- Praetor Gilfol in Gates of Kor-Sha zone gives you two quests, Mysteries of Kor-Sha and Infiltration of Kor-Sha. Both of these are Heroic Adventures that take place in Kor-Sha Laboratory. In addition to giving you Sathir Trade Gems, both of these Heroic Adventures share a unique set of Collectibles that are worth quite a bit depending on your server.
- There are rare items unique to Empires of Kunark and Ring of Scale zones called chase items. For an Advloot list of all these chase items that you can use on your own characters head over to my EoK Advloot Chase Item List page and copy and paste it into your own LF_AN file. More info about how to do that is found on this page.
Kor-Sha Laboratory Allakhazam Zone Information
Kor-Sha Laboratory EQresource Zone Information