
Dreadspire Keep - Depths of Darkhollow Leveling Guide
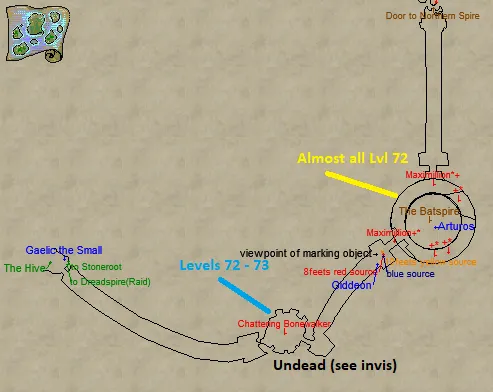
Dreadspire Keep is the hardest zone added in the Depths of Darkhollow expansion pack, the mobs here will all hit really hard and you shouldn't expect them to come in single pulls either. The only place in the zone you can almost guaranteed get single pulls every time is in "The Batspire" marked on the map above, where the yellow line is.
Getting to The Batspire can pose a bit of an issue though since you'll need to run by some Undead enemies (which see invis).
Chattering Bonewalker: Calcified Heart of the Bonewalker (Aug), Hammer of the Bonewalker + Glowing Shadowspine Rune
Maximillion: Court Assassin's Blade, Maximillion's Ire (Aug) + Glowing Shadowspine Rune
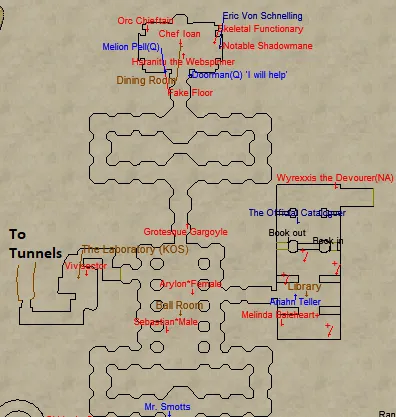
The above map is the first floor in the castle portion of Dreadspire Keep, with the exception of the tower to the west. Shown in the picture above there's multiple different camps throughout the castle's first floor, you have the Ball Room, The Library, The Laboratory and The Dining Room.
Ball Room Nameds
Sebastian: Elddarwood Daire (Bard Drum), Elegant Platinum-Plated Wristguard, Pouch of Curses, Shard of True Power (Aug) + Glowing Shadowspine Rune
Arylon: Decorative Gold-Woven Wristguard, Stole of Dominion + Glowing Shadowspine Rune
Grotesque Gargoyle: Bloodsoaked Stone (Aug), Flesh-Woven Wrist Wrap + Glowing Shadowspine Rune
Grumblebum (Multiple Spawn Locs): Pouch of Curses, Dainty Silken Wristlet, Shiny Sapphire (Aug) + Glowing Shadowspine Rune
Laboratory Nameds
Vivisector: Vivisectionist's Mask, Vivisector's Choker
Library Nameds
Melinda Baleheart: Deathspike, Shadowguard Belt
Wyrexxis the Devourer: Lifebinder, Shaded Band
Dining Room Nameds
Chef Ioan: Ioan's Hunting Bow, Ioan's Special Ingredient (Aug)
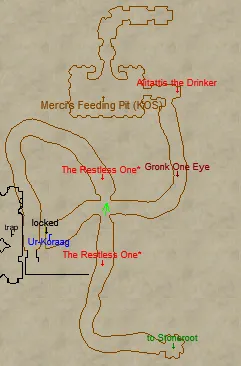
If you fall down the false floor in the Dining Room, you'll find yourself in the tunnel system shown above. Unlike the floors above it, the tunnel is jam packed with enemies that will see through your invis and attack you from quite a distance aways. All in all, not the best camp locations down here.
The Restless One: Tome of Dark Wandering, Wanderer's Durability (Aug)
Aliattis the Drinker: Bleachbone Necklace, Stone of Aliattis
This part of Dreadspire Keep is the most popular location to camp since you'll find the Shadow Student in these parts. This named drops an augmentation with 25 AC on it, something that tanks & other classes will want for many expansion packs to come. What's great about this aug too is you can pick up more than 1 of them and it fits into more than just 1 slot!
In order to get the Shadowy Student to spawn, you'll want to defeat all the werewolf enemies that you come across in the area, they're the placeholder for this named.
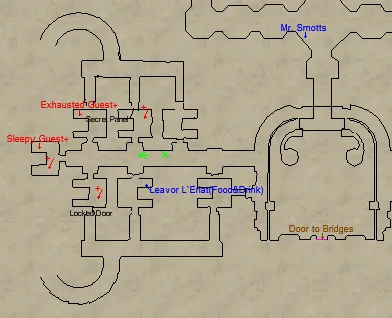
First Floor of Tower Nameds
Sleepy Guest: Emblem of the Violet Order (Aug), Wand of the Violet Order
Exhausted Guest: Pouch of Curses, Azure Drop (Aug), Shield of the Legion
Keleborn Redweave: Shard of True Power (Aug)
Shadowy Student: Shard of True Power (Aug), Gilded Band of the Mystic, Shard of the Guardian (Aug)
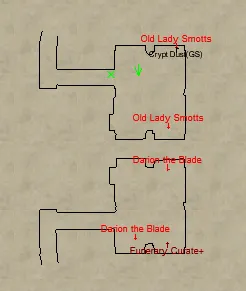
Basement Tower Nameds
Old Lady Smotts: Lady Smotts's Death Shroud, Shadow Slayer's Axe
Darion the Blade: Pouch of Curses, Armsman's Fighting Cape, Shield of the Beast
Additional Information
- Reaching Dreadspire Keep is no easy task. The way here is by taking the Guild Hall portal to Undershore, traveling to Stoneroot Falls, to the Hive & then to Dreadspire Keep. You'll need Levitate to get here, or at least the only way I know how to get here requires Levitate. For more information on How to get to Dreadspire Keep, follow the link provided to be taken to my guide.
Dreadspire Keep Allakhazam Zone Information