Castle Rulnavis Named Strategies

Castle Rulnavis is (in my opinion) the easier of the two towers, in terms of both the named enemies as well as the regular enemies found throughout. In order to gain access to this tower you will first need to defeat The Judicator and obtain the Warlord's Blessing. For more information on how to flag yourself for tower access head over to my Plane of War Guide (Field of Strife) page.
The Barb: The Barb, Curio of Battle, Rune of Tallon
Kijarl, Arcanist of Rulnavis: Kijarl's Ring of Negation, Lifeborn Wand of Light, Warmonger's Circlet
Commander Gannar Dolm: Bloodstained Stud, Signet of Gannar, Soulreaper
The Barb Strategy
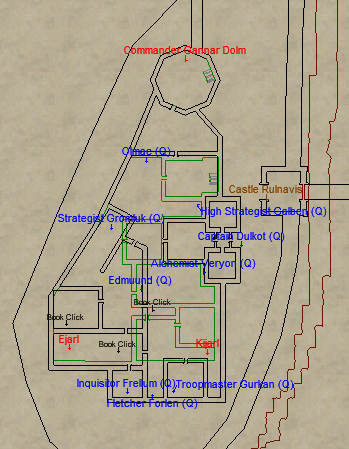
This is arguably the most annoying named in this castle. Not because he is difficult but because he has a chance of permanently locking HP and you having to wipe or evac to reset him. For this reason, I strongly recommend you put a campfire nearby so you can come back to this boss easily should this happen. Inquisitor Fellum's room right next to The Barb's (you can see it on the map above) is a 100% safe location.
As for the named himself, The Barb is actually pretty easy. He has an extremely annoying pull & push back ability - so you'll have to clear a majority of the room when you fight him and his HP periodically locks throughout the fight. There is supposed to be a way to unlock it but I nor has anyone else ever figured out how. Oh and trust me, I have tried damn near everything.
These are the only two unique abilities that this boss has. My strategy is to basically just run in there, agro him and DPS him down as quickly as possible so that his HP only locks once or twice during the fight. This helps me avoid the times when his HP locks forever and I have to reset the fight.
Note: Adds in The Barb's room will not respawn during the fight.
Kijarl, Arcanist of Rulnavis Strategy
This named is a tough one if you have Wizards, Mages or Necromancesr as your DPS. I'd recommend you do not use any fire spells throughout this entire fight since using a fire spell on Kijarl when he is brown will guaranteed result in a wipe. You can use fire spells on him while he is Blue or Green but it is recommended you just take the safe route and don't use them at all. People say that fire procs in weapons count too but I am not sure if they do.
In Kijarl's other two forms, blue and green he is pretty manageable. Green uses Blistering Skin DoT which hits you and your party for 27k damage a tick (2 ticks) and while he is Blue, he's just highly resistant to all spells. Throughout the fight he rotates between these 3 colors. The last thing Kijarl does, is during the fight you will see an emote, "Kijarl begins to absorb all damage" which, once Kijarl is done, he'll heal himself for some of the absorbed damage. His ability is a complete heal so it'll take 10 seconds in total for him to cast - if he is close to dead you can just ignore the emote.
Here is a breakdown of his three forms for easier reading:
Blue: High resists
Green: Uses Blistering Skin DoT that hits for 27k. It's unresistable so you'll need to heal your group through it
Brown: If you use any fire spells on Kijarl during this color he will use Infernal Blast on a member of your party hitting them for about 80k as well as everyone near them. Obviously, do not use any fire spells on him or you'll likely wipe your entire group.
Commander Gannar Dolm Strategy
I am unfamiliar with this named, I will probably do him this year though (2019) as I would like to have one of the only guides available on him.
