
Durlag's Tower Walkthrough - Baldur's Gate 1
Durlag's Tower is the biggest dungeon in Baldur's Gate 1 and was added into the game as part of the Tales of the Sword Coast Expansion Pack. This is a higher level dungeon and you will want to be at least level 5 with all of your characters before attempting it. You can reach Durlag's Tower one of 2 ways; you can travel to Ulgoth's Beard in the far northeastern portion of the map and speak with Ike in that town and agree to the Durlag's Tower tour. This will mark the location on your map and allow you to travel here.
Alternatively you can find Durlag's Tower on your own by exiting north out of the Carnival map or by exiting south out of the Firewine Bridge map. Durlag's Tower has a total of 4 upper levels and 4 lower levels all of which have unique enemies and loot to be found. The 4 upper levels are the easier and more linear parts of this dungeon, I recommend you start there if it's your first time here.
Continue to Durlag's Tower Upper Floors Walkthrough
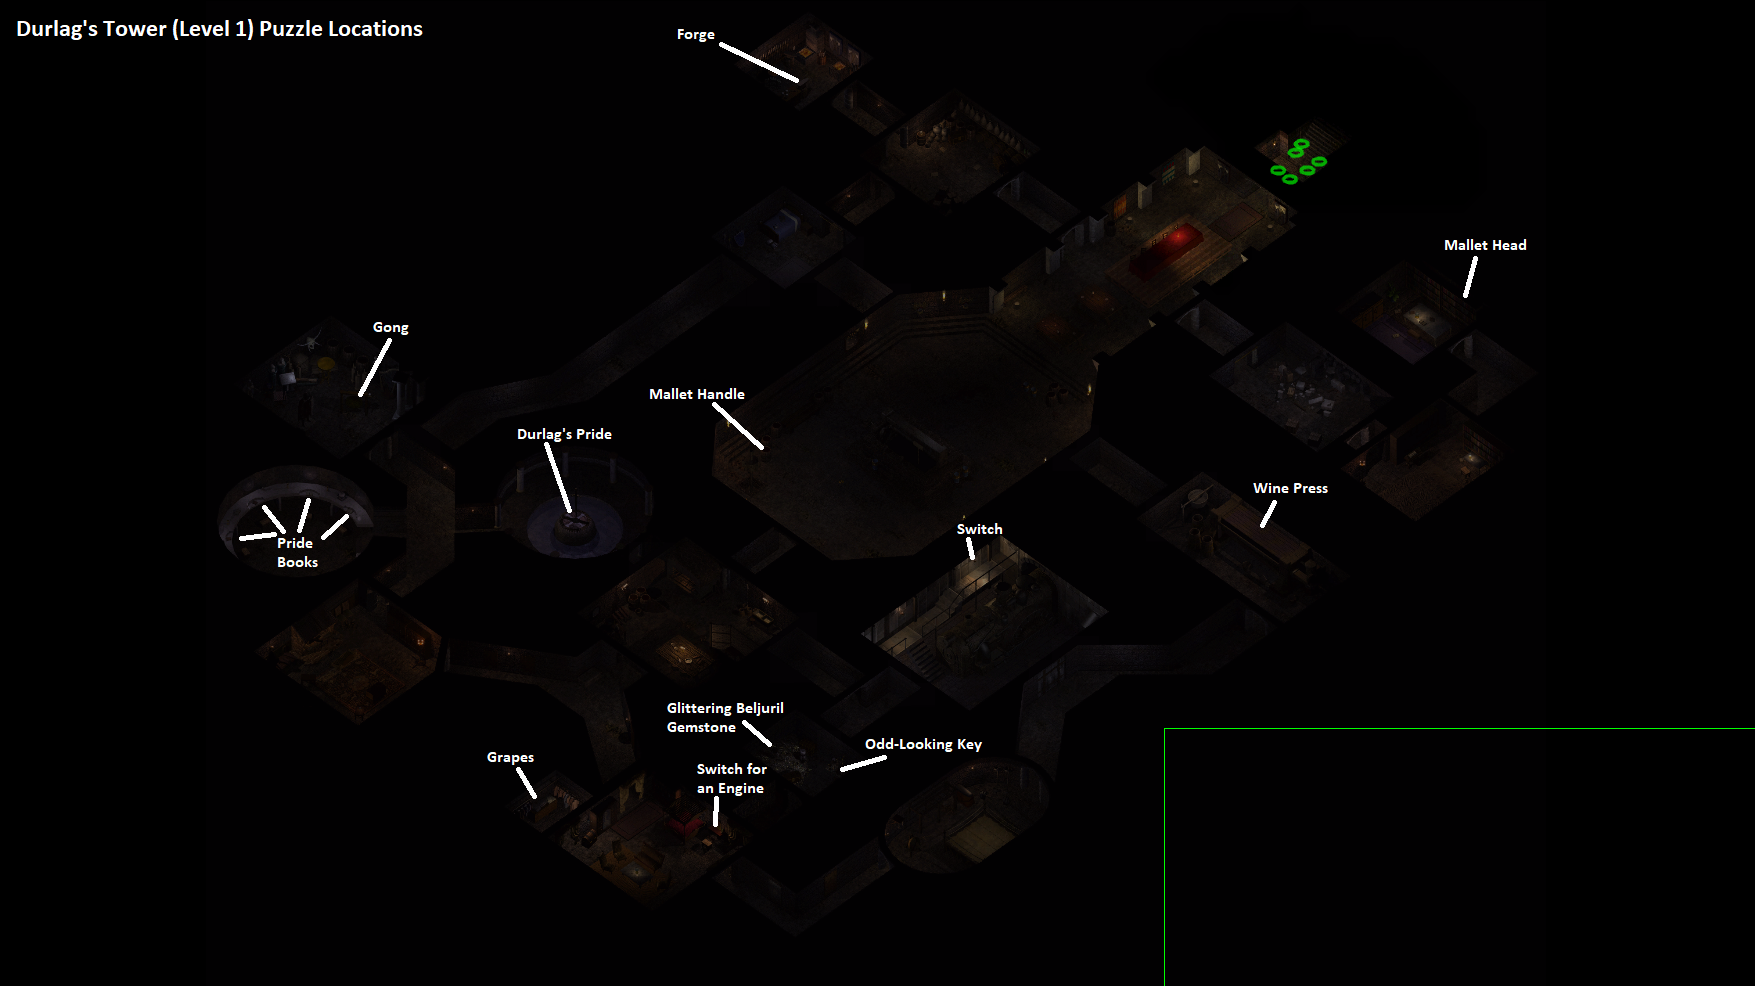
Durlag's Tower Level 1:
Avarice: Give him the Glittering Beljuril Gemstone from the treasure room
Fear: Reconstruct the mallet and use it on the gong. You can find the Mallet Handle inside a barrel in the life chamber room and a Mallet Head in the second library room. Click on the anvil in the northern forge room to recreate the mallet. The Gong is in the northwestern storage room, click that like the anvil and you'll ring it. To watch a video of me doing this entire puzzle check out my Durlag's Tower Level 1 Fear Warder Puzzle Solution.
Love: Collect the Odd Looking Key from the Treasure Room and then enter the Master Bedroom and collect the Switch For An Engine from the desk. While you're in the Master Bedroom grab the Grapes from the closet and then head to the Engine Room. Press the Switch above the train-looking engine twice to turn on the power then go inside of the Brewery and click on the Wine Press 2 times to turn the Grapes into Wine. To see a video of me completing this puzzle check out my Durlag's Tower Level 1 Love Warder Puzzle Solution (Youtube Video).
Pride: In the room that's west of the floating sword you'll want to click on all 4 of the books that have an "?" when you mouse over them. Then enter the room with Durlag's Sword and it will speak to you.
Durlag's Tower Level 1 All Warder Puzzles Walkthrough (Youtube Video)
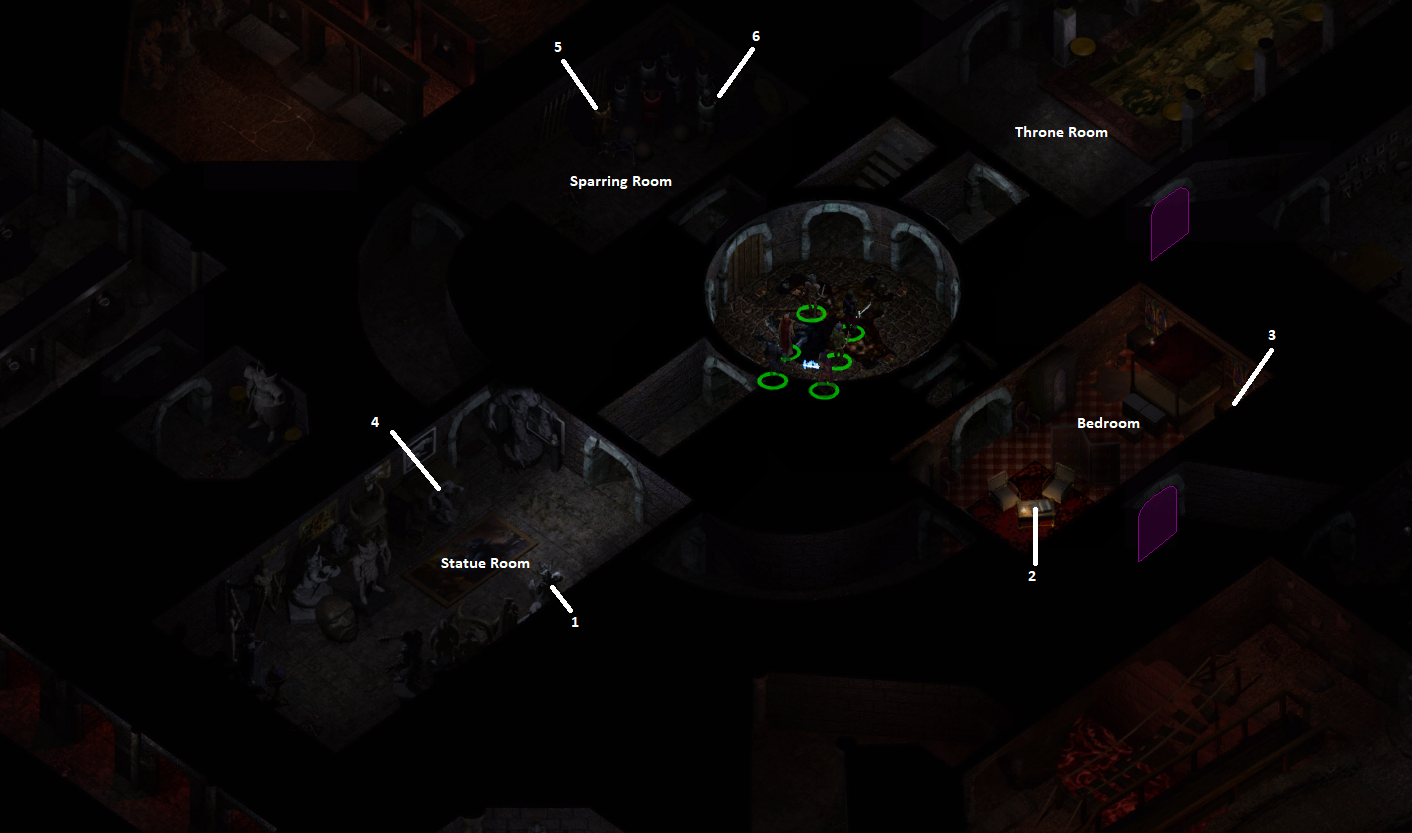
Durlag's Tower Level 2:
1. Activate the southern statue in the Statue Room
2. Collect the Wardstone from the Bedroom Table (triggers Durlag ghost)
3. Collect the Wardstone from the Bedroom Endtable (next to bed)
4. Activate the northern statue in the Statue Room
5. Attack the yellow Sparring Dummy in the Training Room (triggers Durlag ghost)
6. Attack the silver Sparring Dummy to open the door to the Throne Room
Durlag's Tower Level 2 ALL Puzzle Solutions Youtube Video
Durlag's Tower Level 2 Door Puzzle Solutions Youtube Video
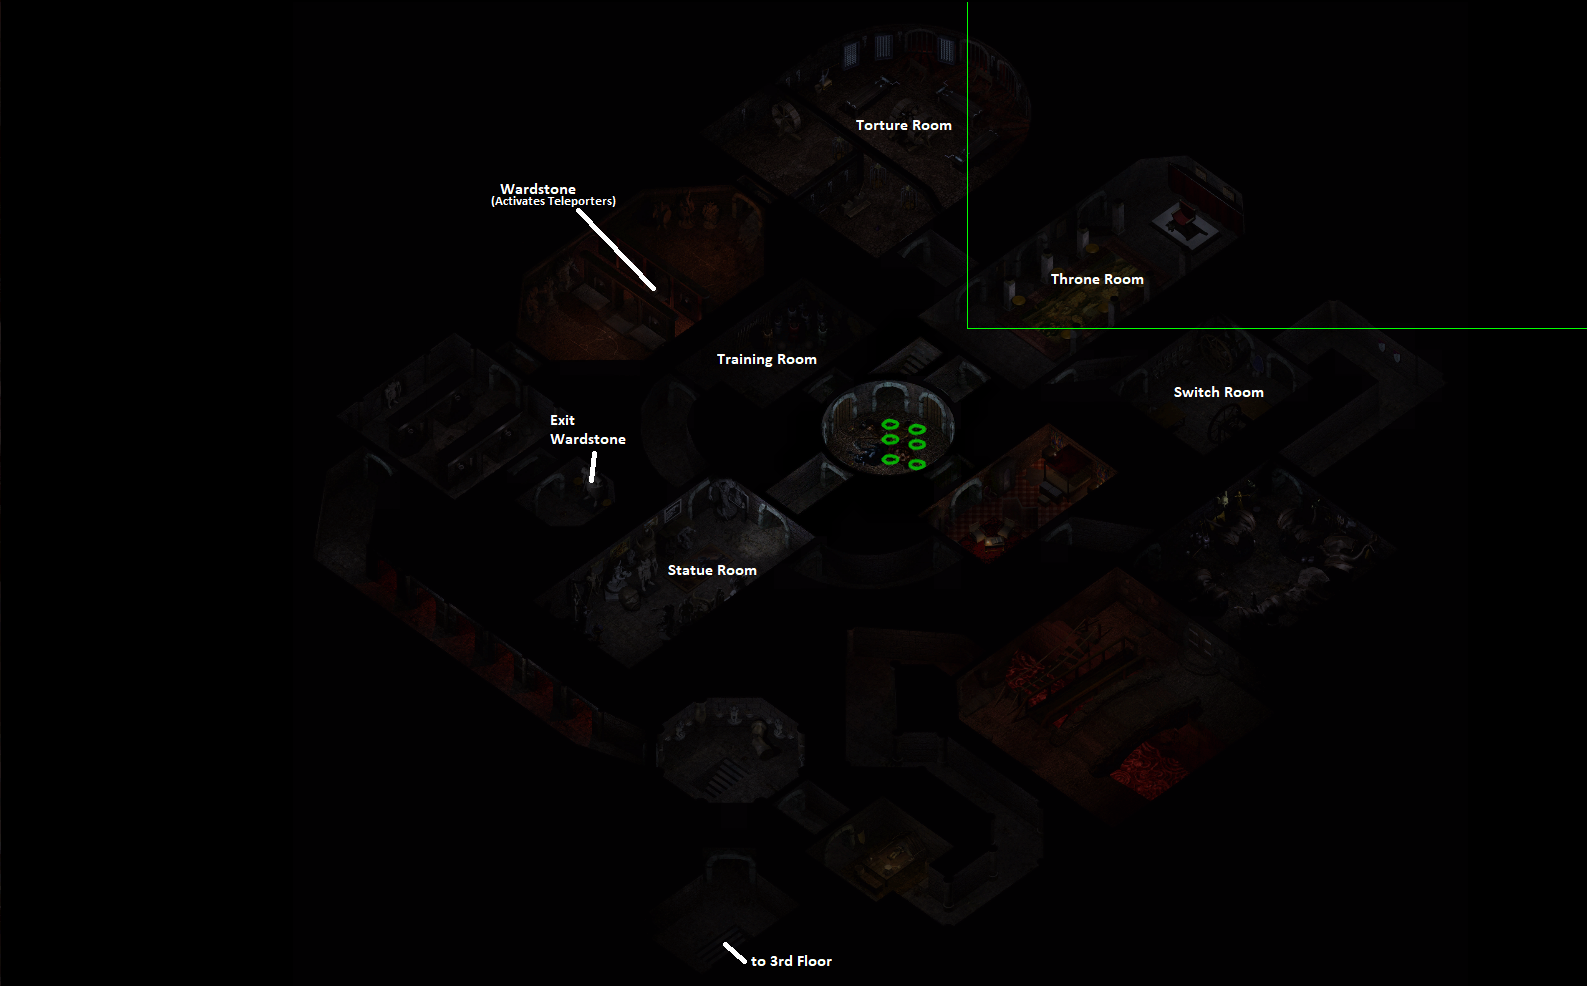
Once you have completed the doors puzzle and enter the Throne Room you'll want to pick up the blue helmet in front of the throne to proceed. This will trigger Durlag's ghost to talk to you a few times before calling in friends and transforming into a Greater Doppleganger. Head north through the Torture Room and into the Teleportation Room. You'll find a little pot in this room with a Wardstone inside of it, loot it and you will activate the teleporter.
The next room that you come across I guess you can call an Altar Room. In the southern portion of this room you'll find a secret door which leads you to another Altar Room of sorts; loot the statue in this room to find another Wardstone. This Wardstone is the item required for you to move down to level 3. Use my map below for a better explanation of where this Wardstone is.
Everything that is left on this floor is optional content but I recommend you do it anyway.
Durlag's Tower Level 3:
For the most part this floor is going to be a test of your combat abilities. When you first arrive you will be outside of a room that pulses with an AoE Fire Nova that will instantly kill you if you let it touch you, unless you're on Story Mode. You will have 3 paths available to you all of which lead to the same destination, I have broken down all 3 possible routes below and what you'll encounter in each area.
Durlag's Tower Level 3 Youtube Video (All Paths including Chessboard)
North (Wyverns): In my opinion this is the easiest route of the 3; here you'll encounter Greater Wyverns in this room which will hit harder than probably any enemy you've faced before. Thankfully when you first enter this room you'll find numerous statues which you can right click on and activate to summon NPCs to fight alongside you. All of these NPCs are very strong and you can pretty much exclusively use them to take out all the Wyverns in this room. The catch is that all of these NPCs will turn hostile to you in a couple of minutes so you best be quick after activating them!
Middle (Skeletons): This route is filled with Skeletons and Gas Bomb traps that will knock your characters onto the ground and leave them vulnerable to attacks. Each of the platforms is trapped with a bomb, it's designed so that anyone who rushes right in and attacks will likely end up dead. I'd recommend pulling the skeletons out of this room and into the northern most room to fight them safely.
South (Rogues): Ashirukuru are the most deadly enemies in this portion of level 3. They are Rogues that will be invisible until the moment they attack you with a backstab! Backstabs can hit you for 50+ damage if you're a squishy Wizard so it's recommended you use one of your tanky characters to bait out these rogues and attack them once they become visible.
Once you've made it to the southwestern end of the map you'll find 4 hallways all of which have different colored ambient lighting. Starting from the southern most one and working up they are Fire, Air, Earth and Ice. Each of these rooms has unique enemies in them that you'll have to defeat in order to proceed to the next part of Durlag's Tower. In my opinion the only 2 difficult rooms are Fire and Earth.
In the Fire room you'll have to defeat 2 Phoenix Guards who will explode and deal AoE damage on death. Earth has a Fission Slime enemy that will keep splitting upon death unless you deal fire damage to it. Having a Wizard in your group with Fireball or having a character use Wand of Fire is highly recommended.
After you've taken out all 4 rooms you will be teleported to the Chessboard which is the final area of floor 3 and also the hardest. You will get an explanation about how the Chessboard works when you first enter and I recommend you read it thoroughly as being careless for this part can easily get you killed (if not on Story Mode).
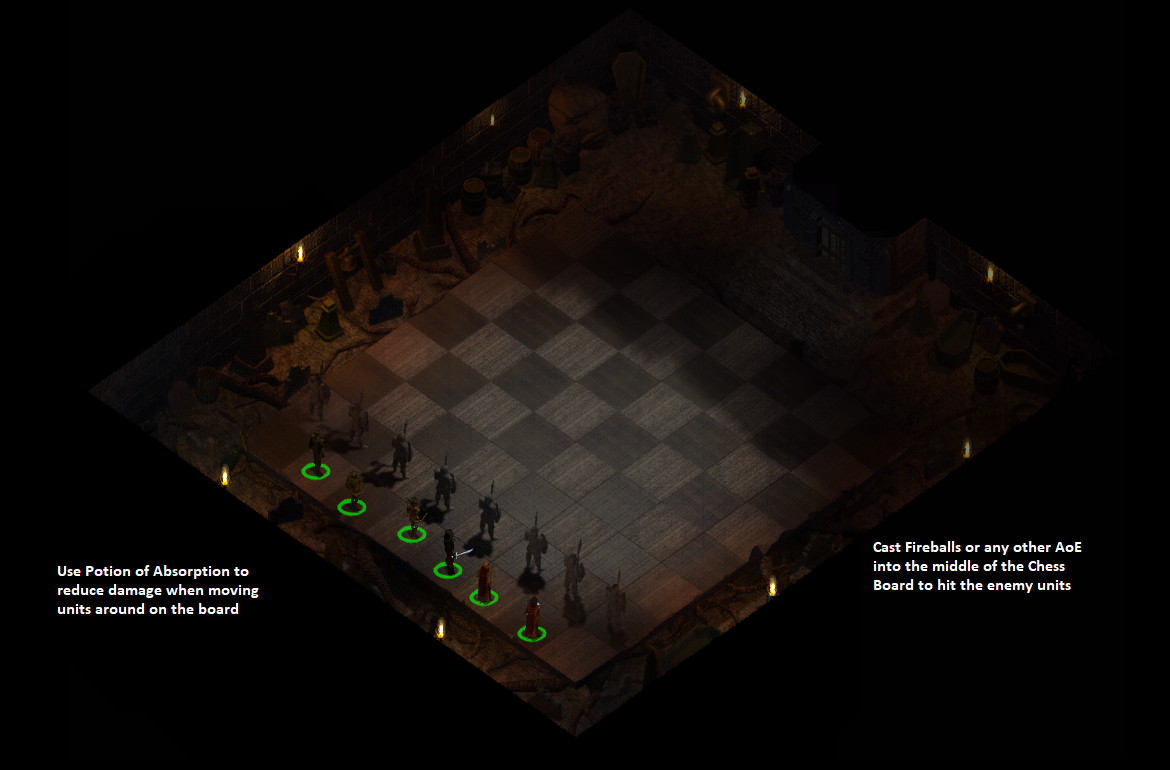
Durlag's Tower Chessboard Strategy Youtube Video
My strategy for the Chessboard event makes the whole thing trivial but it will only work if you have a Wizard in your party or someone who can use a Wand of Fire. What I like to do is target the far end of the Chessboard with the Fireball spell and use it repeatedly until I defeat most of the enemy units. You won't be able to see the enemy units but you'll see the experience each time one is defeated. Any AoE spell would work in this situation but I find Fireball works best.
The enemies will not agro you until you step into range so you're free to blast away at them as many times as you want. Alternatively, use gear with Electrical Resistances and/or Potions with Electric Resistance like Potion of Absorption since that will protect you against the Lightning Bolts that.
Durlag's Tower Level 4:
This is the final floor of Durlag's Tower and also the most difficult. Our overarching goal on this floor is to find and complete the 3 'compass room' riddles. Compass Room refers to the small square room that you get teleported to when you start one of these riddles. When you successfully complete all 3 riddles you will open the door to the Throne Room which is the final area before the Demon Knight boss.
As you can probably guess, this floor is filled with excellent loot. Many of the items you can find in this dungeon are best in slot and I feel the need to point out where to find the best items on this floor along with how to beat it. Below you'll find 2 different sections of information, the first part tells you all of the important items and a little bit about each room. The second part tells you how to solve the compass puzzles and complete the dungeon.
Every location that I talk about is marked on my map which you can find below.
Throne Room: Cloak of the Shield
Tomb: Bracers of Defense AC 8, Necklace of Missiles, Arla's Dragonbane +3 (Sling +3), Karajah's Life and Death +3 (Leather Armor +3), Krotan's Skullcrusher (Mace +2), Pellan's Shield (Large Shield +2)
Treasure Chamber: 14K Gold, Gems and a Compass Room
Forge: Inside this room you'll find some magical items as well as a Bone Wardstone which can be used to turn off the rune traps in the tomb.
Chest: Flame Tongue +1 and Staff of Striking +3
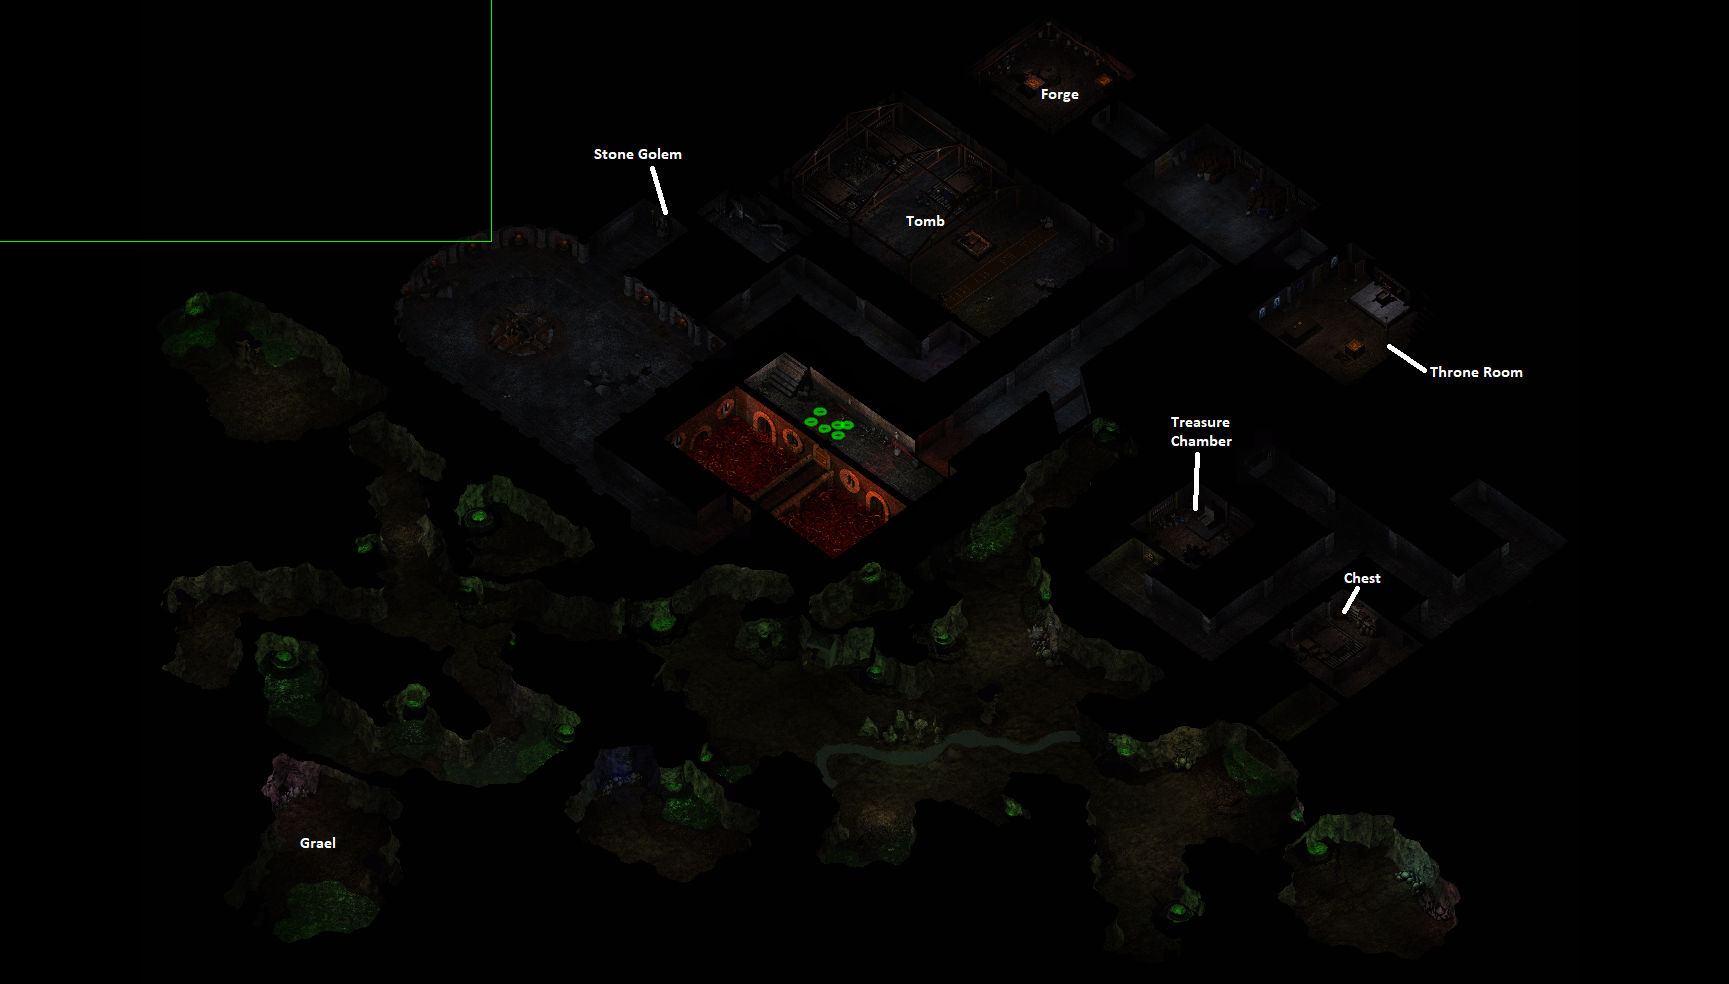
Stone Golem Compass Room: In the north-central portion of this map you'll find a Stone Golem that you can interact with. He will ask you a couple of questions, answering them all correctly will teleport you to the Compass Room where you'll have to answer another question. The first question the Stone Golem asks you can vary, all 3 answers are below.
(1) Who is the mother of the clan? Islanne
(1) Who is the eldest son of Durlag? Kiel
(1) Who is the youngest son of Durlag?
Fuernebol
(2) What is the second name of Durlag? Trollkiller
(3) What is the second name of Durlag's father Bolhur? Thunderaxe
The answer to the riddle in this Compass Room is #3, From the west it came, and then the south. The east held it next, and now it rests in the north. If you're wondering why this is the answer, the pain originated from the Dopplegangers which came from the west. Dopplegangers killed the families (south) and it took root in the (east) before residing in Durlag (north).
Treasure Chamber Compass Room: In order to reach the Treasure Room you will need to first defeat Grael in the southwestern most room on the map and loot the Compass Wardstone from him. He's the ghoul that you talk to in the acidic slimey area, marked Grael on my map above. Once you have the Compass Wardstone you'll be able to get inside the treasure chamber and click on the old throne which will teleport you to the next Compass Room.
Answer: #3 The blame begins with the invaders, but they attacked with supposed good reason... Eventually this paragraph ends with, "you are the one to blame for all that happened" which is the truth of the matter, it's Durlag's fault for what happened.
Tomb Compass Room: Inside the room marked 'Tomb' on my map above you'll find our final Compass Room. To access this room what you need to do is click on one of the 3 'tombs' that is inside the room; if you're having trouble figuring out which tomb to click on mouse over each of them. When you mouse over the correct one your mouse icon will change to the same icon you see (the 3 stars with the crescent moon) when you go to cast a spell.
Answer: #1 Here is a quote of the correct answer: "It began with you and your need for a home. It grew with your clan, as you feared losing them. It manifested in the invaders that came, but you feared their coming already. It became your home, where it keeps you safe."
Once you have completed all 3 Compass Rooms return to Durlag's ghost in the central portion of the map and speak with him to proceed. Durlag's ghost will lead you to the northeast where you'll find a secret path has opened leading you into the true Throne Room. Inside here you'll meet Clair De'Lain who will warn you about the Demon Knight in the adjacent room.

The Demon Knight is the final boss of Durlag's Tower and he can be a pretty tough fight depending on the difficulty you're playing on. Next to the Demon Knight there's a Mirror of Opposition which you can attack/destroy and it will summon several additional enemies to the fight. These enemies will attack both you and the Demon Knight so be careful with your decision.
Demon Knight Loot: Helmet of Opposite Alignment, Large Shield +1 and Soultaker Dagger
After taking out the Demon Knight be sure to loot the Soultaker Dagger as we'll need it for a quest in Ulgoth's Beard and speak with Dalton inside this room to complete the Therella's Missing Son Side Quest. That's all there is to Durlag's Tower! At this point you should return to Ulgoth's Beard as there are some changes that have taken place in town.
Return to Durlag's Tower Upper Floors Guide
Return to Tales of the Sword Coast Walkthrough
Return to Baldur's Gate 1 Walkthroughs Index