Kaesora Library Raid Swarming Guide
Before you read any of this guide know that you wont be able to just jump right in and do Kaesora Library raid. You'll first need to complete a bunch of tasks from Jaled'Dar and every time you want to swarm this instance you will need a minimum of 6 people in your group to even accept the task (they can all be offline if you want to do it solo, or have a few offline, a few online, it doesn't matter. You just need 6).
Kaesora Library Raid (KL Raid) works almost the same exact way that normal KL does. That is of course if you're swarming normal Kaesora Library in the same location. The only main difference you'll notice about KL raid is that there are absolutely no mobs on your way to the swarm location and you can safely leave the people you're PLing (if there are any) at the 'camp spot' before the pit.
KL Raid is a bit annoying to swarm because of all the running around you'll have to do while swarming here. To start you'll need to run out to the field (right outside the Kaesora gates) and hail Jaled'dar to accept the task "Raid Expedition: A Council Divided". Once you accept that task you need to return to the Kaesora Library zone in and click on the door to enter the instanced version of Kaesora Library. Once inside you will run down, making a left at the split to the pit area that you normally swarm in KL.
In this area there are the same amount of mobs uptop as there normally are, there are raid bosses in the middle (they won't agro you so don't worry at all about them) and there are absolutely no mobs down below in the area under the pit. You'll learn how to pull this pit perfectly (if you don't know already) and probably already have a comfortable 'end' area to your route if you swarmed normal KL. What I like to do is start by running left, I run around the ring until I reach the far end then I jump onto the level right below me, coming back up on the ramp about 25 feet in front of me on the opposite end that I started.
What this does is allow mobs to follow me down, then follow me back up which will agro more. Once I come up the ramp I agro all the mobs on the 'buldge' area, and jump across, falling down once I agro those mobs and running across to the side I started on, but on the 'bottom' part. (Note: when I say bottom I don't mean the bottom of the pit, I mean the level right below the top. You should NEVER go to the bottom of the pit where the raid NPCs are unless you use a corner down there to back yourself into, but I do not).
Once I get back to the side I started on I quickly look and see if any of the mobs agro'd on the bottom part back when I jumped down, if they did not I DoT the one furthest away with a weak DoT and then run up the far ramp and back to where my group is/where I first entered the pit area from. I then plant myself firmly in the pillar to the right of where you first ran out and went left, on the far side from where I ran out.
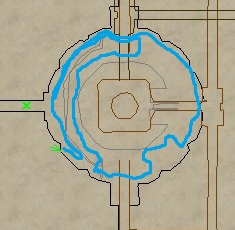
This will be ungodly hard to follow without a map or a video of some kind, here is a map of exactly the route I take, but I won't be able to provide a video (at all) or maybe for sometime.

As you can see, the green arrow is me and that's the corner I stop in. Note, if you're a large race (troll, ogre) you'll have to shrink. I am a Dark Elf so I don't have that problem when I swarm here. Though, you MUST BLOCK ILLUSION FOR VISAGE OF DEATH. If you don't you'll duck yourself then die almost immediately after when you use it. Blocking the illusion won't have any other negative effects on your character so do not worry about it. Aside from that, popping your cooldowns right will maximize the amount of runs you'll get in for each potion in KL Raid.
Also, learning the best time to use /kickp exp (removes everyone from your current expedition, it's the only way to zone out of here and it takes a minute after you enter the command to go into effect. I usually use it 10 seconds into a visage of death pull, otherwise you gotta learn how fast you kill stuff).
Here is what I like to do:
Use Visage of Death and only Visage of Death on a pull. Don't waste any other cooldowns because this is by far the only one you'll need when it is up. On the pull after I use Second Spire and Scarlet Blade. Whenever both Visage of Death and Scarlet Blade are down I use Second Spire and just Second Spire.
In Closing: Please know you will absolutely need your epic 2.0 in order to swarm here effectively. You can do it without but you'll get 3 maybe 4 runs per pot in instead of 5 or 6. It just doesn't compare.
