
Trial of the Crusader 25man Instance Guide (WoTLK)
Trial of the Crusader is the 10/25man instance located in the Argent Tournament Grounds of Icecrown. This instance is home to 6 different boss encounters. It is also the first instance to use the new "No Trash Mobs" rule. Players must have at least 3/4 Ulduar gear or equivalent gear to even stand a chance in this raid instance.
The Northrend Beasts
The first encounter you will need to face is The Northrend Beasts. There are 3 separate bosses. The first encounter is Gormok the Impaler. The second is Two Jormungars, Acidmaw and Dreadscale. The final encounter is Icehowl.
Gormok the Impaler
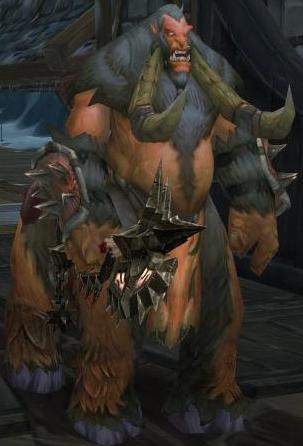
You will need to have two tanks on Gormok for this fight. He will use an ability called Impale, that will "Bleed" the tank. When the tank gets to 3-4 stacks the other tank will need to taunt it Gormok off. You can counter Impale by using any Disarm-like abilities. (Rogues and Warriors are usually chosen to disarm Gormok)
Also during the fight Gormok will summon Snobolds at players (4 on normal, 5 on heroic). As soon as the Snobolds spawn, all dps will need to take care of them *immediately*. They will latch onto a certain player and use a few different abilities on the player. You can get the snobolds off by attacking them and killing them. They have roughly 126k hp. The most notable ability they have is Fire Bomb which puts a patch of fire on the ground, dealing damage to anyone within 8 yards. Players will need to quickly move out of this.
Another important element is every time Gormok throws a Snobold his damage is increased by 15%. After you kill Gormok, shortly after Acidmaw and Dreadscale will appear.
The Two Jormungars
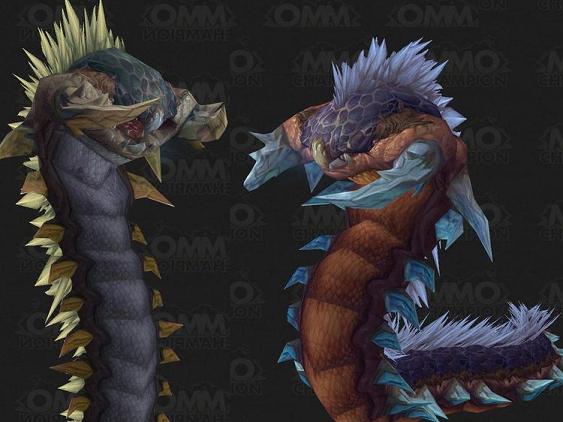
Acidmaw is the tough encounter during this fight. He has one ability, Paralytic Toxin that kills. Usually the most common strategy used here is to burn down Acidmaw and Off tank Dreadscale. To burn down Acidmaw, blow everything you got. Bloodlust, Cooldowns, everything possible. If you're unable to kill Acidmaw before he burrows, when he surfaces have the tank pick him up and finish him off.
The tank of Dreadscale will need to occasionally run through the tank and melee on Acidmaw to rid them of their toxin. Since he is the only one with Burning Bile. After Acidmaw is dead, everyone will need to spread out and heavily heal the tank. From there, just burn down Dreadscale.
Icehowl
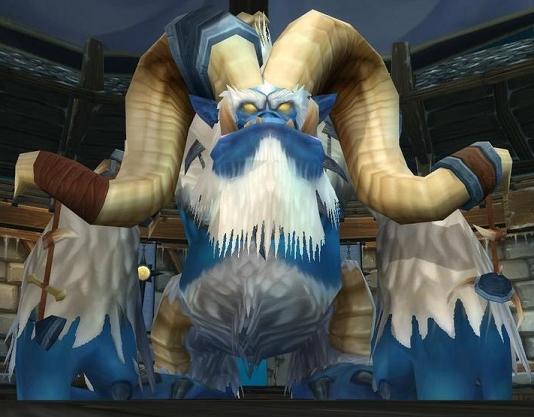
Icehowl is a "Heal the F'ing shit out of the tank" fight. Once he comes out the tank should pick him up and take him to a near by wall. Make sure his back (the tank) is to the wall and start the fight. This will make sure the tank doesn't get knocked back by whirl. Icehowl has a few hurtful abilities. The most notable is his Ferocious butt combo.
After awhile of the fight going on Icehowl will use Massive Crash, throwing everyone to the wall. When everyone is thrown to the wall Icehowl will emote that he is glaring at a random player on the raid. At this time everyone will need to run away from the location of the player Icehowl was glaring at. He will charge towards the player and use his Ferocious butt ability.
If everyone successfully moves out of the way of the Ferocious butt ability then Icehowl will slam into the wall and be stunned for 10 seconds. In addition when he is stunned he will take 100% more damage.
Loot Table:
Trophy of the Crusade
Crusader Orb
Sabatons of the Courageous
Belt of the Ice Burrower
Ring of the Violent Temperament
Cloak of the Untamed Predator
Legwraps of the Broken Beast
Leggings of the Broken Beast
Breastplate of Cruel Intent
Flowing Robes of Ascent
Drape of the Untamed Predator
Belt of Tenebrous Mist
Barb of Tarasque
Boneshatter Vambraces
Cuirass of Cruel Intent
Boneshatter Armplates
Drape of Refreshing Winds
Steel Bladebreaker
Binding of the Ice Burrower
Boots of the Harsh Winter
Shawl of the Refreshing Winds
Boots of Unrelenting Storm
Hauberk of the Towering Monstrosity
Boots of the Courageous
Flowing Vestments of Ascent
Chestplate of the Towering Monstrosity
Cord of the Tenebrous Mist
Blade of Tarasque
Stygian Bladebreaker
Band of the Violent Temperment
Crystal Plated Vanguard
Forlorn Barrier
Lord Jaraxxus
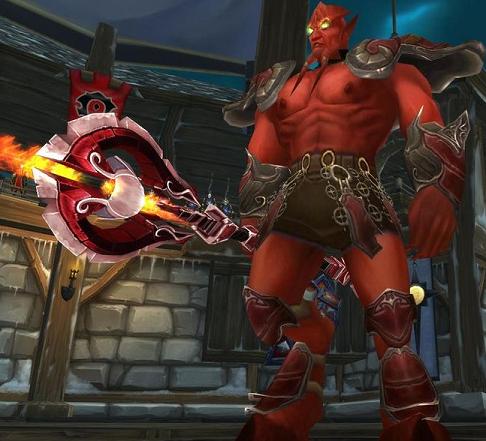
Lord Jaraxxus should be tanked in the center of the room and all DPS/Healers should spread out, much similar to the Kel'thuzad fight. The reason you'll want to spread out is because Fel Lightning and Touch of Jaraxxus will rape you if you're not spread out. Also, in order to reduce the damage the tank takes it is important to have someone interrupting Fel Fireball.
During the encounter Jaraxxus will spawn a Fel Volcano or Nether Portal. He will alternate between spawning either one of these. He will spawn one of them every 60 seconds.
Fel Volcano: The Volcano will spawn 3 Felflame Infernals which should be tanked away from Jaraxxus. The Infernals will sometimes turn into a floating orb and hover over a random raid member. They will then channel Fel Inferno which deals a shit ton of damage to that player every second and everyone around him.
After the Infernal becomes an Infernal again the tank will need to pick him up quickly before he kills anyone. When the infernals spawn ranged DPS will want to focus on killing the Infernals. However, Melee will want to focus on the boss.
Nether Portal: The Nether Portal will spawn a Mistress of Pain which must be quickly picked up, tanked and burned down as fast as possible. She will choose a random raid member, apply a Spinning Pain Spike debuff which deals 50% of their maximum HP.
Lord Jaraxxus will occasionally give himself 5 stacks of Nether Power (25man he gives himself 10) which increases magical damage dealt by 20%. Mages will want to spell steal this as quickly as possible to highly increase their DPS. If your mages suck, or you don't enough you will want to dispell this buff off Jaraxxus.
Jaraxxus will also cast Incinerate Flesh on a random raid member which will absorb healing until a certain amount of healing has been done.
10man - 30,000
10man heroic - 40,000
25man - 60,000
25man heroic - 85,000
Players will need to heal the target until the debuff is gone. If you are unable to heal the target enough for the debuff to fade it will explode and deal fire damage every second to all friendly targets.
The final note-worthy ability that Jaraxxus uses is Legion Flames. This will cause flames to appear under the target for 6 seconds. The target will suffer damage and deal damage to everyone around him. He will need to run away from anyone near by, to make sure he does not deal damage to them.
Since A lot of the damage done by Jaraxxus is Fire, Paladins or Shamans should use a Fire Resistance Aura or Totem.
Loot Table:
Trophy of the Crusade
Leggings of the Failing Light
Bloodbath Belt
Ring of the Darkmender
Dawnbreaker Greaves
Charge of the Eredar
Legguards of Feverish Dedication
Solace of the Defeated
Death's Hand Crossbow
Legplates of Failing Light
Symbol of Transgression
Charge of the Demon Lord
Bracers of the Autumn Willow
Cuirass of Calamitous Fate
Blood Fury
Pants of the Soothing Touch
Leggings of the Soothing Touch
Bracers of Cloudy Omen
Wristwraps of Cloudy Omen
Talisman of Heedless Sins
Pride of the Eredar
Legplates of Feverish Dedication
Vest of Calamitous Fate
Dawnbreaker Sabatons
Solace of the Fallen
Talonstrike
Circle of Darkmender
Pride of the Demon Lord
Lionhead Slasher
Bindings of the Autumn Willow
Bloodbath Girdle
Faction Champions
(Strategy Taken from Wowwiki)
This encounter is much like an arena match between you and 10 (6 at 10-man) quasi-player NPCs. Before even attempting this encounter, your raid will need to assume a PvP mindset. The enemies you will face in this encounter act very much like a good arena team does and some (but not all) PvP mechanics are applied to these NPCs. For example:
-- The NPC healers will switch to spam healing your DPS target(s) and should be Crowd Controlled when possible, or stun-locked by a Rogue(s).
-- The NPC damage dealers will gang up on a single raid member and focus fire him dead
-- All NPCs, including healers, will use player crowd control abilities like Polymorph, Fear, Hex, and even Banish - Tremor Totem and the like are very useful here.
-- NPCs in this counter are affected by the same diminishing return rules for player-cast crowd controls as other players are
-- Resilience does not reduce damage taken by the NPC enemies
-- Faction champions do more damage than typical players, have drastically more health (2.4 million on 25 man), and cast enormous heals - the druid champion's rejuvenation, for example, heals for more than 50,000 per tick
-- The NPCs cannot be mind controlled. All other forms of crowd control seem to work, but are subject to Diminishing Returns - after 3 casts, the NPC will be immune to that Crowd Control effect for that fight.
As with any arena match, picking a damage target and focusing it down is critical. While one target is picked to be killed, all other enemy combatants should be controlled by whatever mechanics are available, including player CCs and focused distractions (e.g., keeping a warrior on the rogue NPC to disarm, hamstring, intercept, stun etc.). The NPCs appear to indiscriminately pick their own targets and they will gang up on a single raid member - healers do not appear to be disproportionately targeted as they often are in real arena combat. The NPCs generally cannot be tanked.
As a result of the chaotic nature of this fight (especially early on when all 10 NPCs are alive), every raid member needs to be fast on his feet. When one or more of the melee champions targets a soft target, that target needs to run, fear, snare, escape, stay alive. To facilitate these maneuvers, it is best not to clump together. Every second that a champion is traveling to its target is a second that it is not doing damage to any particular target, so the more you can keep them moving the safer your raid will be.
Another aspect of this encounter at odds with an arena match is that all of your opponents and their classes are known ahead of time, so it is possible to create a variety of control macros that target specific roles by name. This is strongly recommended. It is often very difficult to pick your control target from within the crowd while also performing your other role. Every class with a control ability should be using it as often as possible, including healers. Because of diminishing returns, as the fight goes on, your crowd control target will become actually or effectively immune to your ability, so don't be afraid to use control on any active target that is not the current focus fire target.
The fight becomes exponentially easier as each champion is killed, so getting the first one down as soon as possible greatly increases your odds of winning. All cooldowns, including Bloodlust/Heroism, should be used immediately to facilitate a speedy kill on the first target. The target you pick will be dependent upon your raid makeup, but for the majority of groups the most effective strategy is unsurprisingly to kill the healers first.
The four healers are a restoration druid, a restoration shaman, a holy paladin, and a holy priest.
-- The restoration druid casts Rejuvenation, Lifebloom, Nourish, and Regrowth. Two of these can be interrupted, and three of these must be dispelled.
-- The restoration shaman casts Greater Healing Wave, Lesser Healing Wave, Earth Shield, and Chain Heal. Three of these can be interrupted, and one of these must be dispelled.
-- The holy paladin casts Flash of Light, Holy Light, Hand of Freedom and Divine Protection. Her Divine Protection will be cast when she is at around 25% health and should be broken swiftly (by Shattering Throw or Mass Dispel) so the Holy Light which she inevitably starts casting afterwards can be interrupted.
-- The holy priest casts Greater Heal, Flash Heal, Renew, and Power Word: Shield. Two of these can be interrupted, and two of these must be dispelled.
The most effective healer is the restoration druid. As with arena combat, they are very difficult to kill by themselves. In this encounter, in addition to the restoration druid healing himself, the other two healers will also focus heal while your raid focuses damage; this is true regardless of the target you pick. However, because the druid casts three very powerful healing-over-time effects that must be dispelled (as opposed to one from the shaman and two from the priest), if you leave the restoration druid up, a small interruption in chain dispelling from another champion's control abilities, such as a fear bomb, can quickly undo a great deal of damage progress. While focusing the restoration druid from the start, use as many stuns and interrupts as possible, use your longest-duration crowd controls on the other two healers, and burn him.
If you have competent warlocks and can keep the druid banished, you may have better luck burning one of the others first. Remember that your banishes will be subject to PvP limits and diminishing returns, so unless you can kill one of the healers before the druid becomes immune to banishes, you may find yourself chewing through druid heal buffs on your kill target, which may greatly slow your kill time.
After the restoration druid is dead, choose either the shaman, the paladin, or the priest. The shaman will use a powerful earth shield which makes him slightly more dangerous than the priest; in addition, he casts Hex on your raid. The shaman cannot resurrect himself like a player shaman can. The paladin will use Divine Protection on low health which should be broken swiftly so her Holy Light can be interrupted, and will use Hand of Freedom to break her allies out of Crowd Control effects.
After the healers are dead, the next highest priority should be the melee DPS. The rogue is probably the most dangerous followed by the warrior, the retribution paladin, and the death knight; the rogue is also a softer target than the plate wearers and will consequently die sooner. The enhancement shaman is the weakest of the melee champions and is weaker than most of the ranged. It is safe to kill him last.
Once the three healers are dead the fight becomes several orders of magnitude simpler and boils down to a burn phase. Keep the DPS champions chasing and your healers alive. Players assigned to distraction on various enemies should continue distracting until their target is picked for the kill. One of the primary jobs for distraction players will be to watch their target's target and call out who they're pursuing.
Two of the most important abilities in this encounter are offensive dispelling and spell interrupts. All of the champions are susceptible to spell interrupts, and offensive dispel is critical to cut through the healers' effects. Another strong ability to remember is mass dispel, which can cut through Divine Shields and Ice Blocks, both of which will be used by enemy champions. Mortal Strike and Wound Poison will also greatly aid you in taking out the healers early on. The death knight and rogue will use disease and poison effects so Cleansing Totems should be down.
Your PvP trinkets will come in handy in this encounter as well, as you will be constantly controlled throughout the fight. For all but the most elite raid groups, you can expect this fight to last close to 10 minutes, so you will use your trinket several times throughout the battle.
Loot Table:
Band of Callous Aggression
Bastion of Purity
Bastion of Resolve
Belt of Biting Cold
Belt of Bloodied Scars
Boots of the Mourning Widow
Boots of Tremoring Earth
Bracers of the Broken Bond
Bracers of the Silent Massacre
Bracers of the Untold Massacre
Chestplate of the Frostborn Hero
Chestplate of the Frostwolf Hero
Cloak of Displacement
Cord of Biting Cold
Dual-blade Butcher
Girdle of Bloodied Scars
Icewalker Treads
Juggernaut's Vitality
Justicebringer
Leggings of Concealed Hatred
Legguards of Concealed Hatred
Ring of Callous Aggression
Robes of the Shattered Fellowship
Sabatons of Tremoring Earth
Sandals of the Mourning Widow
Satrina's Impeding Scarab
Shroud of Displacement
Treads of the Icewalker
Twin Val'kyr
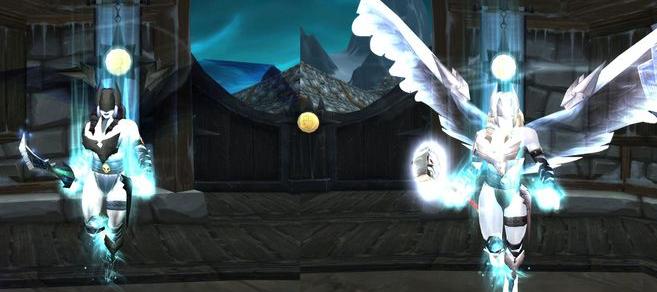
When you first start the encounter, split the raid into equal halves. You will need half the raid to click the Dark portal and half the raid to click the light portal. Now, half the raid will have the Light Essence buff and the other half will have the Dark Essence buff. The Dark Essence half of the raid will attack Lightbane, the Light Essence Half will attack Darkbane.
The tanks of each side will want to keep the Twins separated and also tank them near the portal of their color. For example, tank the dark one near the dark portal and the light one near the light portal.
When the encounter is started Light and Dark orbs will move around the room. If any player touches the orb it will cause them to explode. However, touching the orb isn't always a bad thing. If a light player touches a light orb, them and anyone around them will receive a Speed and Damage boost. If a Dark Player touches a dark orb the same will happen for them.
However, if you touch an orb opposite of your color you will suffer 7000 damage and also take a speed hit. If an orb touches the boss, a similar thing will happen to them, as it would happen to you. What this means is a light orb touches the dark guy, it will harm him and vice versa for the light guy.
The Twins have two note-worthy abilities:
Twin's Pact: One of the twins will shield herself and begin casting a 15 second heal. If this heal goes off it will heal her for 20% of her maximum HP. Everyone must focus fire this twin to burn the shield off. After the Shield is off interrupt the heal.
Vortex: Vortex requires the raid to switch their color. Depending on who is casting this vortex will determine what color you need to switch to. If Darkbane starts to cast Dark Vortex everyone who is "Light" will need to switch to Dark. When she finishes casting the Vortex (8 second cast) everyone can safely switch back.
Same goes for Lightbane. That is about it for the Twin Val'kyr encounter. There is no enrage timer, however if the fight goes on for too long and the Twin Val'kyr's keep powering up by being hit by orbs, they will kill everyone.
Loot Table:
Belt of the Merciless Killer
Death's Choice
Legplates of Ascension
Lupine Longstaff
The Executioner's Vice
The Arbiter's Muse
Armguards of the Shieldmaiden
Belt of the Pitiless Killer
Legguards of Ascension
Sabatons of Ruthless Judgment
Death's Verdict
Legionnaire's Gorget
Bracers of the Shieldmaiden
Greaves of Ruthless Judgment
Skyweaver Robes
The Executioner's Malice
Skyweaver Vestments
Twin Spike
Gouge of the Frigid Heart
Twin's Pact
Trophy of the Crusade
Belt of Pale Thorns
Chalice of Searing Light
Cord of Pale Thorns
Chestplate of the Frozen Lake
Cry of the Val'kyr
Breastplate of the Frozen Lake
Mystifying Charm
Wail of the Val'kyr
Bindings of Dark Essence
Dark Essence Bindings
Anub'arak
(Strategy to come)
Loot Table: