
Botanica Farming Guide
Out of all the Outlands instances Botanica is the instance that I have found best to farm. Here you will get Netherweave Cloth as well as high end level 70 greens which you will want to Disenchant into Arcane Dust and Greater Planar Essences. These three items will be your biggest money makers from farming Botanica. As mentioned in the video for Botanica I strongly recommend the character you farm it with has Herbalism since that will allow you to gather the Netherbloom, Dreaming Glory, Terocone, Felweed and also you can herb the final boss which usually has Mana Thistle or some other miscellaneous Outlands herb.
If you have Herbalism while farming here you will open yourself up to another 5 or 6 different markets which is amazing when it comes to maximizing your hourly profits. The more markets you have yourself open to the more hourly gold you will make. That is why it is so important to have herbalism when farming here if you really want to maximize your income from Botanica. The only herb out of all of them which actually sells for an extremely high amount is Netherbloom. Usually I see it selling for 70 - 80g a stack which you can collect an entire stack in only a few runs.
Besides having Herbalism your second Tradeskill doesn't really matter at all. You can have anything else you want here or nothing at all. One thing I will say though, is if you have Enchanting don't Disenchant the blues from Botanica. Large Prismatic Shards have a crappy sale value and you will get more from just vendoring the blue rather than Disenchanting it. Botanica is pretty darn big and I think this will work a lot better if I post a screen shot of the map of the instance when it comes to explaining it.
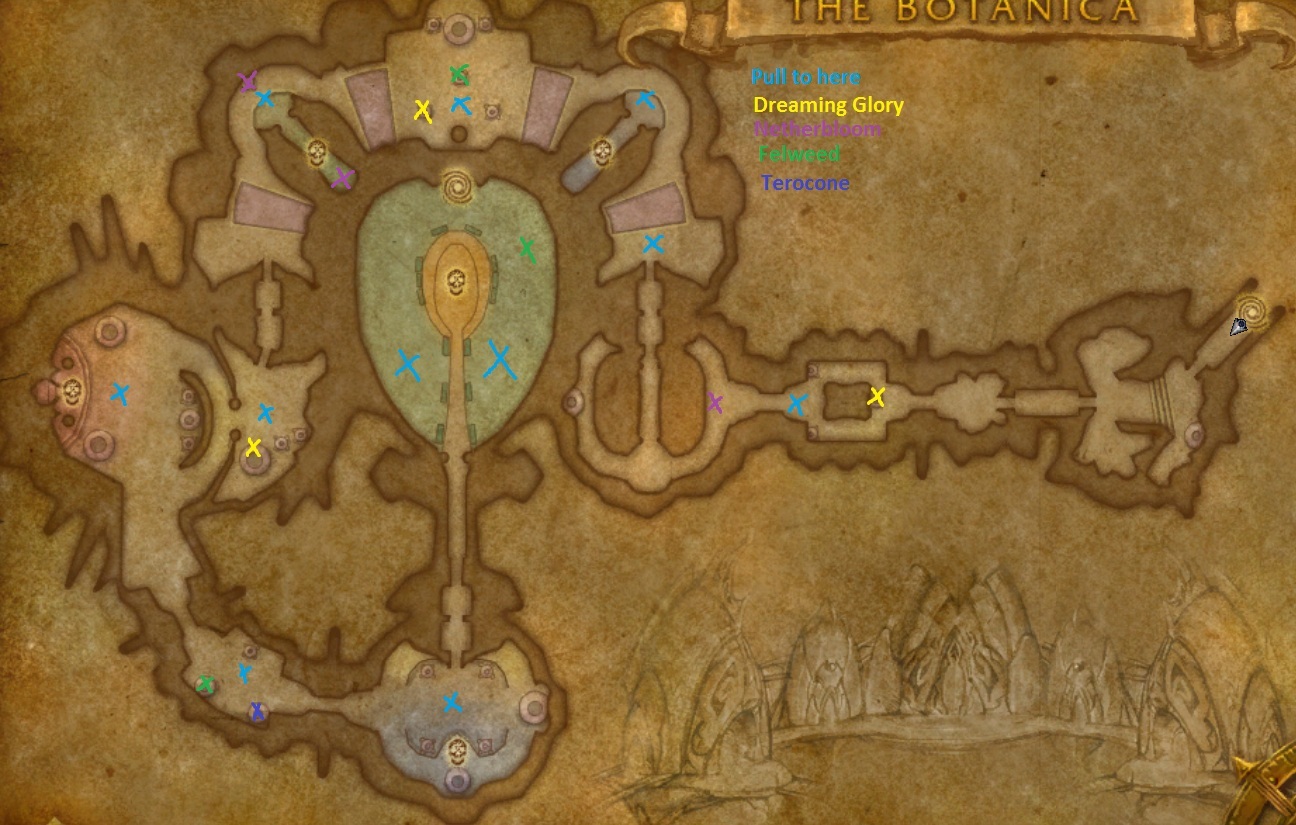
Take at a look in the upper right hand corner of the map for the key which will help you understand the map. Each color represents something different and important. I will make a few references to the colors while explaining the instance so it is very important that you know what they represent.
Now at the very far eastern end is where you enter Botanica, you can see the little arrow on the map of where I am standing at the entrance of the instance. From here you will drag all of the mobs you come across to the first little blue X on the map. After you AoE all the mobs down at the blue X you will want to slightly backtrack to the very first herb of the instance, Dreaming Glory. After you collect the Dreaming Glory continue west and clear the pack of three mobs by the Netherbloom before collecting it.
After you have collected the Netherbloom you will want to pull all of the mobs until you reach the next blue X on my map, which is right before the first boss. Now kill all of them and loot up before charging into the next pack of mobs and the boss. You will still want to AoE the mobs down here but focus any single target DPS you have (such as auto attack) onto the boss. After the boss is dead loot up and charge into the next area which you will want to completely gather up and AoE down.
Once all of the mobs here are dead you will want to gather the Felweed and Dreaming Glory before charging into the next pack of mobs just north of the next boss. Clear these mobs, gather the Netherbloom and then kill the boss. Behind the boss is yet another spawn of Netherbloom which you will want to collect once you kill the boss. After this pull all of the mobs to the next blue X on the map. Note: You can skip the pack of flower elemental guys by hugging the northern wall around them. Watch what I mean in the video.
At this blue X you will want to clear all of the mobs and also if the satyr's are pathing up around here pull them too and AoE them all down. After everything is dead loot it all up and also grab the Dreaming Glory that is here before running down to the boss and pulling both packs in front of him. Now depending on your class you shouldn't pull the boss if you don't know what you can handle. These two packs could have the damage buff on them at the time you pulled them which will make them do 50% more damage and they also stun + reduce your maximum HP. It's a triple threat!
After those packs are dead and you have them looted up charge in to the boss. Now the key is to quickly kill him before he puts you on the sacrifice table which will just waste your time because you can't do anything for a certain amount of time. After he is dead, loot him and continue south into the next room. Pull everything in this room and AoE it down. It is important that you keep on the move here because they put this aura bloody crap on the ground which actually still does a lot of damage at 85. As I do in the video, just keep jumping around to avoid it.
After all of these mobs are dead loot up the Terocone and the Felweed (as well as the mobs of course) before charging to the next blue X on my map, which is right before the next boss (don't pull him too!). AoE down all these little beast things, loot them up and then charge into the boss! Now this is another boss where you will want to kill him as quickly as possible. If you aren't able to kill him within something like 20 to 30 seconds he will summon two elemental adds on each of the platforms to the north of him which don't despawn after you kill him so you will need to waste time killing them as well. (They also don't leash)
Once the boss is dead run north into the final room, where Warp Splinter is. Clear both packs of low level elementals on each side of him and loot them all up. They drop items that are worth 50s a piece usually with a chance to drop a green and a gray weapon which can be worth up to 3g. After they are dead you will want to take out Warp Splinter who is rather easy too. If you take to long he will call out adds which if they reach him will heal him... Even if he calls for the adds I'd just stay DPSing him to make this go as fast as possible. Chances are you can kill the adds before they reach him even if they are summoned.
When Warp Splinter dies you will want to loot him and then herb his corpse for a few goodies as well as collect the Felweed which spawns in the room. If your inventory still has a lot of space (which it should) zone out, just north of Warp Splinter's room and then reset the instance before zoning back in and running it again. That is all there is to farming Botanica!
Items You Will Be Getting in Botanica to Sell: