
Grieg's End - Luclin Leveling Guide
Grieg's End is a fairly large zone with plenty of enemies to kill and plenty of great areas to camp. You'll need to have a group to do basically anything in this zone, I'd recommend a well geared group with few numbers or a large group with mediocre gear. The parts of the zone closest to each zone line are where you'll want to hang out with your group if you're between the levels of 40 - 50.
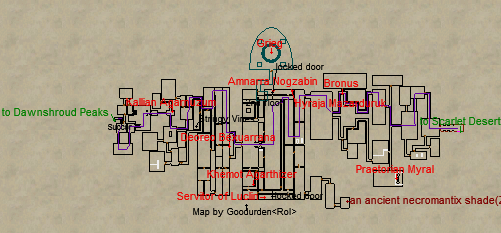
As you and your group start to level up you can slowly make your way towards the central portion of the zone shown in the map below. There are a few 'safe' locations throughout this zone but they are only areas which you'll learn are safe through experimentation of standing there and waiting to be killed.
One other thing to keep in mind too is that the nameds don't always spawn where the map shows them to spawn at. Basically the named enemies in Grieg's End can spawn in any location within their 'spawn area' as long as he isn't already spawned somewhere else in the zone.
Kallian Agarnuzum: Blade of Insanity, Gauntlets of Dementia, Helm of Senselessness
Deoreo Bexuarrana: Earring of Madness, Gauntlets of Dementia, Mantle of Distraction
Bronus: (Nothing of value on loot table according to Allakhazam)
Praetorian Myral: (Raid target, most known for its drop: Divine Hammer of Consternation )

The large black box you see on my map above is the central area of Grieg's End, it's the best location to hunt for players 55+ and is pretty good all the way up until level 65. Of course it'll start slowing down in your 60s but once you get used to Grieg's End it's a rather engaging zone to hunt in.
What I mean is, once you spend the time to learn the area and the zone you'll realize that you can quite easily hunt here even as a solo player. Most of the pulls in Grieg's End are extremely spaced out and come as singles which is fantastic for smaller numbers - less fantastic for very well geared groups.
If you're 60+ with a well geared group there's definitely better locations for you to hunt at. Those of you staying in Grieg's End - you'll want to keep an eye out for the following named enemies which can spawn from almost any PH in their vicinity; much like the nameds above do too.
Khemot Agarthizar: Book of Impracticality, Helm of Senselessness, Ring of Absurdity
Amnarra Nogzabin: Pantaloons of Derangement, Ring of Absurdity
Hyraja Mazarduruk: Earring of Madness, Greaves of Obscurity, Ring of Lunacy
That's basically all you need to know about Grieg's End! If you want one last tinsy winsy final tip - on the picture of the map above at the far northern end where you see Amnarra Nogzabin marked in red, the hallway just below his spawn location is safe to go AFK in/a good location to pull to.
Additional Information
- The best side to enter Grieg's End from (for this guide) is Dawnshroud Peaks. The easiest way to reach Dawnshroud is via a Druid or Wizard portal - if that isn't available to you then from The Nexus you'll have to travel through The Netherbian Lair to reach this zone.
Pickzone Threshold: 20
Grieg's End Allakhazam Zone Information
Grieg's End Post Mercenary Leveling Guide
This guide was written for players with Defiant Gear/Mercenaries. It may have *some* useful information for a player on the TLP but not much.
If you've found this page by mistake and you're actually playing on Live, follow the link.
Grieg's End Almar's Original AA Farming Guide
This guide may contain errors or inaccuracies since the game has changed a lot since I wrote it.
It also contains a lot of information not found on this page about the zone and the mobs in it.