
Zul'Drak 76 - 78
(At some point early in this zone you will ding level 77, this is the level you are able to train your flying mount skill for Northrend. It's purchased from Hira Snowdawn right near the flightmaster in Dalaran and costs 950g. The second you hit 77 leave and go buy this, also while you're in Dalaran grab the Ampitheatre of Anguish quest from Shifty Vickers in the Dalaran Sewers.)
(Once you hit 77 and you have your mount and the Ampitheatre of Anguish quest, constantly look for a group for it. This IS the Ring of Blood for this expansion, and it rewards an amazing weapon, and a ton of XP.)
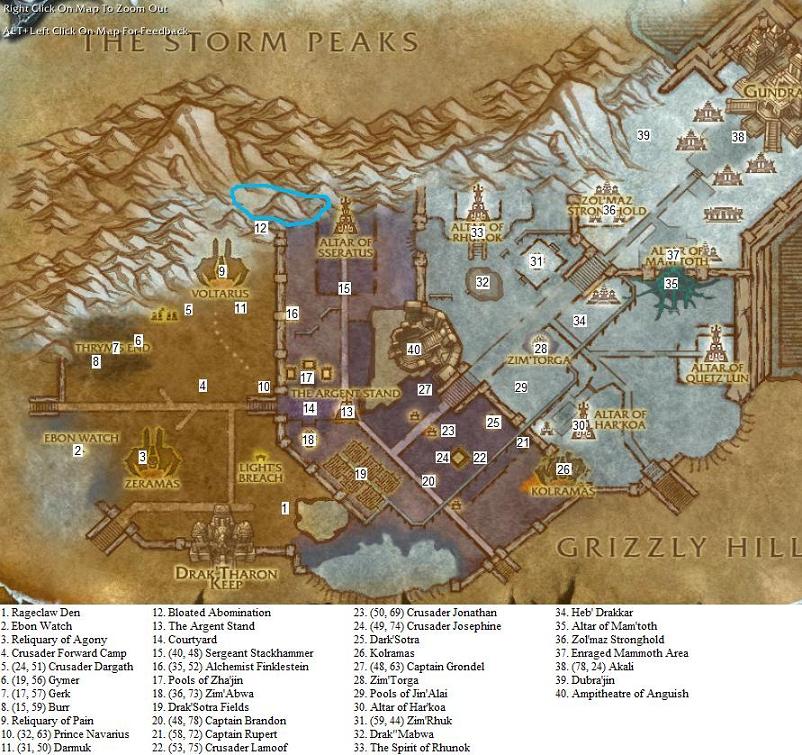
When you land in Lights Breach grab the flightpath and all of the available quests. (Don't forget to turn in your quest!) From town head south to Rageclaw Den(1). Refresh your quest at the Orders From Drakuru in the center of town and kill Trolls for 8 Drakuru "Lock Opener"'s. Use the lock openers in front of the Captured Rageclaw to smash their shackles. Now run around town and spam right click your Rageclaw Fire Extinguisher to put out 15 hut fires.
When you're done all 3 quests return to Lights Breach and refresh your quest. From town head west to Ebon Watch(2). Refresh your quest here and then head east to the area in between both towns. Kill Withered Trolls (Don't forget to loot them for a Start-a-quest-Item) and when you kill a troll use Stefan's Steel Toed Boot to Kick Nass, in the ass to loot the Trolls Hair Sample. When you're done return to Ebon Watch and refresh both of your quests. Also ask Bloodrose Datura to Demonstrate how the Necklace works and then refresh your quest again at Stefan Vadu.
Head east to the Reliquary of Agony(3). Here you need to kill Putrid Abominations for 5 Putrid Abomination Guts and collect 5 Gooey Ghoul Drool from the ground. The drool looks like little tiny Oozelings. Once you complete the quest return to Ebon Watch and refresh your quest. Now return to the Reliquary of Agony and use your Ensorcelled Choker to transform yourself into a Scourge. Blightguards are the only ones who can see through your disguise, watch out for them. Head to Gristlegut(19, 75) and accept his quest. Get close to any of the Decaying Ghouls and drop the Bowels and Brains Bowl to feed them. Once you feed 10 of them return to Gristlegut and turn in your quest. Buy a Bitter Plasma and then return to Ebon Watch.
Refresh your quest and then head east to the Crusader Forward Camp(4). Turn in your quest and grab the two that pop up. Head north of here to Crusader Dargath(5). Run by him to get quest credit then head west to Gymer(6). Grab his quest then continue west to Gerk(7) and accept his quest. Now head further west (I know... I know...) to Burr(8). Discover his body then kill 15 Vargul's and collect 10 Scourge Scrap Metal. When you're done killing the Vargul return to Gerk and turn in your quest. Then go back to the Crusader Forward Camp and refresh your quests.
From the Crusader Forward Camp head to The Dead Fields, which are between Thyrm's End and the Crusader Forward Camp. Keep an eye out in the air for the Banshee Soulclaimers. These are the mobs you need to kill for the 6 Banshee Essence. You'll have to pull them out of the air, pallys use Exorcism, they're too far for judgement sometimes. Once you have all 6 Banshee Essence head to Ebon Watch and kill the Icetouched Earthragers for 6 Diatomaceous Earth. When you have 6 of both return to the Crusader Forward Camp and refresh your quest. Now head back to Gymer's Cage and blow the lock.
This next part is going to take a lot of patience and explanation. Tell Gymer you're ready to ride on his back then head Northeast to the Reliquary of Pain(9) and start attacking Algar the Chosen. Spam skills 1 and 2. Then occasionally hit 3, when you have a Vargul in your hand hit 4 to chuck him and kill a lot of Scourge. When you kill Algar, find a storm cloud (Click on it and then use 3 to pick it up.) Then head south to Prince Navarius(10). Do the same that you did for Algar to him. Once he's dead QUICKLY find a Storm Cloud then head back to where you killed him. Thrym will spawn, immediately engage him and spam your abilities, do not leave melee range or he will begin pelting you with Lightning Bolts that will Beat the living crap out of Gymer. This quest may take a few tries, but the reward is worth it. After you complete all 4 of your objectives head to the Crusader Forward camp and unmount Gymer. Turn in your quest then head north to the Reliquary of Pain.
When you get to the Reliquary use your scourge disguise and take the teleporter up to Voltarus. Grab the quest from Drakuru and go speak with Gorebag on the southeastern end of Volatrus. Tell Gorebag you want to go on a tour of Zul'Drak. Watch the quick flight and go turn in your quest at Drakuru. Head down to the Reliquary of Pain and use Stefan's Horn. Refresh your quest at Stefan then head back up top where Drakuru is. Accept his quest then head down again to the Reliquary of Pain.
You need to use the Diluting Additive on 5 Cauldrons in this area. When you Dilute them, watch out Alarmed Blightguards come and rip you out of your Disguise. After you Dilute 5 Cauldrons use your Scepter of Suggestion on Blight Geists and use the only ability thats on the pet bar while standing near one of the Crystals in the "water" around the Scourge Platform. After you command them to harvest 7 Crystals return to Drakuru and turn in your quest. Head down to the Reliquary and use Stefan's Horn to call him and refresh your quest.
Head back up to Drakuru and accept his quest. Run around up here and collect 5 Crates of Blight Crystals. After you have all 5 Crates head down to the Reliquary and head southeast to Darmuk(11). Use the Scepter of Empowerment on a Servant of Drakuru and send him after Darmuk. Use each of the 3 Abilities every time they're up and you'll have no problem defeating him. The only thing you have to make sure is that you have your Scourge Disguise on when he dies, if you don't you will not get credit. When he's dead return to Drakuru and turn in your quest. Head back down to the Reliquary and call Stefan to refresh your quest.
Head up top again and grab Drakuru's Quest then take the portal back down to the Reliquary. In this area use the Explosive Charges next to 5 Scourgewagons to destroy them, then head to (12). You have to use the Scepter of Command on the Bloated Abominations in this area to gain control of them, and run them up to where all the trolls are (The Blue ring above (12)). What you have to do here is agro a lot of trolls then use the Abominations Skill "Burst at the Seems" to kill all the trolls around the abomination. For every 20 trolls you kill a Chieftain will come out. In order to get credit you MUST be in disguise.
After you're done the quest return to Drakuru and refresh your quest. Head to the Teleporter above the one you usually go in to be taken to the top floor. You'll appear up top with a Coffin in front of you. Right click the Coffin to open it and bring out Malmortis. Follow him around and when he gets you near the teleporter in the middle of the room WAIT UNTIL IT COMPLETES. THEN step on the teleporter. Return to Drakuru and turn in your quest. Head out of the Citadel and call Stefan and refresh your quest.
Back at the citadel tell Drakuru you're ready to accompany him. You'll be ported to the top of Voltarus, what you have to do here is use your Scepter of Domination on a Blightblood Troll up here and send it after Drakuru. Spam the two abilities that attack Drakuru, but wait until you need a heal to use the one that heals you. It might take two trolls to kill him, if this is the case wait until the first one is COMPLETLY DEAD before using the rod on another one. Otherwise the troll will come at you and kill you. As for getting off of this tower, use the item you get when you loot the skull. You'll be teleported back to Ebon Hold
Either way, when you get to the bottom call Stefan and turn in your quest. Then head to The Argent Stand(13). Turn in your quest, grab the new quests and the flightpath. Head out to the Courtyard(14) and use the Crusaders Parachute on 10 Argent Crusaders or Shieldman and kill 10 Scourge. When you're done return to Argent Stand and refresh your quest supply. Head north to Sergeant Stackhammer(15) and Refresh your quest. (don't forget the one that pops up next to him)Head north and kill 10 Trolls in this area and tell 10 Argent Soldiers to report back to the Sergeant. (Don't forget to loot the trolls, they drop a start a quest item).
When you're done both of these quests head north and around the Prophet of Sseratus into the largest building in this area. This will complete your "Trouble at the Altar of Sseratus" quest. Return to Sergeant Stackhammer and Coroporal Maga and turn in your quests. Then head over to Alchemist Finklestein(16). Accept his quest then head into the room thats to your right upon entering the building. Open the bag that looks like a bag of gold for a Muddy Mire Maggot. Open any of the brown turd-like things to loot an amberseed. On the shelf thats on the western wall, loot the Withered Batwing on the bottom rack. Head across the hall to the southern facing room. The shelf on the eastern wall, second rack up, has the Chilled Serpent Mucus.
When you've found all 4 return to Alchemist Finklestein and turn in your quest. Accept Captain Arnath's quest if you have not already done so then head to the Pools of Zha'jin(17) to the south. Here you have to kill the Lost Drakkari Spirits for 5 Ancient Ectoplasm's. When you have all 5 return to Captain Arnath and turn in your quest. Grab the two that popped up then kill the Zul'Drak bats around this area for 7 Unblemished Bat Wings and the Trapdoor Crawlers for 7 Fresh Spider Ichor. When you're done both of these quests return to Captain Arnath and turn them both in. (Don't vendor any Iceweb Spider Silk, its the new Netherweb Spider Silk.)
Return to Argent Stand and refresh your quest. (You should be level 77 now, if not you're gonna have to wait for that flying mount =( .) Also grab the quest from Sub-Lieutenant Jax, shes at the southwestern part of the stand. From town head to the statue of Zim'Abwa(18). Turn in your quest and head southeast to the Drak'Sotra Fields(19). Here you need to kill 10 Drakkari Water Binders and Crazed Water Spirits for Water Elemental Links. When you get 3 Water Elemental Links right click them to combine them into a Tether to the Plane of Water. Once you have that use that to summon a Watery Lord which will drop the Precious Elemental Fluids. Rinse and repeat this process 3 times until you're done both quests.
From the Pools head northeast to Captain Brandon(20). Accept his quest then head back to the Drak'Sotra Fields. Collect 5 Mature Water-Poppy then return to Captain Brandon. Turn in your quest then head northeast to Captain Rupert(21). Grab his quest and Dr. Rogers quest (<- MR. ROGERS LOL OK ILL SHUT UP NOW). From town head southwest to Crusader Lamoof(22). Use your Crusader's Bandage on him and then run back to Captain Rupert without stopping. Now mount up and head to Crusader Jonathan(23). Use the Bandage on him then run to Rupert without stopping. Mount up and head to Crusader Josephine(24). Use the bandage on her then run her back non stop to Captain Rupert. Turn in the quest then head Northwest to Drak'Sotra(25).
Here you need to use your High Impact Grenades on 5 Nerubian Tunnels. They're inside as well as outside. Once you destroy 5 of them return to Rupert and refresh your quests. Head over to where you had to blow up 5 tunnels and smash open the Nerubian Cocoons until you free 5 Captive Footmen. Once all of them are free head southeast to Kolramas(26). Here you need to kill 8 Hath'ar Necromagus and Hath'ar Skimmers for 5 Intact Skimmer Spinneret's. When you're done both quests head back to Captain Rupert and refresh your quests. From here head southwest to the Crashed Plague Spreader. It's located inbetween 20 & 24 on my map.
Loot the parts and fly back to Rupert to refresh your quest. Head into Kolramas and use your Tangled Skein Thrower on 5 of the Plague Spreaders that hover around this area to destroy them. After you destroy all 5 head into Kolramas and collect 10 Chunks of Saronite. They're little green rocks on the ground. When you have all 10 head up to the top level and kill Malas the Corrupter. She's a really easy fight only thing you gotta remember is stay out of the fire she creates on the ground. After she's dead return to Captain Ruperts outpost and turn in your quests. Fly back to the Argent Stand and refresh your supply of quests.
From Argent Stand fly Northeast to Captain Grondel(27). Accept his quest then head to the watery area around you and collect 10 Muddlecap Fungus, 20 Dead Thornwood and 25 Zul'Drak Rats. When you have all of the rats throw 5 of them at a Basilisk to Gorge him, then loot his Crystal. After you complete all of your quests return to Grondel and turn in your quest. Fly to the Argent Stand and refresh your quest. Fly back to Alchemist Finklestein and turn in your quest, then continue to the Prophet of Sseratus that we had to dodge earlier. Throw your Modified Mojo at him and then kill him. Head back to the Argent Stand and refresh your quest.
From town head east to Zim'Torga(28). When you arrive refresh your supply of quests and grab the flightpath. Turn in your quest in the center of town then head south to the Pools of Jin'Alai(29). Here you need to disturb the Red, Blue, Green and Purple cauldrons (Simply right click them) and kill trolls to make Kutube'sa, Chulo the Mad and Gawanil spawn. When the boss is summoned and slain they drop a treasure chest on the ground that you can pick up for your quest item. After you're done both quests that you have for here return to town and refresh your supply of quests.
From town head to the Altar of Har'koa(30). When you get here refresh your quest at Har'koa. Here you have to collect 10 Har'koan Relics from the ground and kill 7 Cursed Offspring of Har'koa then Ressurect them with the Whisker of Har'koa. Once you complete both quests return to Har'koa and refresh your quest. Now fly back to town and refresh your quest (Also grab the new one thats up) then fly to the Zim'Rhuk(31). Turn in your quest then head west to Drak'Mabwa(32). Here you have to kill Frozen Earth for 7 Essence of Frozen Earth and seal 7 Elemental Rifts by destroying them.
When you're done both of your quests head a little north to The Spirit of Rhunok(33). Refresh your quest then go into the center of the lake (Where you just where fighting elementals and the Rifts) and kill the Prophet of Rhunok. Loot the mojo then return to The Spirit of Rhunok and refresh your quest. Head into the large building here and kill Rhunok's Tormenter. Loot the Incense, and use it on Rhunok's body. Rhunok will come alive, kill him then return to The Spirit of Rhunok and refresh your quest. Kill the trolls in this area for the remaining Rhunokian Artifacts that you need.
When you have all the Tablets fly back to Zim'Torga and refresh your supply of quests. Afterword fly back to Har'koa and refresh your quest. Now unmount and tell Har'koa you want to ride one of her children to assess the problem at the Altar of Quetz'lun. Once the ride is over refresh your quest then kill trolls and cats in this area for 8 Sacred Adornments. When you have all 8 return to Har'koa and refresh your quest. Fly to the Altar of Quetz'lun and refresh your quest at Quetz'lun's Spirit. Run around this area and collect 10 Underworld Power Fragments. They are the floating Crystal things. When you have all 10 return to Quetz'lun's Spirit and refresh your quest.
What you have to do now is pull 12 Trolls near the Soul Fonts around this area and kill them to get credit for your quest. when you're done your quest return to Quetz'lun's Spirit and refresh your quest. Now what you need to do is use Quetz'lun's Hexxing stick on (And then kill them);
Highpriest Mu'funu (74, 57)
Highpriest Tua-Tua (73, 60)
Highpriest Hawinni (75, 54 to 78, 54)
When you use the rod on them kill them and then return to Quetz'lun's Spirit and refresh your quest. Return to Har'koa and refresh your quest, then head to Heb'Drakkar(34). Here you need to kill 10 Trolls and scalp them. You also need to bang Heb'jin's Drum to call him down, and kill him. After you're done both of these quests head northeast to Altar of Mam'toth(35). Here you need to kill the Blood of Mam'toths for 7 Bloods of Mam'toth. When you're done the quest return to Zeb'Torga and turn in both of your quests. Then fly to Har'koa and refresh you quest.
Return to the Altar of Quetz'lun and use Quetz'lun's Ritual on the Prophet of Quetz'lun. Watch the quick scene and when the prophet becomes drained, kill him. Then fly back to Zeb'Torga and grab all of the quests. Don't forget the one from Har'koa who's now in town. From town head northeast to Zol'maz Stronghold(36). Here you need to kill 12 Enchanted Tiki Warriors, Collect 12 Zol'Maz Stronghold Caches and kill Warlord Zol'Maz's 3 Family Members, Tiri, Drek'Maz and Yara. You'll receive a unique piece of loot from all 3 of his family members that you need to combine to make the Tiki Dervish Ceremony.
When you've killed 12 Tiki Warriors and collected 12 Caches head to the northernmost building that Warlord Zol'Maz is in. Use the Tiki Dervish Ceremony outside his gate to anger him, and cause him to run out at you. Kill him then fly to (37) here you need to use your Medallion of Mam'toth on an Enraged Mammoth to calm him, and then mount him. After you mount the Mammoth you have to use the two abilities available to you to kill 12 Mam'toth Disciples. After you kill all 12 return to Zim'Torga and refresh your quest. Head far northeast to Akali(38). Here you need to use the key of Warlord Zol'Maz on every Akali Chain Anchor to free her. Once she's free mount up and head West to Dubra'jin(39). Grab the flightpath and turn in your quest then fly south to the Amphitheatre of Anquish(40) if you have not already done it and turn in your quest.
Fly back to Zim'Torga and turn in your quest. From here fly to Dalaran and accept the quest from Archmage Pentarus. Then tell him you want to fly to Sholazar Basin.