
Naxxramas 10 Man Instance Guide
Naxxramas was originally added in the last patch before Burning Crusade back in "Classic" WoW. Due to popular demand the raid was revamped in Wrath of the Lich King to a 10 and 25man version. This guide is for the revamped 25man version of Naxxramas in WoTLK.
This guide was never updated post Cataclysm which means it'll be accurate for people playing on a WoTLK emulator or for those on any Blizzard Progression Server for WoW. During the WoTLK era all of the information in this guide will be accurate assuming the game is exactly as it once was.
Due to the length of this guide and how many pictures it contains I have decided to split it up into multiple parts, which will greatly help those on mobile devices or tablets. The way this dungeon works is it requires you to complete all four wings (mentioned below) before being able to challenge Kel'thuzad and Sapphiron, the final bosses.
Most commonly guilds start with the Arachnid wing, known to be the easiest then move to Plague, Construct and finally Military which is pretty well known to be the most challenging of the four. Follow the link to see the boss strategies, loot drops and more for that wing.
Once you complete all four wings of Naxxramas you'll be able to challenge the final two bosses, Sapphiron and Kel'thuzad! Both of these guys are reached from the platform found just above the zone in area; this platform won't even be activated though until you complete all four previous wings.
Information for these two can be found below.
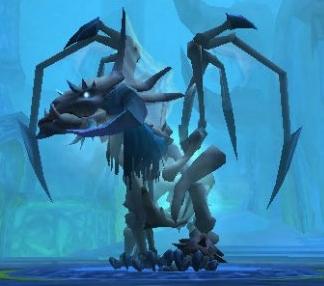
Sapphiron: Sapphrion is the second to last boss in Naxxramas. The tank should pick Sapphrion up and point him towards the door to Kel'thuzad's chamber. Everyone else should get on one side of Sapphiron and Melee should stack up on his hind leg. Sapphiron will use blizzard which anyone stuck in will need to move out of quickly. He will also put a Life Drain curse on people which you will need to decurse immediately.
During Phase 2 Sapphiron will take to the air and will no longer use Life Drain or Blizzard on the raid. Make sure to top everyone off as well, so they can take the hit of a Frost Bolt. Sapphiron will use Frost Bolt on a random person in the raid, when they're hit by it they will become an Ice block. Players should gather around him After Sapphiron casts 3 Ice Bolts he will emote "Sapphiron takes a deep breath". 7 seconds later he will use Frost Breath in the middle of the room, in order to avoid it players must be standing behind another player that is Ice Blocked.
After Sapphiron uses Frost Breath he will land and restart phase 1. Sapphiron will no longer go into the air if he is at 10% or lower HP. Also additional information, phase 1 lasts 45 seconds.
Sapphiron's Abilities:
 Frost Aura: Deals 1200 frost damage every 2 seconds.
My Advice: Nothing you can do besides have frost resistance.
 Cleave: Inflicts normal damage plus 50 to an enemy and it's nearest allies. Affects up to 10 targets.
My Advice: Only have the tank standing in front of Sapphiron.
 Tail Sweep: Inflicts 1500 to 2500 damage on enemies in a cone behind the caster, knocking them back.
My Advice: Don't stand near the tail.
 Life Drain: Drains 2188 to 2812 health and heals Sapphiron for 4376 to 5624 every 3 seconds for 12 seconds.
My Advice: Sapphrion will put this curse on 2 random players every 24 seconds. It needs to be quickly decursed.
 Chill: Inflicts 3500 to 4500 Frost damage every 2 seconds and slows movement speed by 50% to enemies in the area of the effect.
My Advice: This is the Blizzard ability Sapphiron will use. It will circle around the room, just get out of it.
 Berserk: Increases the caster's attack and movement speeds by 150% and all damage it deals by 500% for 5min. Also grants immunity to taunt effects.
My Advice: Enrage timer is 15 minutes, if you take too long you're dead.
Phase 2:
 Icebolt: Encases the target in a solid block of ice, stunning the target and dealing 2625 to 3375 Frost damage to the target and nearby enemies.
My Advice: Players who are hit by Icebolt will become entrapped in ice, protecting players behind them for frost breath.
 Frost Breath: Inflicts 112,500 to 187,000 Frost damage to all nearby enemies.
My Advice: Stand behind a Iceblock'd player or die.
Sapphiron Loot Table:
Key to the Focusing Iris
Shroud of the Citadel
Massive Skeletal Ribcage
Leggings of Sapphiron
Circle of Death
Circle of Life
Cowl of Winged Fear
Helmet of the Inner Sanctum
Cloak of Mastery
Helm of the Unsubmissive
Helm of the Vast Legions
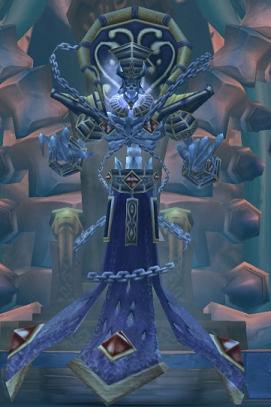
Kel'Thuzad: Kel'Thuzad is the final boss of Naxxramas. During phase 1 everyone will need to move to the center of the room. During this phase Kel'Thuzad will send adds out to attack you, below is a list of what each person should be doing.
Phase 1: 3:48 (Three Minutes forty eight seconds in length)
Ranged DPS: During phase 1 ranged DPS will need to focus on killing the Soldiers of the Frozen Wastes before they get to the center and also kill the Soul Weavers. When the Soldiers of Frozen Wastes die they will exploding, damaging everyone around them for 3 to 4k damage. The Soul Weavers will do 4 - 5k damage and knock anyone back in melee range so you're the only ones who should be attacking them.
Melee DPS: You will be helping the tanks on the Abominations.
Tanks: You will be picking up the Abominations as they come to the group. During this phase 8 abominations will come out
Healers: Keep everyone alive, main focus being tanks.
Phase 2:
During Phase 2 Kel'Thuzad will awaken. The tank must quickly pick him up while the DPS finish's off any of the remaining adds. After all of the adds are dead everyone can switch to KT. Have everyone on KT spread out, pretend KT is a box and have melee at 3 corners and the tank at the 4th. No one is able to stand near the tank.
Melee will need to interrupt KT's single Frostbolt ability, which he will try and cast every couple of seconds. Kel'Thuzad will also use a Frostbolt AoE which will hit the whole raid. You can't avoid this and you have to just eat it and heal through it. Kel'Thuzad will also place a Shadow Fissure underneath a random player in the raid. the fissure will be "inactive" for 3 seconds, after 3 seconds pass it will activate and shoot a purple beam up killing anyone in it.
KT will also place a debuff on Mana users called Detonate Mana. After 4 seconds it will consume half of the players mana and explode, dealing damage to everyone around him based on how much mana it consumed. His final move during phase 2 is Frost Blast. Frost Blast will freeze a random player and anyone within 10 yards of him into an Ice Block. They will take 104% of their maximum hitpoints over 4 seconds. The player will need heals quickly in order to survive.
Phase 3:
At 45% health Kel'Thuzad will call for help summoning 2 Guardians of Icecrown. When Phase 3 starts the fight becomes a DPS race. The off tank will need to tank the 2 Guardians of Icecrown while everyone burns KT. The Guardians of Icecrown will apply a buff that increases their damage by 15% each time it's applied and it stacks.
Due to the amount of HP they have they can't be focused and burned down before KT.
Kel'Thuzad's Abilities:
Phase 1:
 Mortal Wound: Inflicts 150% weapon damage and reduces healing received by 10% for 15 seconds.
My Advice: The Abominations will use this on who ever is tanking them. Not much to worry about, but make sure the main tank doesn't have any before engaging Kel'Thuzad. Alternate tanks to avoid stacking Mortal Wound too high.
 Wail of Souls: Inflicts 4250 to 5750 Shadow damage and knocks back enemies in front of the caster.
My Advice: The Soul Weavers will use this if anyone gets into their melee range. So, don't get into their melee range.
Phase 2:
 Frostbolt: Inflicts 10,063 to 12,937 Frost damage to an enemy and reduces it's movement speed by 50% for 4 seconds.
My Advice: This Frostbolt is the one used on the main tank. Melee will need to Interrupt this as much as possible if not always.
Frostbolt: Inflicts Frost damage to nearby enemies, reducing their movement speed by 4 seconds.
My Advice: This Frostbolt is used against the whole raid. It will hit the raid for 4,500 to 5,500. It's fully resistable and your only options are to eat it and heal through it.
 Shadow Fissure: Summons a Shadow Fissure on a nearby enemy player.
My Advice: The Shadow Fissure will remain "Inactive" for 3 seconds. After 3 seconds it will activate shooting a purple beam up and killing anyone in it. Solution, Move out of it.
 Detonate Mana: Destroys a portion of the target's mana, causing damage to enemies around the target based upon the amount of mana destroyed.
My Advice: After 5 seconds you will explode. The debuff will take half your mana and deal an equal amount of damage to everyone around you.
 Frost Blast: Stuns the target, dealing 26% of the target's maximum health in Frost damage every second for 4 seconds.
My Advice: Heal the person, quickly. Also be sure to spread out so no one else gets hit by Frost Blast.
Phase 3:
 Blood Tap: Deals 125% weapon damage and increases damage dealt by 15%
My Advice: The Guardians of Icecrown will use this during phase 3. It's a DPS race to kill Kel'Thuzad before they get too many stacks of this and wipe the raid.
Kel'Thuzad Loot Table:
Helm of the Lost Vanquisher
Helm of the Lost Protector
Helm of the Lost Conqueror
Staff of the Plaguehound
Nerubian Conqueror
The Soul blade
Cloak of the Dying
Wand of the Archlich
Gem of Imprisoned Vassals
Kel'Thuzad's Reach
Anarchy
Death's Bite
Hammer of the Astral Plane